Showing posts with label vegan. Show all posts

Monday, July 21, 2025

If You Give a Kid a Cooking Pot: One Pot Taco Soup

Over the next several weeks, we'll be bringing you recipes for beginning cooks designed to teach basic cooking skills. So be on the lookout for all the recipes in the series. Today's recipe is part of the Cooking Challenge series.

With only one pot needed to make this soup, it's an easy-to-make dinner!

As written, the recipe is a healthy, high protein meal that makes a BIG pot of soup. This is a great one for beginner cooks because you can get dinner on the table in 30 minutes and have plenty of leftovers for later in the week or to freeze for later.


One Pot Taco Soup

Soup Ingredients

1 Tbsp. olive oil

1 large onion, diced

6 cloves garlic, minced

1 15 oz. can light red kidney beans, undrained

1 15 oz. can dark red kidney beans, undrained

1 15 oz. can canneloni beans, undrained

1 15 oz. can chili beans, undrained,

1 15 oz. can black beans, undrained

1 15 oz. can pinto beans, undrained

1 15 oz. can corn, undrained

1 15 oz. can Rotel, undrained

2 15 oz. cans diced tomatoes, undrained

1 28 oz. can tomato puree

4 cups water

1 1/2 1 oz. packets Taco Seasoning Mix, or 4 1/2 Tbsp. homemade taco seasoning mix

1 oz. packet Hidden Valley Ranch Seasoning, or 3 Tbsp. homemade ranch dressing mix

1 1/2 pound ground beef (optional)

Garnishes

green onions, chopped

fresh cilantro, chopped

jalapenos, sliced for serving

avocados, peeled and diced

sour cream

hot sauce

shredded cheese

  1. Heat olive oil in a large 8-quart pot over medium heat. Saute onion until soft and translucent. If adding ground beef, brown it along with onions, about 5-6 minutes. Drain grease before proceeding with the rest of the recipe as written.
  2. Add the minced garlic and stir until fragrant, about 30 seconds.
  3. Add tomatoes and spices, stirring to combine.
  4. Add remaining soup ingredients, and stir to combine.
  5. Bring to a boil, reduce heat to low, and simmer covered for 25 minutes.
  6. Serve topped with garnishes of your choice (optional).

You Can Get with This or You Can Get with That (Ingredient Substitutions):

  • If interested in making a smaller quantity of soup, use only 3 cans of beans, tomato puree (omitting diced tomatoes), and 1 packet of Taco Seasoning Mix.
  • Substitute garlic powder or jarred minced garlic for fresh minced garlic.
  • All garnishes are optional.


This Is How We Do It (Kitchen Skills You'll Learn in This Recipe):

  • Boiling vs. simmering
  • Browning ground meat (optional)
  • Chopping vegetables
  • Measuring ingredients
  • Reading and following a recipe
  • Sauteing vegetables
  • Setting a timer
  • Using a can opener


Mama Said Knock You Out (Prep Ahead for Easy Dinners):

You can either freeze taco soup before cooking, or you can cook it first and then freeze to reheat later. (This works well with leftovers.) Either way, the flavors in the soup will remain the same. Taco soup can be stored in the freezer for 4-6 months.


If You Give a Kid a Cooking Challenge

This recipe is part of the three-part If You Give a Kid a Cooking Challenge recipe series. These recipes are designed to: 

  • be easier to make
  • have a minimal number of ingredients (minus pantry staples like oil and spices)
  • be quick to prep 
  • make enough for one person to have leftovers for a few days

    Wednesday, June 18, 2025

    If You Give a Kid a Crockpot: 15 Bean Soup

    Over the next several weeks, we'll be bringing you recipes for beginning cooks designed to teach basic cooking skills. So be on the lookout for all the recipes in the series. Today's recipe is part of the Cooking Challenge series.

    There’s nothing more cozy than a bowl of hearty soup, and this 15 Bean Soup fits the bill. Easy to make in your crock pot, this simple dump and go recipe makes the perfect meal for a chilly day. Make sure to save this recipe for later - it's sure to hit the spot!


    Crockpot 15 Bean Soup

    20 oz. bag 15 bean blend, sorted and rinsed, seasoning packet discarded

    1 medium onion, diced

    6 cloves garlic, minced

    4 carrots, sliced into rounds (approx. 2 cups)

    4 stalks celery, chopped (approx. 1 cup)

    1 tsp cracked pepper coarsely ground

    2 tsp dried thyme

    2 bay leaves

    1/4 cup soy sauce

    6 cups vegetable broth

    14.5 oz. can diced tomatoes

    meat of choice (optional)

    1. Wash the sorted dry beans. Place them into a pot and cover with 8 cups of water. Let them soak 8 hours or overnight. Drain and set aside.
    2. Combine beans, onion, garlic, carrots, celery, black pepper, thyme, bay leaves, soy sauce, vegetable broth, and diced tomatoes in slow cooker. 
    3. Mix well and cook on low for 8-10 hours.
    4. Remove bay leaves from soup and discard. 
    5. Serve soup with a side of bread or cornbread.


    How to Quick Soak Beans

    If you don’t have time to soak the beans in advance, you can rinse them, place them in a large pot, cover with cold water, and bring to a boil over high heat. Boil the beans uncovered for 5 minutes. Remove the pot from the heat, cover, and then let the beans soak in the hot water for 1 hour. Drain the beans in a colander, rinse them under cold water, and proceed with steps 2-4 of the recipe.

    You Can Get with This or You Can Get with That (Ingredient Substitutions):

    As written, the 15 Bean Soup recipe is gluten free, vegetarian, and vegan, but this recipe is easy to change to suit your needs. If you don't want to make this as a vegetarian soup, you can add these types of meat to this recipe with the ingredients in step 2:

    • 1 pound cooked and drained ground beef or turkey
    • 1 pound cooked and drained sausage or kielbasa
    • 2 cups cooked and diced ham 
    • 2 cups cooked and shredded chicken or turkey

    Since you only need a small amount of meat to add to the soup, this recipe is a good way to use up  leftover turkey or ham around holidays like Easter or Thanksgiving. If you're adding extra meat to the soup, you may want to add an extra 2 cups of broth.


    This Is How We Do It (Kitchen Skills You'll Learn in This Recipe):

    • Browning ground meat (optional)
    • Chopping vegetables
    • Measuring ingredients
    • Reading and following a recipe
    • Setting a timer
    • Soaking beans
    • Using a crockpot
    • Washing and sorting dry beans

    If You Give a Kid a Cooking Challenge

    This recipe is part of the three-part If You Give a Kid a Cooking Challenge recipe series. These recipes are designed to: 

    • be easier to make
    • have a minimal number of ingredients (minus pantry staples like oil and spices)
    • be quick to prep 
    • make enough for one person to have leftovers for a few days

      Monday, May 26, 2025

      Roasted Corn Orzo Pasta Salad

      As picnic and BBQ season rolls around, I always like to post a new side dish for you guys to try. This one is an easy one to put together and as a bonus, you might have some of the ingredients already growing in your garden (I did). This recipe makes a big batch so that you can feed a large crowd or you can take half to a cookout and keep half at home.


      Roasted Corn Orzo Pasta Salad

      1/2 cup plus 2 Tbsp olive oil

      6 cloves garlic, minced

      2 cups fresh cooked corn

      2 pints cherry tomatoes, halved

      1 lb orzo pasta

      1/2 cup fresh basil, chopped

      2 bunches green onions, sliced

      5 Tbsp red wine vinegar

      3 Tbsp lemon juice

      3 tsp salt (or to taste)

      1 tsp pepper (or to taste)

      1. Cook orzo according to package directions. When pasta is finished cooking, drain and set aside to cool.
      2. While pasta is cooking, add 2 tablespoon of olive oil to a large 5 quart sauté pan. Add garlic and sauté over medium heat for about 3 minutes.
      3. Add corn, 1 teaspoon of salt, and 1 teaspoon of pepper and sauté 8 more minutes. Add pasta to corn and stir to incorporate. Remove from heat and let cool.
      4. While corn is cooling, chop cherry tomatoes, basil, and green onions.
      5. In a small bowl, combine 1/2 cup olive oil, vinegar, and lemon juice.
      6. When corn and pasta mixture has cooled, add tomatoes, basil, and green onions and stir to combine. Pour dressing over salad and toss well.
      7. Refrigerate at least 2 hours before serving.

      Make sure to check out these other favorite Harris Sisters side dishes for your next summer cookout:

      Sunday, November 5, 2023

      No Roll Press in the Pan Pie Crust

      I'm going to let you in on a little secret. I LOVE pie, but I will do absolutely anything to avoid making a traditional pie crust.

      Why don't you use store bought pie crusts you ask? Well, you'd think that would be the easy solution. And it is probably a go-to for many people. However, if you have food allergies (like I do) or are a vegetarian (like I am), these won't work because so many store-bought pie crusts either contain food allergens or lard.

      So, let me share this easy pie crust recipe that you can use for your next pie. You can cater it to whatever food allergies you might have in your family, if needed. (For example, you can use gluten-free flour, soy-free oil, or dairy-free milk.) And the absolute best part? You make this right in the pie pan, so you don't even have to get out your rolling pin!


      No Roll Press in the Pan Pie Crust

      1 1/2 cups all purpose flour

      1/2 teaspoon salt

      2 Tablespoons sugar

      1/2 cup oil

      2 Tablespoons milk

      1. Add dry ingredients to 9-inch pie plate and mix to incorporate.
      2. Add oil and milk and use a fork to mix together until wet ingredients are incorporated.
      3. Press evenly into bottom and sides of plate and flute edges as desired.

      Baking Instructions:

      1. If pre-baking crust for an unbaked filling, like a cream pie or lemon meringue pie: 
        • Prick the bottom of the crust and bake at 375 degrees for 15 minutes. 
        • Cool crust before adding filling.
      2. If baking the crust along with the pie filling, like with coconut custard pie or Tarheel pie
        • Preheat the oven to the temperature listed in your pie recipe and pre-bake the crust for 5 minutes in the oven before adding pie filling. 
        • Remove the crust from the oven, add pie filling, and cook filled pie at full time listed in recipe.

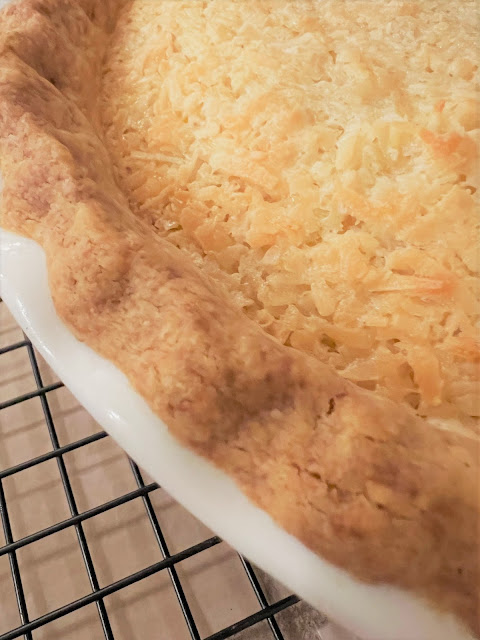
      Here's a photo of what it looks like after the pie crust is baked. It turns out a pretty golden color.

      Coconut Custard Pie


      Notes

      • Pie crust dough should be able to be pressed into the pie pan (up the sides and onto the bottom) and hold its shape.
      • If you find that the pie crust dough is too dry when you're finished mixing, add more milk in small increments to achieve the correct consistency.
      • If you find that the pie crust dough is too wet when you're finished mixing, sprinkle with more flour to achieve the correct consistency.
      • If you omit the sugar, you can use this pie crust for savory dishes, like your favorite quiche recipe.
      This recipe is so easy to make, I enlisted the help of my youngest son, Jaxon, to help me make some of them. This is him fluting the edges of one of the crusts. If my teenager can make this recipe, so can you!


      I hope you enjoy this new recipe! I've got it queued up for all my Thankgiving pies!

      Sunday, December 18, 2022

      Vegan Collard Greens

      I wanted to share with you a new recipe for our family's traditional collard greens for our New Year's meal. It's a vegan recipe that's perfect for our family, which includes two vegetarians.

      This recipe is perfect for if you have to consider a variety of dietary needs at your New Year's table. You can serve the traditional meat of ham separately for any meat eaters in your group.

      We pair this Southern-style recipe with Vegan Hoppin' John and Sweet Honey Cornbread to start the new year off right!


      Vegan Collard Greens

      2 bunches fresh collard greens
      olive oil
      1 small yellow onion, diced
      4 cloves garlic, minced
      4 cups vegetable broth 
      1 teaspoon salt
      1/8 - 1/4 teaspoon Liquid Smoke flavoring
      1/2 teaspoon red pepper flakes
      black pepper (to taste)
      balsamic vinegar (for serving, if desired)
      hot sauce (for serving, if desired)

      1. Remove bottom stalks of the collard green leaves and chop or tear into small pieces. 
      2. Fill your sink or a large container with cold water, add chopped collard greens, and soak for at least 10 minutes. (Some people prefer to soak greens overnight.)
      3. Remove the collard greens from the sink, place them in a colander, give them a good rinse, and drain. Complete this step in batches, if needed.
      4. Coat the bottom of a large pot with olive oil.
      5. Sauté onions over medium-low heat until they begin to brown and then add in garlic.
      6. Cook until onions and garlic are fragrant, for another 2-3 minutes.
      7. Add in vegetable broth.
      8. Season broth with salt, Liquid Smoke, red pepper flakes, and black pepper (if desired).
      9. Taste and adjust the seasonings if needed. 
      10. Bring broth to a boil, then reduce to simmer.
      11. Add in the greens, cover, and cook until greens are completely tender, about 1 - 1 1/2 hours.
      12. Check at the 30-minute mark to make sure there is still enough broth in the pot. Add more vegetable broth if needed.
      13. Serve with hot sauce or balsamic vinegar, if desired.


      Notes:

      Make sure you like the taste of the broth when you taste it at step 9, because this is how your greens will taste. Adjust seasonings at this step, if necessary. 

      Remember that the heat from the red pepper flakes will increase as the greens cook and you can always add more heat by serving the collard greens with additional hot sauce.

      Traditions & Superstitions: 

      A long-held tradition in the South, collard greens are often served for New Year’s Day.  According to superstition, if you eat collard greens on New Year’s Day, then you will have financial success for the coming year.

      • collard greens represent green backs (dollars), or cash 
      • black-eyed peas represent coins (this is traditionally served with alongside collard greens on New Year's Day)
      • cornbread represents gold (this is traditionally served with alongside collard greens on New Year's Day)

      Thursday, July 7, 2022

      Portobello Mushroom Burgers

      It's grilling season and these veggie burgers are not only easy-to-make, but they're delicious too. You can marinate them in 15 minutes, and it only takes 8 minutes to grill them. Super simple. 

      Portobellos are a great vegetable to grill and a great burger alternative - they're already the same size as a burger patty. They hold their shape well and become soft once you've cooked them. Of course, the tasty marinade is what makes them so delicious!

      Portobello Mushroom Burgers

      4 large portobello mushroom caps 

      2 Tbsp. olive oil

      3 Tbsp. soy sauce

      2 Tbsp. balsamic vinegar

      2 garlic cloves, minced

      1/2 tsp. pepper

      burger buns (for serving)

      burger toppings (for serving)

      1. Clean the mushroom caps by wiping away any dirt and cutting off the stems with a paring knife. Remove the gills by scraping them off with a spoon. Place in a single layer in a casserole dish.
      2. Whisk together olive oil, soy sauce, balsamic vinegar, garlic, and black pepper in a small bowl. Brush the mixture all over the tops and undersides of the mushroom caps and let them marinate for 15 minutes.
      3. Preheat a grill over medium heat. Place the mushrooms cap-side down and brush the gill side with some of the reserved marinade. Cover and cook for 4 minutes until golden brown grill marks appear. 
      4. Flip the mushroom caps and brush the tops with more marinade. Cover and cook another 4 minutes until the mushrooms have softened and shrunken slightly.  
      5. Build your burger using your favorite toppings and serve immediately.

      Notes:


      Instead of grilling, you can also roast these in the oven at 400 degrees for 12 minutes.

      This recipe is also suitable for your vegan friends, since they can choose which toppings to add to their portobello mushroom burger.

      We eat them as veggie burgers, but you could also serve them as a vegetarian main dish plated alongside other vegetarian side dishes (to be eaten with a knife and fork in place of a meat, for instance).


      Wednesday, January 12, 2022

      Vegan Tomato Risotto with Roasted Vegetables

      You just can't beat a risotto in the cold winter months. This creamy dish takes a bit longer with preparation, but it always pays off in the end. 

      I remember the first time I had a tomato-based risotto. I was 29 years old and I was eating dinner in a restaurant with a group of work friends while attending a conference in New Orleans. We somehow ended up in a restaurant that didn't have a single vegetarian dish on the menu. I explained my dilemma to the server, and he spoke with the chef who offered to make me an off-menu creation - a tomato risotto with roasted vegetables.

      This particular recipe features roasted vegetables and is cooked low and slow with a tomato puree base that results in a main dish that's rich and creamy. And it's the closest I've come to that dish that the New Orleans' chef made for me years ago. While your vegetarian and vegan friends will love it, you can also serve it to your gluten-free friends too. So, it checks a lot of boxes.


      Vegan Tomato Risotto with Roasted Vegetables


      Roasted Vegetables

      1 Tbsp. olive oil

      10 oz. cherry tomatoes, halved

      2 medium red bell peppers, chopped

      1 large zucchini, chopped

      salt and pepper, to taste

      Risotto

      1 Tbsp. olive oil

      1 large red onion, diced

      3 garlic cloves, minced

      1 cup Arborio rice

      1 Tbsp. balsamic vinegar

      1 cup of canned tomato puree or plain tomato sauce

      2 cups vegetable stock, heated to a low simmer and kept warm

      6.7 oz. sundried tomato pesto, oil drained

      1 tsp. basil

      salt and pepper, to taste


      1. Preheat the oven to 350 degrees and add the olive oil to a large cookie sheet.
      2. Halve the cherry tomatoes. Chop bell peppers and zucchini into small similar-sized pieces and spread out on the cookie sheet. Add salt and pepper and gently toss together in oil.
      3. Roast vegetables for 30 minutes.
      4. Add vegetable stock to a saucepan, bring to a gentle simmer, and keep warm over a low heat.
      5. Dice onions and add olive oil to a large sauté pan.
      6. Sauté the onion on a low-medium heat for a few minutes. Add the minced garlic and cook for another minute.
      7. Stir in the Arborio rice and balsamic vinegar and stir for approximately 30 seconds.
      8. Alternate adding the tomato puree and warm vegetable stock 1/2-cup at a time. Allow each 1/2-cup of liquid to be absorbed by the rice before adding the next.
      9. After all liquid is absorbed, add in the sundried tomato pesto and the roasted vegetables. Give everything a stir and cook for a further 5 minutes until everything is cooked through and the rice is done. Make sure to taste the rice at this step to ensure that the rice is cooked to desired doneness. If the rice is still chewy at this step, add in more tomato puree or more vegetable stock 1/2-cup at a time until desired doneness.
      10. Remove from the heat and stir in the basil, salt, and pepper. 

      Notes:


      If you've never made risotto the old-fashioned way before, remember to add in the liquids a half-cup at a time and stir until completely absorbed before adding in the next batch of liquids. This will help the Arborio rice to release its starch and gives the dish its signature creamy texture. 

      While you might be inclined to crank up the heat to "speed up the process" this will only make the liquid evaporate more quickly, which isn't the goal. The goal is for it to be absorbed into the rice. If it evaporates, you'll be left with crunchy risotto. So, make sure you cook it over low-medium heat.

      You can substitute 6 sundried tomatoes (diced) for the sundried tomato pesto, if desired.

      Garnish with vegan Parmesan cheese alternative, if desired. If your family is not vegan (we have two vegetarians in our family, but no vegans), then feel free to garnish with Parmesan cheese before serving. 

      If you're a fan of risotto, take a peek at this recipe too:

      Thursday, December 16, 2021

      Vegan Hoppin' John (Black-Eyed Peas and Rice)

      I wanted to share with you a new recipe for our family's traditional black-eyed peas New Year's meal. It's a vegan recipe that's similar to Hoppin' John, and it was perfect for our family, which includes two vegetarians.

      Rather than cooking the rice in the same pot with the black-eyed peas, we served the black-eyed peas over a bed of white rice. But, considering Hoppin' John is a recipe that originated in the Carolinas (just like The Harris Sisters!), Carolina Gold rice would be a great addition to this recipe too.


      Vegan Hoppin' John (Black-Eyed Peas and Rice)

      16 oz. bag dry black-eyed peas, sorted and rinsed
      2 Tablespoons olive oil
      1 large onion, chopped
      1 red bell pepper, chopped
      1 rib celery, chopped
      4 cloves garlic, minced
      15 oz. can diced tomatoes
      1 Tablespoon hot sauce
      1 teaspoon dried oregano
      1/2 teaspoon black pepper
      1/8 teaspoon cayenne pepper
      1 teaspoon salt 
      1/2 teaspoon Liquid Smoke flavoring
      cooked rice to serve
      1. Wash the sorted dry beans. Place them into a pot and cover with at least 2 inches of water. Let them soak 8 hours or overnight. Drain and set aside.
      2. Add olive oil and onion to a large pot and sauté until it begins to brown. Add the bell pepper, celery, and garlic and cook for another 2 minutes. 
      3. Then add all ingredients except salt, Liquid Smoke, and cooked rice to the pot, along with enough additional water to cover the beans by one inch. 
      4. Bring beans to a boil, then reduce to simmer, cover, and cook until beans are completely tender, about 1 1/2-2 hours, adding more water as needed. (Note: water should cook down into a thick sauce, but make sure that beans have enough water to cook in at all times.)
      5. When they’re tender, add the Liquid Smoke and salt, cook for 15 more minutes.
      6. Serve over cooked rice with a side of collard greens and cornbread to complete your vegetarian New Year's meal!

      Notes:

      If you prefer a spicier dish, you can either increase the amount of hot sauce and cayenne pepper in the recipe or serve with additional hot sauce.

      If you prefer green bell peppers to red bell peppers, you can substitute them in this recipe.

      If you want to avoid the "rush" of buying black-eyed peas right before the end of the year, put them on your grocery list for the same week you're buying ingredients to make Christmas goodies. While you're buying ingredients to make Christmas cookies, candies, fudge, etc., swing by the dried beans aisle and pick up a bag of black-eyed peas for your pantry. That way, you'll already have them for when you need them, and you won't have to hunt for them when supplies will be low a few weeks later.

      Traditions & Superstitions: 

      Hoppin' John is a Lowcountry dish that is served for New Year’s Day.  According to superstition, if you eat Hoppin' John on New Year’s Day, then you will have good luck for the coming year.

      • black-eyed peas represent coins
      • tomatoes represent health
      • cornbread represents gold (this is traditionally served with alongside black-eyed peas on New Year's Day)
      • collard greens represent green backs (dollars), or cash (this is traditionally served with alongside black-eyed peas on New Year's Day)
      • Sometimes, the cook slips a coin into the dish before serving, or serves each dish with a coin underneath.

      On the day after New Year's Day, leftover Hoppin' John is called Skippin' Jenny, bringing a hope for an even better chance of prosperity in the New Year.

      Saturday, April 23, 2016

      Four Ingredient Orange Coconut Italian Ice

      Today I bring you another super-simple recipe that is perfect for warmer weather. This time, it will help you use up those oranges that are sitting on your counter that didn't quite make it into this week's lunch boxes for the kiddos. ;-)

      What I like about this recipe (besides the fact that it only has four ingredients) is that it tastes very similar to orange sherbet, orange creamsicle ice cream, or the Orange Push Ups that we all know and fondly remember from our days of running after the Ice Cream Man with change in hand.


      Orange Coconut Italian Ice


      2 medium oranges
      1 3/4 cup coconut milk
      4 Tbsp sugar
      1 tsp vanilla
      1. Peel and section oranges. Place sections on a tray and freeze for 1-2 hours.
      2. Place coconut milk and half of the frozen orange sections into a food processor or powerful blender. Puree, scraping down the bowl as needed. Puree until the mixture is creamy and smooth. Add the remaining orange sections, sugar, and vanilla and puree again to combine. 
      3. Pour into a freezer safe container and freeze for a few hours. Serve with your favorite toppings.

      Notes:
      Let this sit out for a few minutes to make it easier to serve.

      If you're looking for other quick and easy Summertime recipes, give these tried and true Harris Sisters recipes a looksee:

      Frozen Lemonade Pie

      This post contains affiliate links.

      Sunday, April 17, 2016

      Two Ingredient Peanut Butter Banana Ice Cream

      When you usually have bananas turning brown on your counter, I bet you either make banana bread or banana muffins, or stick them in the freezer for future baked goods, right? Well, that's what I usually do with them (unless we've got a hankering for smoothies, that is).

      Today, I bring you a super simple recipe that is perfect for Spring and Summer. It's only TWO ingredients (three if you want to get super-fancy). You'll be glad you saved this one. It's a great way to use up those bananas without heating up your kitchen.


      Peanut Butter Banana Ice Cream


      4 large ripe bananas
      2 Tbsp peanut butter
      1 tsp vanilla (optional)


      1. Peel bananas and slice into small pieces. Arrange banana slices in a single layer on a baking sheet. Freeze for 1-2 hours.
      2. Place banana slices into a food processor or powerful blender. Puree banana slices, scraping down the bowl as needed. Puree until the mixture is creamy and smooth. Add the peanut butter and vanilla (if using) and puree again to combine. 
      3. Pour into a freezer safe container and freeze for a few hours. Serve with your favorite toppings.


      Notes:

      This is the perfect recipe to let your kids help with. I let the kiddos slice the bananas. While the slices weren't sized perfectly, it doesn't really matter when you're just going to puree them for the final product.


      If you have a hard time creating a creamy consistency, you can add 1-2 tablespoons of milk to help puree the banana slices. 

      Make sure you are using a powerful food processor or blender - we recently upgraded to a Ninja from the Cuisinart blender that we received in 1999 as a wedding present. While we were sad to see our old standby blender go, the Ninja is leaps and bounds more powerful than our old friend.

      This post contains affiliate links.

      Sunday, April 10, 2016

      How to Make Homemade Vegetable Broth

      Vegetable broth (or vegetable stock) is a staple in vegetarian cooking, and it's so simple to whip up a big batch and freeze it to have on hand for all your upcoming recipes. And as an added bonus, when making your own, you can control all the ingredients, including any that you may be allergic to and/or any that you may want to limit (like additional sodium).

      I have included a basic recipe below if you want to start today, as well as a Super Simple version that allows you to substitute leftover kitchen scraps you save from favorite recipes. 


      Homemade Vegetable Broth

      5-6 oz sliced mushrooms
      4 Tbsp olive oil
      4 cups chopped onion
      2 cups chopped celery
      3 cups chopped carrot or parsnips
      1 cup chopped fennel bulb (optional)
      Salt, to taste
      2 large garlic cloves, smashed
      2 Tbsp tomato paste
      1 Tbsp fresh rosemary
      2 tsp dried thyme
      1 tsp black peppercorns
      4 bay leaves (optional)
      1/2 cup chopped parsley
      approximately 4 quarts of water

      1. Heat the olive oil over high heat in an 8 quart stockpot. Add the mushrooms and saute until they are lightly browned and have given off some of their moisture.
      2. Add chopped onions, celery, carrots, and fennel (if using) and stir to coat. Sprinkle with salt. Cook over high heat for several minutes, stirring occasionally. Cook until the vegetables begin to brown. Considering there are so many vegetables with a high moisture content, it may take more heat and longer time to brown.
      3. Add the garlic and tomato paste and stir to combine. Cook for 2-3 minutes, stirring often. Add the rosemary, thyme, peppercorns, bay leaves (if using), parsley, and water. (Water should cover the vegetables and herbs.) Bring to a simmer and then drop the heat until you just get a bare simmer. The surface of the stock should just barely be bubbling. Cover and cook for 1 1/2 hours.
      4. Using slotted spoon, remove all the big pieces of vegetables. Discard or compost. 
      5. Set up a sieve over large bowl or pot. Line the sieve with a paper towel and pour the stock through it. When you have poured about half the stock through, stop and let what is in the sieve filter through. Then, change the paper towel and filter the rest of the stock in the same way.
      6. To store, pour into quart-sized Mason jars and refrigerate for up to a week or freeze. If you freeze in glass jars, leave at least 1 1/2 inches of headroom so that the stock can expand without breaking the glass of the jars.

      Super Simple Vegetable Broth

      Every time you prepare a recipe, save your vegetable trimmings to store in a gallon-sized Ziploc bag in  the freezer until you collect enough to make this homemade vegetable broth from the saved scraps. 

      Gallon-sized Ziploc bag of frozen vegetable scraps/end pieces and herbs
      2 Tbsp salt (or to taste)
      1 tsp whole peppercorns
      2 bay leaves
      4 garlic cloves, minced
      approximately 4 quarts water 

      1. Save the cut end pieces of vegetables and herbs in a gallon Ziploc bag in your freezer until the 
      bag is full. Onions, carrots, and celery are the base of a good vegetable broth, but use these guidelines for which vegetables to save for your broth:
        • Good vegetables to save include: onions (including papery skins), green onions, celery (including leaves), carrots, mushrooms, leeks, scallions, shallots, and zucchini. 
        • Good herbs to save include parsley, thyme, rosemary, garlic (including papery skins).
        • Do not save broccoli, cauliflower, brussels sprouts, cabbage, turnips, rutabagas, collard greens, kohlrabi, and kale because they will make your broth bitter. 
        • Do not save potatoes or sweet potatoes because they will cloud your broth.
      2. Once the bag is full, add the frozen contents to an 8 quart stock pot and fill with water until the contents are covered by a few inches. You don't need to thaw the vegetables first.

        • Add 2 tablespoons salt (or to taste), 1 teaspoon whole peppercorns, 2 bay leaves, and 4 cloves minced garlic (if you did not already save an abundance of garlic in your frozen vegetable bag).

      3.  Cover and bring to a boil. Simmer the broth for 1 1/2 hours.

      4.  Strain and store as described above in steps 4-6. 


      Notes:

      These recipes make about 5 quarts of vegetable broth.

      You'll note that you remove all vegetables and herbs and then strain thoroughly before jarring and freezing. Because of this, there is no need to perfectly or finely chop any of the vegetables before you cook them. A rough chop just to get them to fit into the pot will do just fine.

      Also, you'll note that the directions call for you to simmer. You'll want to make sure that you follow this closely. If you were to keep your broth at a rolling boil, much of it would evaporate during the cooking process!

      Use either of these vegetable broths as the base for recipes, such as soups or risottos.

      Some of Our Most Popular Recipes That Use Vegetable Broth


      Monday, September 14, 2015

      Crockpot Vegetarian Sloppy Joes

      Now that Fall is right around the corner, we're breaking out the crockpot for some down home recipes that you can simmer all day for a tasty dinner (with not much effort).

      This one turned out pretty tasty and even had my meat-eating husband going back for seconds. We're definitely adding this one into the rotation. With such a small amount of prep time, there was a definitely a big payoff with these sloppy joes.


      Crockpot Vegetarian Sloppy Joes

      1 1/3 cups dried black eyed peas
      1 cup minced carrots
      2/3 cup quinoa
      2 Tbsp minced bell pepper
      4 cloves garlic, minced
      2 tsp Cajun seasoning
      1//2 tsp liquid smoke
      6 cups water
      1 cup minced greens of choice
      6 oz can tomato paste
      1/2 cup Sweet Baby Ray's barbecue sauce
      salt and pepper to taste
      buns for serving

      1. Wash the dry beans. Place them into a pot and cover with at least 2 inches of water. Let them soak 8 hours or overnight.
      2. Drain water and place the drained beans in a crockpot. Add minced carrots, quinoa, minced bell pepper, garlic, Cajun seasoning, liquid smoke, and water. Cover and cook on low setting for 7 to 9 hours.
      3. About 1 hour before you wish to serve, add minced greens, tomato paste, and barbecue sauce. Cover and cook on low for an additional hour.
      4. Add salt and pepper to taste before serving on buns.
      Notes:
      For those of you unfamiliar with cooking with dried beans, please do not dump the opened pack directly into the pot! Sort through the beans a handful at a time and remove any discolored or misshapen beans (or anything that looks suspiciously like rocks). Place them in a colander and rinse them before placing in a pot and cooking.

      Keep in mind that if you've had a bag of beans sitting in your pantry for a while (or even if you just bought them but they've been sitting on the grocery shelf for a while), they might take even longer to cook. So it's always best to leave yourself a little wiggle room with the timing of a dry bean recipe. Always make sure to give it a taste before serving! ;-)

      If you're looking for a tried and true traditional Sloppy Joe recipe, give this one a try. It's a staple in Harris Sister Deanna's home for Halloween night.

      Wednesday, April 8, 2015

      Garlic Roasted Balsamic Brussels Sprouts

      I made these the other night and let me tell you, if you've never cooked fresh Brussels sprouts, you are missing out. I know, I know "but my kids don't like the vegetables." Hush!

      They will like these. They have been approved by my 6 year old and 9 year old. So at least give them a try. They will be the perfect side dish to bring to any upcoming cookouts or pot lucks that may land on your calendar now that the weather is starting to get more Spring-like.


      Garlic Roasted Balsamic Brussels Sprouts

      1 pound fresh Brussels sprouts
      ¼ cup olive oil
      5 cloves garlic, minced
      1 Tbsp balsamic vinegar
      Salt and pepper, to taste

      1. Preheat oven to 450 degrees.
      2. To prepare Brussels sprouts, begin by cutting the buds off the stalk (if not already loose). Wash thoroughly. Cut away any surplus stem, cut in half, and peel and discard any loose surface leaves.
      3. Place prepared Brussels sprouts, olive oil, garlic, balsamic vinegar, and salt and pepper in a small mixing bowl. Stir to incorporate.
      4. Spread mixture on a cookie sheet and roast for 20-25 minutes.


      Note:

      These cabbage-like vegetables are named after the Belgian city of Brussels, which has an S on the end. The correct spelling is Brussels sprouts, even though most people merge the two S's when pronouncing it.

      If this recipe sounds up your alley, then make sure to check out all of our other roasted vegetable recipes:

      Saturday, March 14, 2015

      Crockpot Vegan Chili

      Spring is ALMOST here but we've still run into a few rough patches of cold and rainy days. And that has given me the opportunity to fire up the crockpot to make chili one more time until it gets cool again in the Fall.

      And now that I'm thinking about it, even if it were to turn to full-Spring tomorrow (here's hoping), this is the perfect recipe to Pin now and revisit at the end of Summer when you've got all those garden fresh veggies piling up on you! It will certainly carry you straight into Fall and use up those veggies with ease.

      This recipe is definitely a keeper!


      Crockpot Vegan Chili

      1 medium onion, minced
      1 green bell pepper, minced
      2 zucchini, minced
      1 jalapeno, minced
      4 cloves garlic, minced
      1 15 oz can black beans, rinsed and drained
      2 15 oz cans kidney beans, rinsed and drained
      1 15 oz can Northern beans, rinsed and drained
      1 15 oz can corn, drained
      1 4.5 oz can chopped green chiles
      1 28 oz can pureed tomatoes
      3 Tbsp chili powder
      1 tsp salt
      1 Tbsp cumin
      1/4 - 1/2 tsp cayenne pepper


      1. Add all ingredients to crockpot.
      2. Stir to incorporate.
      3. Cook on low for 8 hours or overnight.

      Notes:

      Use a food processor to mince the fresh vegetables. They will cook down and provide a similar texture as regular chili.

      Add more cayenne pepper if you prefer a spicier chili.

      We chose to serve our vegan chili over pasta and topped with sour cream and shredded cheese (because we're not vegans and we like sour cream and shredded cheese.) However, the recipe as written without these additions is a vegan recipe, and you could easily swap those out for vegan cheese and sour cream if you're serving to vegan guests.

      If you prefer a traditional chili, check out our Kicking Butt and Taking Names Chili recipe.

      If you'd like to serve this up with some cornbread, check out these recipes:


      Enjoy!

      Monday, November 3, 2014

      Black Bean and Corn Succotash

      This recipe is definitely a keeper. It makes the perfect side dish and can be served in many different ways. Give it a try and see if you agree!


      Black Bean and Corn Succotash

      2 Tbsp olive oil
      1 small red onion, diced
      2 cloves garlic, minced
      6 ears fresh corn, kernels removed (or 10 oz bag frozen corn, thawed)
      1 15 oz can black beans, drained and rinsed
      1 pint cherry tomatoes, halved
      3 green onions, thinly sliced
      3 tsp dried cilantro (or 3 Tbsp fresh cilantro, chopped)
      Juice of one fresh lime (about 2 Tbsp lime juice)
      Salt and pepper to taste

      1. Heat oil in a saute pan over medium-high heat. Add the red onion and cook until softened, about 4 minutes. Add the garlic and cook for another 30 seconds.
      2. Add the corn and 1/2 cup of water; cook, stirring occasionally until tender, about 5 minutes.
      3. Add the black beans and tomatoes and cook until just heated through; about 5 minutes longer.
      4. Remove from heat; stir in the green onions, cilantro, and lime juice. Season with salt and pepper to taste.
      Notes:
      This side dish can be served hot or cold. And it makes a great filling for pita bread sandwiches! It's very versatile.

      Do you remember Sylvester the Cat saying, "Suffering succotash!"when we were kids? Well nothing to suffer here. Good stuff - I promise. :-)

      Saturday, September 6, 2014

      Super Moist Pumpkin Bread

      I waited a WHOLE week past Labor Day to post this pumpkin recipe. THAT's self control people.


      Super Moist Pumpkin Bread

      3 1/2 cups all-purpose flour 
      2 cups packed dark brown sugar 
      2/3 cup white sugar 
      2 teaspoons baking soda 
      1 teaspoon salt 
      1 teaspoon ground nutmeg 
      1 1/2 teaspoons ground cinnamon 
      2 cups pumpkin puree 
      1 cup vegetable oil 
      2/3 cup coconut milk 
      2/3 cup flaked sweetened coconut 
      1 cup chopped walnuts 


      1. Preheat oven to 350 degrees. Grease and flour two 8x4 inch loaf pans. 
      2. In a large bowl, stir together the flour, brown sugar, white sugar, baking soda, salt, nutmeg, and cinnamon. 
      3. Add the pumpkin puree, oil, and coconut milk, and mix until all of the flour is absorbed. Fold in the flaked coconut and walnuts. Divide the batter evenly between the prepared pans. 
      4. Bake for 1 hour and 15 minutes in the preheated oven, or until a toothpick inserted in the center comes out clean. 
      5. Remove from oven, and cover loaves tightly with foil. Allow to steam for 10 minutes. Remove foil, and turn out onto a cooling rack. Tent loosely with the foil, and allow to cool completely. 

      Notes:

      You can easily mix this recipe by hand (the way your grandmother used to - unless your grandmother was Grandma Cuisnart or Nana KitchenAid).

      This recipe is fantastic for gift-giving! Make up a few extra batches and share the love with your family and friends around the holidays.


      If you like this recipe, make sure to try out other Harris Sisters tried and true Pumpkin Recipes:

      Roasted Pumpkin Puree (stock up on this for recipes throughout the season!)

      Whew! I feel like Bubba and Forrest:


      That's all I have to say about that . . . .

      This post contains affiliate links.

      Saturday, January 25, 2014

      Cowboy Caviar

      This recipe is a real winner and if you're looking for a new appetizer for Super Bowl Sunday, then give this one a try! And while you should have already eaten your black-eyed peas for New Year's Day, this recipe would also be an excellent way to serve those up, so make sure to Pin it. 

      (I've also included links to other Super Bowl appetizers after this recipe, so keep scrolling!)


      Cowboy Caviar
      1 15 oz. can black-eyed peas, drained and rinsed
      1 15 oz. can black beans, drained and rinsed
      1 15 oz. can white corn, drained and rinsed
      5 Roma tomatoes, seeds removed and diced
      3 avocados, diced
      4 green onions, sliced
      1 Tbsp. cilantro
      4 cloves garlic, minced
      6 Tbsp. lime juice
      salt and pepper to taste


      1. Add drained and rinsed black-eyed peas, black beans, corn, sliced onions, and diced avocados to a large bowl. 
      2. Distribute lime juice over diced avocados to help prevent browning.
      3. Remove seeds and pulp from tomatoes, dice, and add to bowl.
      4. Add Italian dressing, cilantro, garlic, and salt and pepper to taste. Mix all ingredients.
      5. Chill in refrigerator for at least 1 hour.
      6. Serve with tortilla chips. (This is best served the same day as you prepare it.)
      Notes: 

      Make your own Italian dressing with our Italian dressing mix recipe, or use a prepared dressing.

      This makes a great appetizer, but it's also a great sandwich filling - load up a 1/2 pita pocket with this mix and you have a tasty lunch!

      Looking for other Super Bowl recipe ideas? Check out these other Harris Sisters recipes that would be perfect for game day:

      1. Pizza Fondue
      2. Healthier Queso Dip
      3. Spinach Artichoke Dip
      4. Super Simple Salsa
      5. Creamy Spinach and Red Pepper Dip
      6. Black Bean Salsa
      7. Liar Liar Chex Mix
      8. Sausage Stuffed Mushrooms
      9. Sweet Corn Salsa
      10. Kicking Butt & Taking Names Chili

      Tuesday, July 30, 2013

      Crockpot Black Beans

      Not to be confused with our Crockpot Black Bean Soup, THIS recipe is a super-simple way to cook dry black beans. And they are seasoned to perfection if I do say so myself (and I do say so).


      Crockpot Black Beans
      1 16 oz. bag dry black beans
      3 cups water
      6 cloves garlic, minced
      1 small onion, minced
      2 tsp. salt
      1 tsp. cumin
       
      1. Wash the dry beans. Place them into a pot and cover with at least 2 inches of water. Let them soak 8 hours or overnight.
      2. Drain water and place the drained beans in a crockpot. Add the remaining ingredients.
      3. Cook on low for 8 hours or on high for 4-5 hours.
      Notes: Serve topped with salsa, shredded cheese, chopped green onions, or truthfully ALL BY THEMSELVES (they are that good).

      Wednesday, June 12, 2013

      Marinated Cucumbers, Onions, and Tomatoes

      This looks super yum-yummy and perfect for summertime. In fact, it will be on my dinner menu tonight!  Enjoy!


      3 medium cucumbers, peeled and sliced 1/4 inch thick
      1 medium onion, sliced and separated into rings
      3 medium tomatoes, cut into wedges
      1/2 cup vinegar
      1/4 cup sugar
      1 cup water
      2 teaspoons salt
      1 teaspoon fresh coarse ground black pepper
      1/4 cup oil

      Combine ingredients in a large bowl and mix well.
      Refrigerate at least 2 hours before serving

      Tuesday, June 11, 2013

      Garlic Roasted Green Beans

      If you have been a fan of our Garlic Roasted Asparagus recipe, then this recipe is for you! It's a new take on green beans, and it's super-quick and delicious. Try it for yourself.


      Garlic Roasted Green Beans
      1 pound fresh green beans
      4-6 cloves garlic, minced
      3 Tbsp. olive oil (approx.)
      salt
      pepper
      1. Preheat oven to 450 degrees.
      2. Snap ends off of green beans and place on a cookie sheet. Drizzle with olive oil and sprinkle with salt and pepper to taste. Cover in minced garlic.
      3. Roast for 15-20  minutes.

      This post contains affiliate links.

      You Might Also Be Interested In