Showing posts with label crochet. Show all posts

Thursday, June 8, 2023

Hedwig the Owl Crochet Earflap Hat

Miss Lexi recently celebrated her ninth birthday, so I wanted to make her a present to celebrate her special day. 

This year, I crocheted a Hedwig the Owl earflap hat, and I couldn’t be happier with how it turned out. Lexi's a fan of the Harry Potter book series, so I immediately knew that this was the project to make!

I used the Snowy Owl Crochet Hat free pattern in the size 6-10 years.

Modifications to the Pattern

For the most part, I completed this pattern exactly as described with only minor modifications:

  • I did an extra round of SC in gray on each eye to make them extra big. 
  • I did not include the extra "fluff" between the eyes.
  • I did not use a wire brush to fluff the ends of the braided tails or ears. 
  • I trimmed the ears to approximately 2 1/2" so that they were a little longer than the 1" ears described in the pattern.

Overall this is just a really fun pattern that I think any Harry Potter fan would be happy to have it. Whoooo wouldn't love to have a Hedwig the Owl hat? (See what I did there?)


Add this pattern to your Ravelry queue here: Snowy Owl Crochet Hat

If you have a kiddo that you'd like to make a fun project for, check out these other crochet patterns:

Friday, August 26, 2022

Watermelon Child's Swing Top

Today I'm sharing with you a child-sized crochet swing top that I made as a present for Niece Dolly to help her celebrate her fifth birthday. The original pattern was written for a solid color with no color changes, but I decided to modify the pattern slightly to create a watermelon top.


I used the Child Swing Top free crochet pattern with a size H hook using these yarns:

  • Red Heart Super Saver Shocking Pink
  • Big Twist White (enough white yarn for one DC row)
  • Red Heart Super Saver Black
  • Red Heart Super Saver Spring Green

Pattern Help

In order to help me follow the pattern better, I printed it out and numbered the rows. (Note: I did not number the Magic Ring or 7 DC in ring as rows.)

The pattern as written includes: 

Magic Ring
Foundation Row (7 DC in ring)
16 increase rows 
Finishing row 1 (one shell row across bottom)
Finishing row 2 (across top)
Separate section for straps (not written in rows - see below in pattern modifications)

Pattern Modifications

  1. I completed all of the foundation and increase rows with pink as the main color.
  2. In order to achieve the watermelon "seeds": On rows 3, 5, 7, 9, 11, and 13, I evenly spaced black DC stitches across the increase rows and carried the black yarn, changing colors as needed. 
  3. I added one additional row in white with 16 DC between 2 DC and another increase row in green with 17 DC between 2 DC.
  4. I completed the final shell row in green.
  5. Instead of SC across the top, I completed HDC across. This was a preference, but I thought it cleaned up the edge a little better.
  6. I used 1" diameter buttons, which fit instructions for big button holes.
  7. For the straps, I SC the first 28 rows as described then finished differently to put a little more space between the two button holes:
    1. *SC across 5 stitches, CH 1, turn* repeat for 28 rows
    2. CH 1, turn, SC in first SC, CH 3, Skip next 2 SC, SC in last 2 SC
    3. CH 1, turn, SC in first 2 SC, 2 SC in chains, SC in last SC
    4. CH 1, turn, SC across 5 stitches
    5. CH 1, turn, SC across 5 stitches
    6. CH 1, turn, SC in first SC, CH 3, Skip next 2 SC, SC in last 2 SC
    7. CH 1, turn, SC in first 2 SC, 2 SC in chains, SC in last SC
    8. CH 1, turn, SC across 5 stitches
    9. CH 1, turn, SC across 5 stitches

Final Sizing

The final top measurements with a size H hook ended up being 24" around the chest, 11" from top to bottom, and having 9" straps. I considered making the straps longer, but given the fact that yarn stretches, I didn't want to make them too much longer for fear of them getting stretched out over time.
  
Here are a few photos of the top laying flat.


A sweet little top for a sweet little girl. I hope you'll give this pattern a try.

Wednesday, May 25, 2022

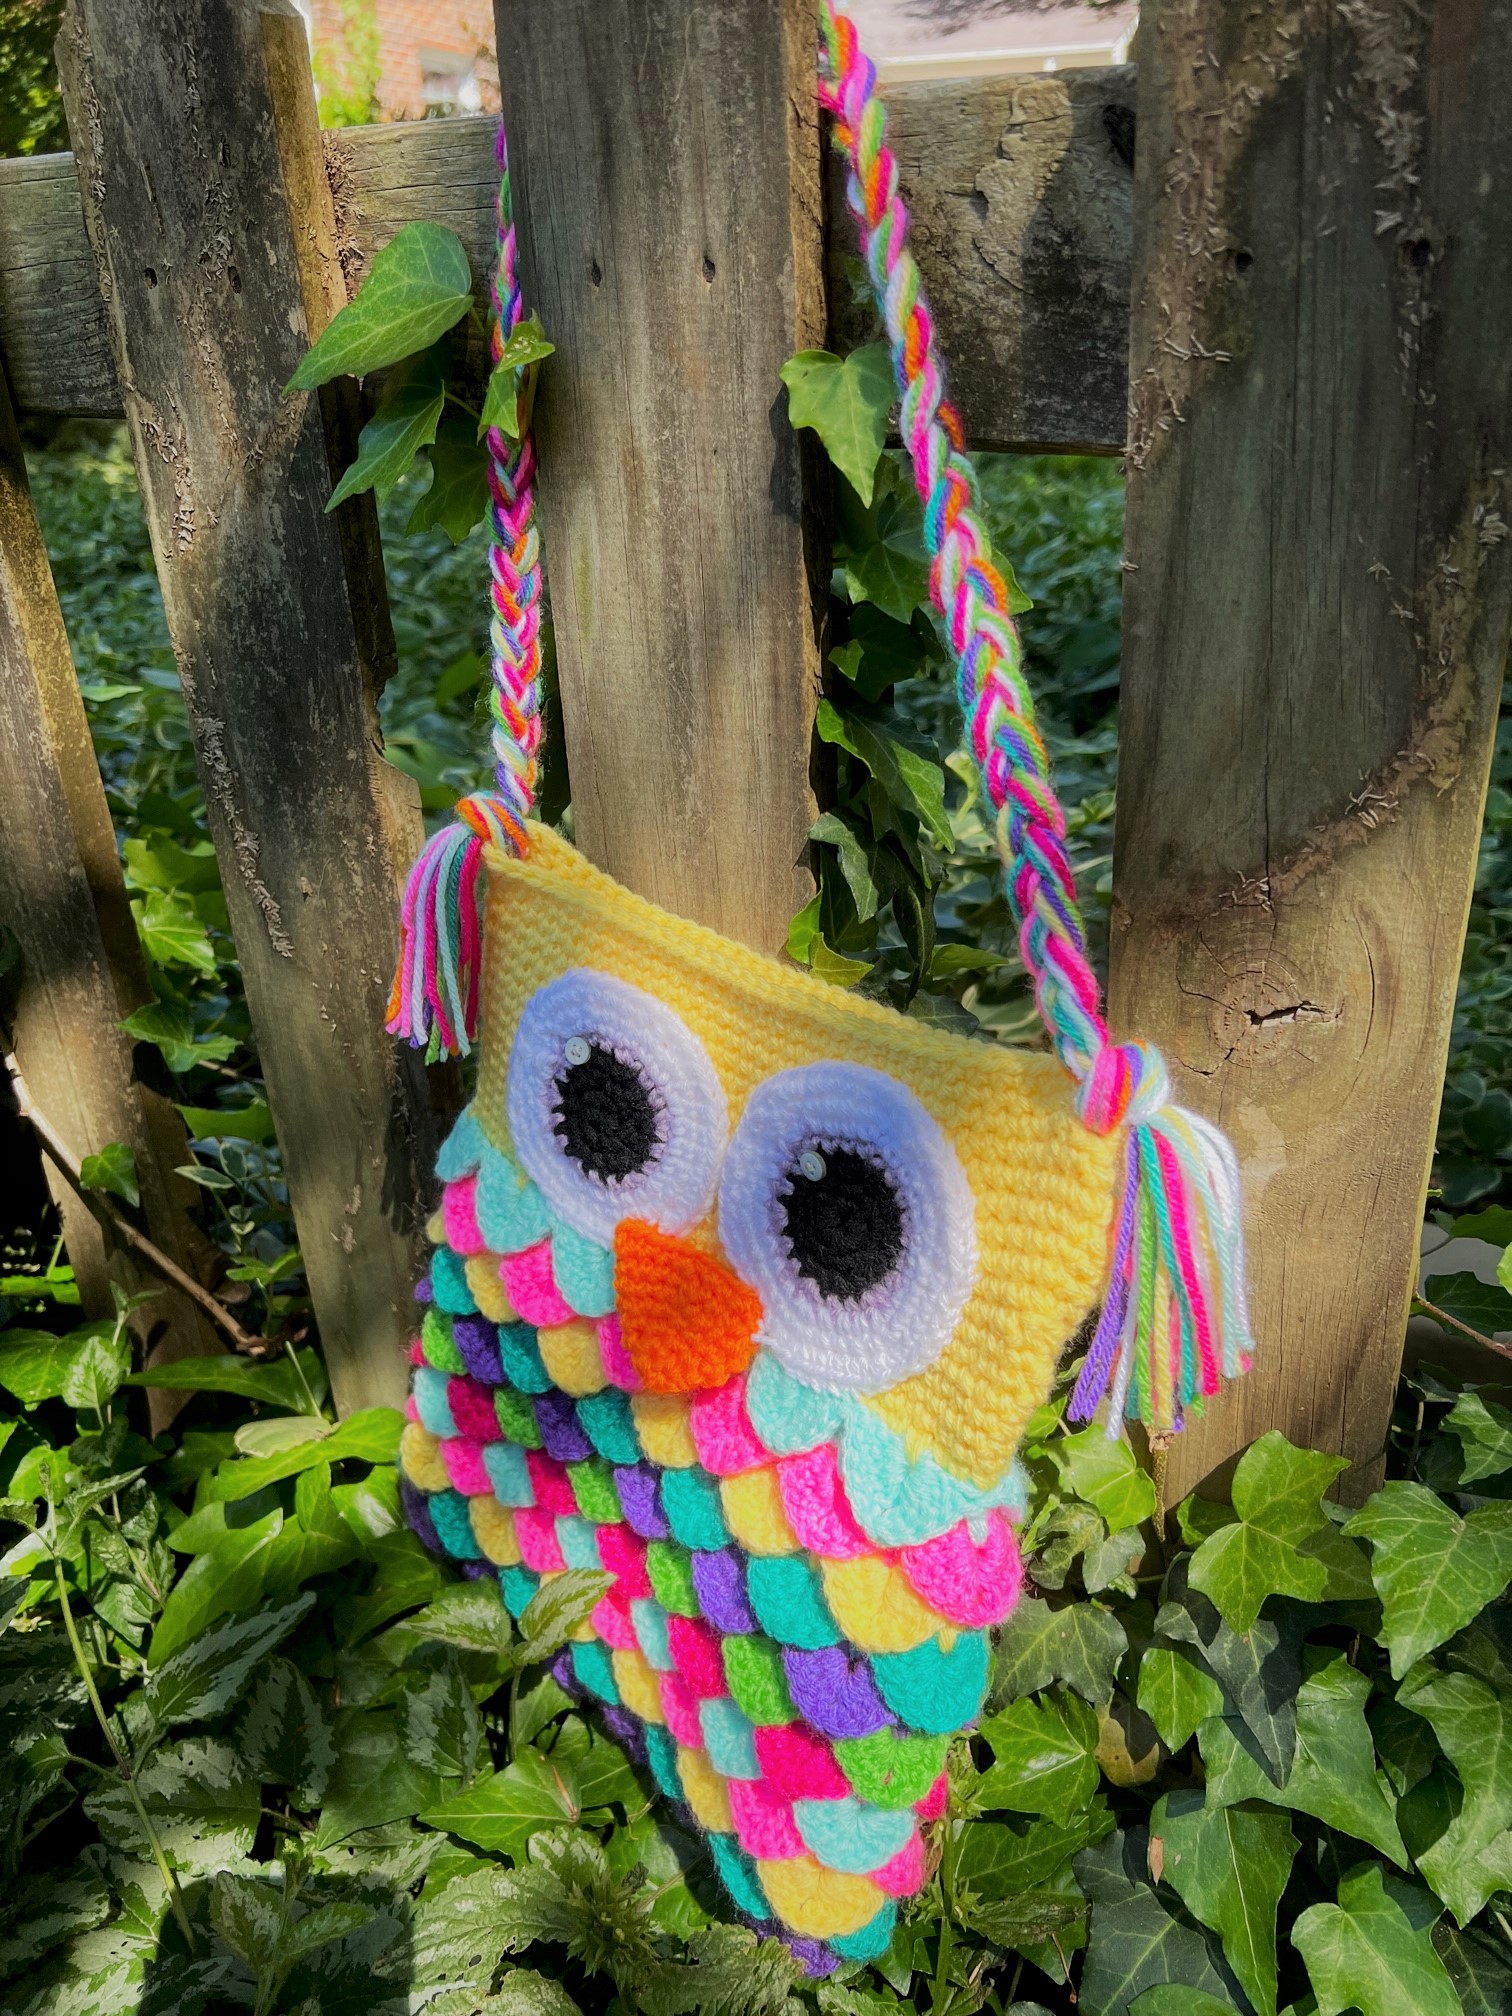
Colorful Owl Child's Tote Bag

Little Miss Lexi recently celebrated her eighth birthday. So of course, she got a special hand crocheted present from her Aunt Donna.

This year, I crocheted rainbow owl tote bag, and I couldn’t be happier with how it turned out. This bag features the Crocodile Stitch, which was a new one for me to try. But it was easy to learn and made for awfully cute owl feathers!

I used the Colorful Owl Purse free crochet pattern.


Materials You'll Need

For this project, you’ll need a variety of yarn colors for the feathers; small bits of white, black, and an additional yarn color for the eyes; and two small white buttons, needle, and white thread for the eye highlights. I used a size H hook for the entire project. 

Yarn Choice

Rather than using the exact yarn colors specified in the pattern, I used a variety of yarn that I had on hand to create the rainbow effect of the feathers. As long as you choose yarns that are all the same fiber and weight, you can also use yarns from your stash. 


The colors of yarn that I used in this project were:

  • Big Twist Blueberry
  • Big Twist Medium Teal
  • Big Twist Buttercup
  • Red Heart Super Saver Pretty 'N Pink
  • Big Twist Light Teal
  • Red Heart Super Saver Shocking Pink
  • Red Heart Super Saver Spring Green
  • Red Heart Super Saver Pumpkin (Beak)
  • Red Heart Super Saver Pale Plum (Iris of Eyes)

Of course, if you'd like to make the rainbow pattern without weaving in ends, you could also choose a rainbow mandala or variegated yarn and let it do the color work for you.

Modifications to the Pattern - The Handle

Other than the color and brand of yarn used, the only modification I made was how I completed the handle. I really loved the idea of the braided handle, and I actually completed one handle exactly as described in the pattern. However, by tying off the ends of the braid 3 inches from each end, tying the ends to the purse, and then trimming, I found that the "tassels" that were created got pretty short, which I didn't care for the look of. 

While I was re-doing the braid, I chose to work with 50" pieces of yarn to give some extra length to the handle. I also opted to double the number of strands of yarn, so that I was working with 24 pieces of yarn, instead of 12.  I tied them about 5" from each end, tied them to the bag, then trimmed to give final tassels that were around 3" finished.


Pattern Help

While the pattern is not difficult at all since the majority of the bag has a step-by-step YouTube video tutorial included. A few parts of the pattern start with a Magic Ring, which may be a new technique for some crocheters. If this technique is new to you, this YouTube Tutorial for a Magic Ring will show you how to do it:


Thumbs up for the pattern and also for the idea - most little girls LOVE rainbows, so this one is sure to be a hit! It works up fast and would make a perfect birthday present! Here's Lexi with her Owl Bag:


Add this pattern to your Ravelry queue here: Colorful Owl Purse

If you're looking for other free crochet patterns for a special little girl in your life, give these patterns a try:

This post contains affiliate links.

Wednesday, August 4, 2021

Rainbow Toddler Dress

Today I'm sharing with you a toddler-sized crochet Rainbow Dress that I made as a present for Niece Dolly to help her celebrate her fourth birthday.

I love making A-line dresses for girls because if you choose the right colors, this dress can be worn in spring and summer, and also with a long sleeved top underneath in fall and winter. And as the child gets taller, it can still be worn as a top over jeans, leggings, and pants as long as it still fits in the arm area.


I used the Rainbow Dress free crochet pattern and followed directions for a size 3-5. (Sizes for 2-3, 3-5, and 6-8 are included with the pattern.) 

Modifications to the Pattern

Other than the color and brand of yarn used, the only modifications I made was to add 5 extra spaces evenly around at the beginning of each new color beginning with the yellow row. I felt this helped to keep the A-line shape of the dress. 

Yarn Choice

I made the entire dress with yarn that I had in my stash. As long as you choose yarns that are all the same fiber and weight, you can also use yarns from your stash. You're just looking for a red, orange, yellow, green, blue, and purple. I used about a 1/2 skein each of these yarns for the size 3-5: 

Of course, since this is a classic A-line pattern dress, if you'd like to make the rainbow pattern without weaving in ends, you could also choose a rainbow mandala or variegated yarn and let it do the color work for you.

Pattern Help

While the pattern is not difficult at all since the majority of the dress is made up of double crochet stitches. It does start with foundation single crochet, which may be a new technique for some crocheters. If this technique is new to you, this YouTube Tutorial for Foundation Single Crochet will show you how to do it:


Thumbs up for the pattern and also for the idea - most little girls LOVE rainbows, so this one is sure to be a hit! It works up fast and would make a perfect birthday present (or even Halloween costume)!

Add this pattern to your Ravelry queue here: Rainbow Dress

If you're looking for other free crochet patterns for a special little girl in your life, give these patterns a try:


Rainbow Halloween Costume

As we get to the end of summer, you might also want to consider this free crochet pattern for an easy DIY Halloween costume. I know you're probably thinking, "Too soon!" But it would be adorable!


If you're looking for other crafty DIY Halloween costume ideas for your child, pop over to these blog posts:


This post contains affiliate links.

Tuesday, May 25, 2021

Lacy Child's Top

Little Miss Lexi recently celebrated her seventh birthday, and I wanted to make her a special handmade present to celebrate her big day.

The free crochet pattern I chose to make was the Lacy Child's Top in the size Child 7-8. (Sizes for 24 months/2 years, Child 4, Child 5-6, and Child 7-8 are included with the pattern.) I used a size I hook with Lion Brand Yarn Pima Cotton in the color Caberet to complete the project. I substituted the yarn for the project because Lion Brand Organic Cotton (the yarn the pattern was originally written for) is no longer available. I used about 2 1/2 balls of the Pima Cotton yarn to make the pattern in size 7-8.


Pattern Notes

I kept a few notes while I was working on the pattern, and I hope these will help you too:

Several times throughout the pattern, it says to work Ch-3 mesh. What it really means is to kind-of-sort-of work Ch-3 mesh while simultaneously decreasing on one side of the pattern. You're just going to have to figure that out on your own. It's not that difficult, it's just not exactly as written.

In the section for Shaping the Cap Sleeves, the second to last row instructed to "Repeat the last 3 rows" (which was supposed to leave you with 11 ch 3 spaces). Considering that there were only 2 previous rows any way you sliced it (either rows 1 and 2 of the original part of the pattern or rows 1 and 2 of the Ch-3 mesh), I wasn't really sure what it was getting at here. I opted just skip this part and move to the next line, which was to repeat row 2 until 3 chain 3 spaces remained. (If you repeated row 2, the next count of chain 3 spaces would be 11, which was what you were trying to get to in the directions that were confusing, so this seemed to work for me.)

In the next section for Sleeve Edging, to get 45 SC evenly across on Row 1, I put 1 SC in each ch and 2 SC in each ch space across for the size 7-8 pattern.

Pattern Modifications

At the end, I chained 35 to create the ties. I also single crocheted back across the chains to create thicker, sturdier ties. Instead of using snaps to fasten the insides, I also created ties for the that part too. (I thought that would give a little more ease to the pattern if needed.)

Also, the pattern seems to suggest that Row 1 single crochet should stop before moving down the left  placket to the bottom edge and that Row 2 picots would only go around the neckline portion. I opted to single crochet around the entire front placket and neckline for Row 1 and to complete the decorative picot trim of Row 2 all the way around as well. Even though the left side of the sweater is covered when it is closed and the picots are not necessary for this part, I felt like it added a nice finishing touch to the sweater.

Pattern Rating

All in all, I would rate this pattern a definite intermediate to difficult in terms of pattern clarity/difficulty. In addition to some challenges with the how the pattern is written (noted above), it also includes quite a bit of seaming. The only finishing notes included in the pattern are: "Sew shoulder, side, and sleeve seams. Sew in sleeves." So you will need to look up how to correctly sew in sleeves if you've never done that before to ensure that they line up correctly on the sweater.

You can definitely make this one yourself, but you will have to dedicate time to figuring out parts of the pattern.  

You can add this pattern to your Ravelry queue here:

I hope my notes are helpful to you!

Lexi looks great in her birthday present, so I am definitely happy with the outcome!


If you're looking for other free crochet patterns for a special little girl in your life, give these patterns a try:

This post contains affiliate links.

Monday, January 4, 2021

Tips and Tricks for Beginner Crocheters

Harris Sister Misty's daughter Charlotte has shown an interest in learning how to crochet. As part of her Christmas present, I bought her a few crochet kits but I also promised to write her a blog post with some crochet tips and tricks for beginners. 

These pro tips and tricks will help any beginning crocheter get off on the right foot while they learn how to crochet. And if you're thinking of taking up crochet as a new craft for the new year, then these tips will be perfect for you too!

First, Learn the Basics

You might have wanted to learn how to crochet because you fell in love with a beautiful handmade sweater or an adorable (and tiny!) amigurumi toy, but before you jump into the deep end, you've got to learn some basic stitches. 

I learned how to crochet at the ripe old age of 10 from a book that I checked out from our local library. Since dinosaurs are no longer roaming the earth, I would recommend heading straight to your computer to check out video tutorials to learn basic stitches. 

The Crochet Crowd on YouTube has lots of how-to tutorials, including basic stitches (and many videos for left-handed people too!):

Once you're comfortable with the basic crochet stitches, you can move on to following crochet patterns to make finished products. A good first pattern to start with is a Granny Square. If you learn how to change colors, you can make one about 3 feet square and you'll have a Granny Square Baby Blanket. If you keep going (to about 6 feet square), you'll have an adult sized Granny Square Blanket. And if you learn a little more about finishing crochet pieces, you can make one into a Granny Square Striped Bag. So, a Granny Square is a very good place to start your crochet journey. Many who crochet will tell you it's the first thing they learned!

Granny Square Scrap Afghan


Crocheting Will Take Patience and Practice

New crocheters tend to crochet stitches very tightly, which might cause you to have trouble sliding the yarn easily over the hook. Try your best to keep your stitches relaxed. You will need to count stitches to make sure you’re not accidentally dropping stitches. 

If your crochet work doesn’t come out right – you can always frog it. This is the crochet term that means to rip out the stitches and start over (rip it, rip it - like the ribbit, ribbit sound a frog makes!). 

What I made when I was 10 doesn’t look anything like what I would make now. But, think about something you're truly good at and how you got to be that way. Probably through a lot of practice, right? Start with simple patterns and work your way up. You'll see a lot of patterns for cable stitches, popcorn stitches, appliques, chevrons, and more, but the best thing to start with as a beginner are straight rows of single crochet and double crochet until you get a feel for producing those stitches consistently every time.

Retro Cherry Baby Dress


Use a Big Hook and Yarn

When you first start to learn how to crochet, one thing that can really help you with your stitch counting and knowing which stitch to insert your hook into is to start with a big hook and yarn. When I first learned how to crochet in the days of yore, larger sized yarns weren't as readily available as they are now. So, I learned on H and I size hooks with worsted weight yarn.

However, now that bulky weight yarns are easy to find, you can pair those with L, M, or N size hooks. To find the weight of a yarn, look on the yarn label and you will see a number in a box. Worsted weight yarns are size 4, and bulky weight yarns are size 5.

Having bigger hooks and thicker yarn will make it easier for you to see your stitches. Lighter colored yarn is also a little easier to see the stiches in, so you might want to use that for some of your practice work. (For example, work your way up to using black or navy blue yarn.)


Pick the Right Yarn for Your Project

Acrylic yarn is the best type to use when you're first learning how to crochet for a few reasons. First, acrylic yarn will make it easy to see your stitches, which is important when you're first starting out. And second, chances are you're going to frog your work a time or two, and if you start with some fancy-pants, super-floofy yarn, you might not be able to frog your project. (The fibers in these types of yarns sometimes get tangled as you go, so if your work isn't perfection, there might not be a chance of frogging all the stitches you need to.)

Once you're ready to tackle an actual project, acrylic yarn is also a good choice for any item that will be washed a lot (blankets, baby clothing, etc.). Also, acrylic yarns are safe for babies’ sensitive skin. Some good brands are Red Heart, Hobby Lobby I Love This Yarn, Caron Simply Soft, and Lion Brand Yarns. Save fancier yarns (wool or wool blends, alpaca, hand-spun craft fair purchases, etc.) for clothing items like hats and scarves that don’t get washed as often and can easily be hand washed and laid flat to dry.

Pay Attention to Dye Lots

When you're purchasing yarn for a project, make sure to purchase enough yarn in the right dye lot at the same time and then save your receipt. (A dye lot is the batch the yarn was dyed in and this number is also listed on the back of the yarn label. You will want to buy skeins of yarn with matching dye lot numbers to ensure that the yarn was dyed the same time and the colors match exactly.) Keep all of the yarn for that project in a clean container with the receipt. If you have any leftover, unused skeins of yarn, you can return them to the store for a refund. But, it is unlikely that you will be able to purchase more yarn in the same dye lot at a different time.


Ball Your Yarn or Pull from the Center of a Skein


Either pull from the center of each skein of yarn or wind each skein of yarn into a ball before starting to crochet. I am a center-pull crocheter myself, but this is a personal decision. Under no circumstances should you ever pull the yarn from the outside of a skein and unwind around. You will have skeins of yarn flopping all over the place and probably getting tangled, which will inevitably lead to frustration.

To pull yarn from the center of a skein, start by finding the end that is tucked into the center. Dig your hand into the middle and pull it out. You might have to pull out a little "chunk" of yarn and unravel it to find the very end, but it will work. The end should be hiding in the chunk you pull out.

Always Do These Things Before You Start Crocheting


Before you start crocheting, always do a few things consistently:

  1. Make sure you will be relatively uninterrupted and can concentrate on the project, especially if you are following a pattern.
  2. Remove all bracelets and rings so that you don't have any jewelry that might snag on your work.
  3. Wash your hands so that you won't transfer anything to your work. This is especially important if you're working with white yarn.
  4. If you have long hair, pull it back into a ponytail or a bun so that you don't accidentally crochet shedding hair into your project.
  5. Pull out only the yarn that you need for the part of the project that you will be working on. (For example, if you are working on a large blanket with multiple colors, but you will only be working on one green row, you only need to pull out the green yarn.) All other yarn should stay in a dedicated bin or tote that you can close to keep pets away from it. (The project itself should also go back into that bin or tote while it's a WIP - work in progress. This helps to keep the project clean and away from pets.)
  6. BONUS TIP: If your hands start hurting (or your neck muscles), stop at the end of the row you're on and come back to it on a different day. This is especially important when you're just learning how to crochet because you won't yet be used to moving your hands this way or looking down at your work. So, instead of making yourself miserable and not having a great experience crocheting, give your muscles a break and come back to it.
Wire Beaded Bracelet


Learn How to Read Written Crochet Patterns

When you start reading crochet patterns you are going to think you're reading a different language. First you'll need to figure out the stitch abbreviations. The easiest thing to do might be to view a tutorial on it and The Crochet Crowd has a good one on YouTube

Once you've got that down, the next best thing to do is to read through the entire pattern before you do anything. Is there any finishing that you'll need to do? Are there any new stitches that you'll need to learn? Will you need to block the finished piece? Do you have all of the supplies to complete the project? Is the project recommended for someone with your crochet experience?

Until you get the hang of crocheting by patterns, print out the patterns and check off or highlight each row as you complete it. That way, when you put your project away and come back to it later, you'll know exactly where to start again. I still use this method for more complicated patterns, and I have been crocheting for 30+ years.


Dedicate a Space for All Your Crochet Supplies

Set aside a space for all of your crochet supplies. Besides the obvious items like yarn and hooks, you'll also need scissors, stitch markers, a tape measure, and a yarn needle. If you print your patterns and would like to save them (especially after making notes on them), three-hole punch them and save them in a binder. 

Keeping all of your crochet items in one location will not only save you time when you want to start a project but also your sanity. Where did I put my yarn needle?!? I just used it last Wednesday!!! 

Save Any Leftover Yarn

This might seem obvious, but save any leftover yarn you have once you've completed your projects. If you have nearly a complete skein left, you can leave it in skein form with the wrapper intact for future reference. If you've only got a little bit left, it's probably easier to roll it into a ball and then store it in a container with a lid to keep it dust-free. You will slowly build what crocheters refer to as a yarn "stash." This is yarn that you can use when you only need a little bit for a project or that you can put together to make a larger project.

Scrap yarn crochet usually involves patterns for small items or patterns that have lots of color changes. You can make a large project, like a Super Thick Stash Busting Crochet Afghan or a Granny Mandala Ottoman Cover that involves whatever you have in your yarn stash. What makes these stash-busting crochet patterns so fantastic is that they are budget-friendly! (You aren't purchasing new yarn for these projects, but you're using what you have.)

Even the smallest amount of yarn can be used to make scrap projects like pom poms, tassels, cell phone covers, hats, scarves, bracelets, washcloths, amigurumi, and more. 

Granny Mandala Ottoman Cover


How to Weave in Ends of Crochet so They Don't Come Out

Once you learn to make projects from patterns, you'll need to learn how to weave in your ends of yarn. And, you'll want to make sure that your ends are secure so that they don't come unraveled when the item is washed. 

If you get this trick "down" you will have figured out something that some crocheters have a hard time with. The trick is to do three things consistently: 
  1. leave a long enough tail of yarn to actually weave in (don't clip the yarn close to your project to "save more" to crochet with)
  2. if possible when changing colors, hold that tail of yarn down on top of the previous row of stitches and crochet over top of the tail of yarn with the newly attached yarn for a few stitches
  3. attach a yarn needle to the tail of yarn and weave the yarn in three different directions through the same color of stitches as the yarn tail (e.g. weave a blue yarn tail through blue yarn stitches rather than white yarn stitches so that the woven area will disappear). Make sure to go through the fibers of the yarn in at least one pass.

Once you've completed these three steps, you can clip the yarn close to the piece, making sure not to clip any of the stitches in the work.

Spiderman Afghan

I hope these tips and tricks make it easier for you to learn how to crochet. Remember to practice, practice, practice and good luck on your crochet journey!

This post contains affiliate links.

Friday, September 4, 2020

Flower Child's Toddler Sweater

Little Miss Dolly recently celebrated her third birthday, and in honor of the occasion I wanted to make her a special handmade present. Dolly is quick on her feet and if you're not careful, you'll just see a streak as she runs past you (on to her next adventure)! With the intricate detailing on the back of this sweater, I thought this free crochet pattern would be perfect for our fleet-footed flower child!


I ended up completing the size 4T Flower Child's Sweater free crochet pattern with a size I hook using these stash yarns:

  • Red Heart Super Saver Pale Plum
  • Big Twist Blueberry
  • I Love This Yarn! Ivory


Modifications to the Pattern

I completed the pattern as written for the back, sleeves, attaching both sleeves, and collar. The original pattern had multiple ties in the front, which I did not think was very practical for a young child, so I modified both front pieces and finishing as follows:

Front pieces:

Row 1: as written
Rows 2-8: Ch 2, dc in each dc across. Turn.
Rows 9-10: Ch 1 (counts as hdc), hdc in each stitch across. Turn.
Row 11: Change to color B. Ch 2, ch 1. DC, ch 1 across. Fasten off.

Finishing:

With right side facing, join A in the bottom right DC stitch. Ch 1. Work 2 hdc in corner stitch (this counts as 3 hdc in corner). Hdc in each stitch around lower edge of back to back point underneath flower. Work 3 hdc in this stitch and in each corner around. Work evenly around entire piece (rather than just back portion as described in original pattern). Fasten off.

This new method of finishing will give a final row of the main color over the decorative stitching at the front placket and at the front bottom of the piece.


I added a button to the top front of the sweater instead of the the ties that were with the original pattern and I varied the colors on the collar a bit from the pattern (but I completed the stitches in the same order):


Overall, this is not a very difficult pattern to complete. It does involve some finishing work, which might be new to some beginner crocheters. But the pattern only uses basic stitches, so it might be a fun one to try if you're new to the world of finishing.


You can add this pattern to your Ravelry queue here:


This post contains affiliate links.

Monday, June 15, 2020

Idlewild Girl's Dress

Today, I'm sharing with you a Quarantine Crochet project that I completed for niece Lexi's birthday. I found the free crochet pattern for this little girl's dress online, and it had video tutorials with each section of the dress in addition to the written pattern.


I ended up completing the pattern for the Idlewild Dress in a size 6 using a size G crochet hook and three balls of Bernat Softee Baby: Baby Denim Marl yarn that I already had in my stash at home. The pattern is available in children's sizes 2, 4, 6, 8, 10, 12, 14, and 16 and women's sizes S, M, L, 1X, 2X, 3X, 4X, and 5X.

The lacy bottom (skirt) part is worked in rows of four that are each started and finished slightly differently from one another. This means that it was hard to just pick up the project and work on it when I only had 15 minutes of free time. I learned quickly that if I didn't have enough time to devote to completing all four rows, it was better for me to not get started so that I wouldn't lose my place since I was working from the pattern on my iPad.


The video tutorials were a great help too, so keep them in mind if you'd like to tackle this pattern. I would definitely say that it is more for intermediate crocheters than beginners. While many of the stitches are basic, the pattern involves seaming, blocking, and some more advanced stitches like the crab stitch.


The pattern is also written somewhat like a "choose your own adventure" book - so the crocheter has to make some decisions along the way about how she wants to proceed, and those decisions will inform which parts of the pattern to follow next. That may confuse someone who is new to reading patterns.


Thumbs up for this pattern - it may be the perfect project for you to complete this season! Doesn't little Lexi look adorable in her new dress?


Add this pattern to your Ravelry queue here: Idlewild Dress

This post contains affiliate links.

Monday, August 12, 2019

Proud as a Peacock Baby Dress

I haven't checked in with you guys in a while with a new crochet project, but you're really going to like the one I have for you today! I recently made a handmade crochet baby dress for a very special little girl, and I'm proud as a peacock over how this one came out for two reasons:

  1. The original pattern was written for a solid color of yarn, but I chose a variegated yarn, which created a finished product that I think looks similar in color to a peacock's plumage. With its various purples, blues, and greens, the colors in this dress are really beautiful.
  2. I finished the dress in 2 days flat - start to finish - ends woven in - buttons sewn on - inaugural wash and dry - photos taken - and wrapped for gift giving! How awesome is that?!?


I used the Little Sweetie free crochet pattern and followed the directions for a size 12 months. (Directions for size 6 months, 12 months, 18 months, and 24 months are included with the pattern.) The only modification I made was the color of yarn I used. I chose Red Heart Super Saver Stripes Parrot Stripes to complete the pattern, and it's a beautiful variegated yarn that does all of the color blending for you!

(Some of you might remember that I chose Red Heart Super Saver Stripes Grape Fizz for my Mermaid Tail Afghans that I made for all the kiddos one Christmas.) This yarn comes in many ombre colorways that would make good choices for this dress!

I know the name of the yarn I chose for this dress is Parrot Stripes, and I have lovingly called this dress Proud as a Peacock - I have switched birds on you! But with good reason!

Once I completed the last round of stitches at the bottom of the dress, I really thought the pattern in this colorway turned out to look like peacock feathers. Take a look at some close up photos:


Don't let the beautiful stitching at the bottom of the dress fool you - this really is a simple pattern to follow! This YouTube Video Tutorial will walk you through working every step of the pattern if you think it looks hard to make. (But it's really just a long written pattern because it includes multiple size options.)


Long time readers of the blog might recognize this pattern because I've made it before for niece Lexi for her first birthday! At that time, I changed the color scheme to transform it into a Retro Cherry Dress. Make sure to read all about the pattern modifications to make that version too!

Retro Cherry Baby Dress Free Crochet Pattern

You can add this pattern to your Ravelry queue here:

Little Sweetie Dress
Retro Cherry Baby Dress

Have fun making your own version of this crochet baby dress!

This post contains affiliate links.

Thursday, May 2, 2019

Strawberry Tote Bag

Little Miss Lexi is celebrating her fifth birthday and so of course, she got a special handmade present from her Aunt Donna.

This year, I made her a crocheted drawstring strawberry tote bag, and I couldn’t be happier with how it turned out. This bag is the perfect size to pack a pair of pajamas and maybe a stuffed animal to have a sleepover at Grammie and Pop Pop’s house. Or maybe to tote around all the treasures that 5-year-old girls collect. Either way, I think Miss Lexi will like it!


Pattern Choice

Now, I have to start by saying that there are a lot of free crochet strawberry bag patterns out there. And I read through many of them before starting this project. The project that you see here is really a cobbled together version of a strawberry tote bag. A Frankenberry! I incorporated what I felt were the best parts of several different patterns, and I’ll link those patterns and explain the whole process below.

Materials You'll Need

For this project, you’ll need a dark pink (or red) yarn for the berry, a green yarn for the strawberry cap, small bits of white and yellow yarn for flowers, and small bits of white or black yarn for the seeds. I used a size H hook for the entire project. And I used Fray Block on all the knotted ends of the seeds to make sure that they stay secure. (See directions below.)

The Strawberry

For the body of the bag (or the strawberry), I mostly followed this step by step video crochet tutorial. The only changes I made were that I stuck to the repeat of four increase rows and one non-increase row for the main body. I worked the pattern until I had 18 stitches between increases. When it came time to decrease, I worked a few more decrease rows than specified.


The finished strawberry on my bag measures 11 ¼ inches from top to bottom and about 13 inches across the top opening when laid flat. Of course, you can make your bag any size you choose by following the same repeats in the tutorial.


The Seeds

For the seeds on the strawberry, I followed the same video tutorial instructions. However, I looped the yarn through each area three times before tying off. I made sure to tie off each seed four times (tightly). And then after cutting all loose ends, I also dabbed each knot with Fray Block. I hope this will ensure that none of the knots will come untied and the strawberry seeds will stay put.


The Top

For the top of the strawberry, I followed this step by step YouTube crochet tutorial. This tutorial had more of a ruffle top strawberry, which I preferred to the individual leaves that many strawberry bag patterns had. I ended up doing 5 total rows of double crochet just so that the top to the strawberry bag would look proportionate. I believe the bag that I started with was larger than the bag in this tutorial.


The Drawstring

For the drawstring, my main concern was that it might come out of the bag since there was nothing at the ends of the drawstrings in many of the strawberry bag patterns. I found this free crochet Strawberry Pajama bag pattern that had strawberry blossoms attached to the ends of the drawstring, so that was the perfect solution! Make sure to weave your drawstring into the bag before attaching your blossoms to the ends.


To attach them, I knotted the center yellow yarn from the flower and the green yarn from the drawstring chain tightly. Then, I wove the yellow yarn into the yellow part of the flower and I used the green yarn to tack the drawstring down to the flower petal (from behind) and weave extra into the green part only. This hid the stitches so that the flowers will look good from both sides and will also be secure.


(Note: as written, the pattern only produces blossoms with 4 petals, even though 5 are shown in the photo with the pattern. If you’d prefer to have 5 petals on your blossoms, I would suggest starting with more single crochets in your ring.)

The Handle

Many of the free crochet strawberry bag patterns I found were for backpacks, and many of them had very thin handles. I really thought that regardless of whether it ended up being a backpack or a tote bag, the handle needed to be sturdy since it was ultimately going to be a gift for a five-year-old.

I really liked the way the handles on this Out & About Backpack looked, so I used that same basic principle. Instead of a starting chain of 101, I only chained 85. And instead of 11 rows of SC, I only did 7 before folding over and trimming in the scallops. The scallops seemed to work better for me (not ruffle) when I skipped 2 stitches between them. I used pink yarn to attach each end of the handle securely to the inside top of the bag and weaved in ends.

I decided on a tote bag version which only required one handle, but if you’d like to make a backpack version for your strawberry bag, you could always make two handles and attach them to the back of the bag instead of the top.


So that’s it! A little legwork to get the look, but I think it turned out fantastic!

And here's a few photos of the birthday girl enjoying her bag:


And if you don’t have a kiddo who would appreciate a strawberry tote bag, I happen to think that this strawberry might look awfully cute in your kitchen pantry holding extra plastic grocery bags. Or even leave off the handle, fill it with fiberfill stuffing, and cinch it tight to make a cute summertime pillow. Or maybe just make one for yourself to take to the Farmers' Market this Summer.

Have fun crocheting your strawberry bag!

This post contains affiliate links.

Thursday, January 17, 2019

Granny Mandala Ottoman Cover

Seems like it's been a while since we've checked in with you guys. We've been taking down Christmas decorations and clearing clutter just like everybody else! But now that things are starting to get back to normal, I wanted to share a quick crochet project with you. It's actually one that I had put on my craft wish list last year, but then I decided to devote all of my extra crafting time to crocheting afghans for charity. So I back burnered all of the crafting items on my wish list so that I could devote more time to that project.

Hopefully, I'll be able to get to a few more of my back burnered craft projects this year!


This is the first one and I'm so happy with how it came out. It's a crochet granny mandala ottoman cover. I love it for two reasons. First, I was able to upcycle a very old ottoman that I had squirreled away in Jaxon's room. He used it as a step stool to reach things when he was younger, but this is actually MUCH older than Jaxon. (HINT: The hunter green color should be giving off a strong 1990s vibe - I purchased this when I was in college.) Here it is in all its pleather-y glory. Soak it in, it's just too good:


Second, it's always fun to crochet a quick and colorful project during the dreary days of January. This colorful ottoman is going to brighten up our sunroom.


What Is a Mandala?


For those of you not familiar with the term mandala, it's basically a doily with a few minor differences. While they're both circular, mandalas are usually colorful and they're usually made out of yarn instead of thread. But if you find a vintage doily pattern that you like, you could probably convert it into a mandala pattern easily.


Pattern, Hook, and Modifications


For this project, I started with a free crochet granny mandala pattern and then I worked the pattern as written through row 12 with a size K crochet hook, which gave me a flat circle the same size as the top of my ottoman. Then, I switched to a size J hook and stopped increasing while continuing rounds until I had enough rounds to cover the sides of the ottoman. I switched crochet hook sizes to make sure that the cover would fit snugly to the ottoman.

If I were to do this project again, I might try not increasing on row 12 and then working the entire pattern with one size hook. You will need to adjust the pattern for your size ottoman specifically, trying the work on your ottoman periodically to ensure it fits correctly.


Yarn Choices


The yarns and colorways that I used were as follows:

  • Red Heart Super Saver Bright Yellow
  • Red Heart Super Saver Pretty 'N Pink
  • Red Heart Super Saver Pale Plum
  • Big Twist Damson Purple
  • Red Heart Super Saver Light Blue
  • Red Heart Super Saver Light Periwinkle
  • Red Heart Super Saver Royal (from Captain America Hat and Spiderman Afghan)
  • Red Heart Super Saver Pumpkin
  • Bernat Super Value True Red (from Captain America Afghan)
  • Red Heart Super Saver Shocking Pink
  • Big Twist Light Teal
  • Big Twist Medium Teal
  • Caron Simply Soft Limelight
  • Caron Simply Soft Watermelon
  • Red Heart Super Saver Aruba Sea
  • Big Twist Buttercup
  • Loops & Threads Impeccable Orange
  • Vanna's Choice Radiant Lime (from Mary, Mary, Quite Contrary Baby Blanket)
  • Vanna's Choice Fern (from Mary, Mary, Quite Contrary Baby Blanket)

As you can see, it's Smitty approved!


Notes:


This really was a simple project, so if you have a little ottoman or even a stool that doesn't match your current decor or that's seen better days, maybe consider giving yours a makeover too. It's really like making a very large hat for it!

My best tip for any project that uses a lot of different colors of yarn is to weave in your ends as you go. Weaving in ends is my least favorite part of any crochet project, but with 35 different pairs of yarn ends to weave in, leaving them ALL to the end of the project was not a good option. Weaving in two ends of yarn after each row made it into a manageable task that really seemed like no trouble at all.

I did not stretch it around the bottom and attach it (it's hanging freely), but you could easily do that if you'd like a more fitted look for yours!

If you like the look of colorful crochet projects, check out these past projects for a burst of rainbow inspiration!

Granny Square Scrap Afghan
The Lucy Bag
Color Block Toddler Dress
This post contains affiliate links.

You Might Also Be Interested In