Showing posts with label spring. Show all posts

Wednesday, March 1, 2023

How to Plan a Spring Tea Party

With winter coming to an end, now is the perfect time to plan a spring Tea Party. Whether you're celebrating a birthday, Mother's Day, Easter, baby or wedding showers, or just enjoying brunch with girlfriends, you can't go wrong with a tea party theme.

Spring Tea Party Invitations

Start with an invitation that matches your spring tea party aesthetic. If you'd like for your guest to come dressed for the party, add "tea party attire requested" to the invitations. 


What to Wear to a Spring Tea Party

A tea party invitation can be the perfect time to break out your fancy dresses. Since you're not actually going to meet the royal family, the rules for your tea party outfit can be a bit flexible. Find a fun dress in a bright color, and pair it with some accessories like:
 
  • a hat
  • a fascinator
  • gloves
  • vintage jewelry
  • a parasol
  • a special purse


Spring Tea Party Decorations

Part of the fun of decorating for a spring tea party will be the decorations. Now's your chance to bring out your vintage china, jadeite, pink Depression glass, and milk glass to set a stunning table. Mix in bouquets of colorful flowers and set them all on a vintage tablecloth. 

Mix and match your vintage china, tea cups, saucers, and tea pots to create unique spring tea party table settings. We chose to use tea pots for both vases and to serve tea. And make sure to use cake stands and pedestals to add height to your table.


Gather teacups and luncheon sized plates for guests. You can create beautiful place settings by mixing and matching pieces. If you don’t own tea cups, ask each guest to bring a tea cup with them to the party. At the beginning of the tea party, you can have each guest tell where they got their tea cup and why it is special to them as an icebreaker.

In the photo below, the tea cup and saucer are a matching set, but they are layered with a pink Depression glass salad plate and then another vintage gold-rimmed china salad plate.


The Perfect Spring Tea Party Menu

For your spring tea party menu, you want to serve simple finger foods and appetizers. Serve a mix of both savory and sweet foods. And don't forget to include a variety of beverages in case you have guests who don't actually enjoy drinking tea. If you're holding your party outside (like we did), you might also want to consider serving cold beverages too. Here's a list of our spring tea party food ideas:

Savory Appetizers


Sweets


Beverages

  • Variety of hot teas (Green Tea, Peppermint Tea, Raspberry Tea, Earl Grey)
    • plus milk, lemon, and sugar for serving
  • Iced tea
  • Lemonade
  • Champagne
  • Wine Spritzer


Other spring tea party appropriate menu items include:


We hope you've found some fabulous spring tea party ideas that you can enjoy with your friends and family. 

This post contains affiliate links.

Wednesday, April 7, 2021

Lemon Velvet Cake

We recently made this cake for Easter lunch, and it did not disappoint. This old-fashioned recipe for a lemon velvet cake hits the spot with not only the lemon flavors in the cake but also a creamy lemon cream cheese frosting. I cannot begin to tell you how delicious this cake was.

If you're looking for a new springtime dessert recipe now that warm weather is upon us, give this made-from-scratch cake a try.


Lemon Velvet Cake with Lemon Cream Cheese Frosting

Lemon Velvet Cake

2½ cups all purpose flour

1 teaspoon baking soda

1 teaspoon baking powder

1 teaspoon salt

1¾ cups granulated sugar

3/4 cup vegetable oil

1/4 cup butter, softened

2 eggs

2 teaspoons pure vanilla extract

1 tablespoon pure lemon extract

1 heaping teaspoon lemon zest (from 1-2 lemons)

1 cup buttermilk

1/2 teaspoon white distilled vinegar

1/3 cup hot lemon water (hot water mixed with 2 tablespoons fresh lemon juice)

6 drops yellow food coloring

Lemon Cream Cheese Frosting

2, 8 oz. blocks of cream cheese, softened

8 tablespoons unsalted butter, softened

1 ½ teaspoons pure vanilla extract

1 ½ teaspoons pure lemon extract

1 ½ heaping teaspoons lemon zest (from 2 lemons)

5 cups powdered sugar

2 teaspoons lemon juice

5 drops yellow food coloring


Lemon Velvet Cake

  1. Preheat oven to 325 F. Thoroughly grease and flour two 9-inch cake pans. Set aside.
  2. In a large bowl, sift together flour, baking soda, baking powder, and salt. Set aside.
  3. In another large bowl, mix together sugar, oil, and shortening.
  4. Mix in eggs one at a time.
  5. Mix in vanilla extract, lemon extract, and lemon zest.
  6. Combine dry ingredients into wet ingredients, alternating with the buttermilk.
  7. Mix together the distilled vinegar and hot lemon water and mix into the batter.
  8. Mix in the food coloring until you reach your desired shade of yellow.
  9. Pour batter evenly into prepared pans and shake pans to release any trapped air bubbles.
  10. Bake for 25-35 minutes, checking it at the 25-minute mark and adjusting the time, if needed. (See note below about timing.)
  11. When moist crumbs cling to a toothpick inserted into the center of the cake, remove cake from oven. Let cakes rest in the pans until pans are cool enough to touch. The cakes will continue to cook in the pans as they cool.
  12. Once cooled, carefully remove cakes from pans and place on cooling racks to cool completely.

Lemon Cream Cheese Frosting

  1. In a large bowl, mix together cream cheese and butter.
  2. Mix in vanilla extract, lemon extract, and lemon zest.
  3. Mix in powdered sugar until creamy, adding lemon juice one teaspoon at a time to thin it out (if needed).
  4. Mix in food coloring.
  5. Place frosting in the refrigerator to allow it to firm up a bit before frosting the cake.
  6. Stir the frosting until it's creamy and spreadable. Frost the cake.
  7. Decorate the cake with additional lemon zest if desired.


Notes

The batter for this cake is thinner than many cake batters. This is because of the addition of the hot lemon water, which adds to the lemon flavor of the cake.

Don't overbake the cake. The key is to take the cake out of the oven when moist crumbs cling to a toothpick inserted into the center and allow it to finish baking as it cools down in the hot pan. This timing will vary depending on your oven, which is why it's best to check the cake at the 25-minute mark.

Wrap warm cakes in plastic wrap to seal in moisture. (This step is optional and is not specific to this cake!) The plastic wrap traps warmth and creates a moist and tender cake. When the cakes are warm but the pans are cool to the touch, wrap them in plastic wrap for a few hours as they continue to cool (or even overnight if you can't frost the cake right away).


If you're looking for other tried and true dessert recipes for spring, make sure to give these Harris Sisters' favorites a try:

Enjoy!

Saturday, March 27, 2021

Springtime Asparagus Tortellini

Now that spring is here, I like to take advantage of the window of time when there's an abundance of fresh asparagus. This recipe makes a quick pasta with a creamy sauce and fresh asparagus. In about 30 minutes, you can have this vegetarian meal on the table, which leaves you more time to enjoy the nice weather that spring has to offer!


Springtime Asparagus Tortellini

2 packages three cheese tortellini, 9 oz. each 
1 small yellow onion, diced 
1 bunch asparagus, chopped into bite-sized pieces
4 garlic cloves, minced 
2 cups heavy whipping cream 
1 cup shaved Parmesan cheese
Salt and pepper to taste 
Oil for cooking 

  1. Cook tortellini according to package instructions, drain, and set aside.
  2. Preheat a pan over medium heat and add a couple of tablespoons of oil. 
  3. Add onions and sauté until translucent.
  4. Add chopped asparagus and sauté for 5 minutes or until desired tenderness. Add minced garlic, salt, and pepper.
  5. Mix well and cook for about 5 more minutes.
  6. Pour in heavy cream while stirring. Add shaved Parmesan cheese and stir until cheese is melted.
  7. Stir in tortellini until completely mixed and cook for a couple of minutes.
  8. Serve and enjoy.

If you're looking for other simple asparagus recipes for springtime, give these tried and true Harris Sisters' recipes a try:

Enjoy!

Sunday, March 14, 2021

Vintage Easter and Spring Decor Ideas

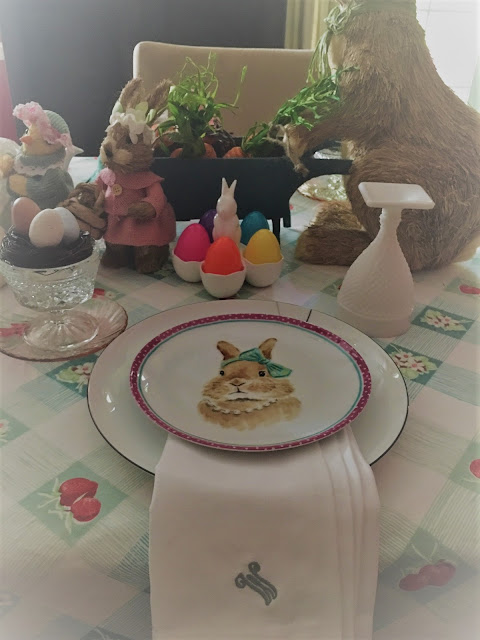
Now that we're counting down the days until spring, it's a good time to decorate for Easter. If you love vintage pieces, you can also incorporate them into your Easter and spring decor even if they didn't start out as Easter decorations.

This 1960s Metlox Poppytrail Lamb cookie jar is the latest piece I've added to my collection. Because it's a lamb, I thought it would fit right in with my Easter decorations. It still has the original crier in the hat and is in perfect working condition with no chips or cracks. We found this at an antique mall a few years ago while on vacation in the fall, so not only was I surprised to find this, but I think Ryan was surprised to hear that I wanted it to add to our Easter decorations (when I'm sure everyone else had their mind set on Halloween or maybe even Christmas decorations that time of year). The owner of the antique mall let us walk away with this guy for $30. We've since found him on Etsy and eBay for $75-$100, so we got a great deal on him, especially since usually the crier is no longer working and ours still works!


The next two pieces also didn't start out as Easter decorations, but that's how I use them now. Both are mid-century planters, so they're a little older than the cookie jar. The first is a lamb planter. These were popular baby shower gifts in the 1950s. I got this at a different antique mall from a vendor that was closing their booth. Everything in the booth was 50% off, so this was $3.00. This one has a yellow bow, but since they were originally baby shower planters, they often have pink or blue bows. All perfect colors to match your Easter decorations! These turn up at thrift stores, and you can also find them on Etsy and eBay, so it's easy to add a few extra lambs to your Easter decorations if you'd like to!

The second is a little chick hatching out of an egg and it's marked Japan. I got this one at a local thrift store for 99 cents. He's nestled into the table decorations and because of his size, he'd make a great Easter candy dish.


Next, we have a few vintage pieces that I've displayed together. I found this 1960s Inarco cake stand at a thrift store for $4. It features an embossed pattern of green apples and daisies, which is perfect for spring decor. I've used it as a pedestal for my trio of vintage 1950s Lefton rabbits.


I've got a few vintage pieces incorporated into the table setting, as well. At each place setting, I have a Depression Glass saucer topped with a vintage Anchor Hocking Champagne/Tall Sherbet Dish in the Wexford pattern. I have the sherbert glass filled with a mini bird's nest and eggs, but you could also fill it with Easter candy or an actual dessert for Easter dinner.


I have also added a vintage Smith Glass Early American Milk Glass Water Goblet in the crosshatch pattern to each place setting.


Bonus Tip:

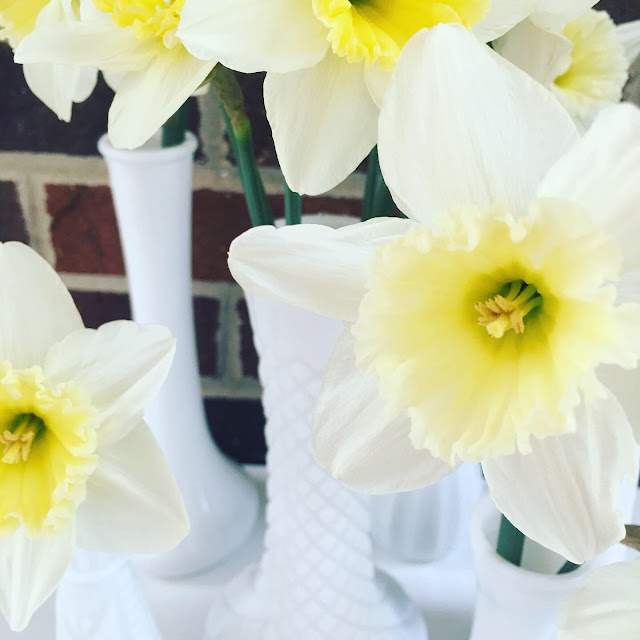
Here's a bonus spring decorating tip that will work for you if your daffodils are blooming around the same time that you've decorated for Easter. This makes an easy centerpiece if you like the look of fresh flowers. And you can continue to refresh the centerpiece with different flowers from your garden to keep it out past Easter and well into spring. 


I like to collect all of my vintage milk glass bud vases and use them to display fresh daffodil blooms. You could also use your vintage milk glass vases to display other spring blooming flowers, such as tulips, irises, sweet peas, peonies, stock flowers (gillyflowers), lily of the valley, ranunculus, freesia, gardenias, or forsythia branches.

For this display, I used milk glass vases in varying heights to add visual interest. Milk glass vases are available individually at thrift stores, estate sales, and antique malls, but you can often find collections of them on Etsy or eBay if you'd like to buy a whole group at once.

Milk glass vases are easy to decorate for different seasons. You can see these same vases decorated for both Halloween and transitional Halloween to fall/Thanksgiving decor in our Halloween Home Tour. And pop over to our 12 Vintage Days of Christmas post to see how to decorate milk glass for Christmas.


I hope this gives you some ideas about how you can repurpose vintage items to decorate for Easter. For more vintage Easter and spring decorating ideas, make sure to check out Harris Sister Deanna's Spring Home Tour

Spring will be here before you know it!

Tuesday, July 17, 2018

One Man's Trash: Vintage 1970s Soup Recipe Mugs

Today I'm sharing with you a little upcycling project that I've been meaning to post for you since springtime! 

The original idea is not mine, but one that I originally saw on Sadie Seasongoods (who is ALWAYS upcycling awesome vintage and retro finds into useful projects for today's home - so make sure to check her out on her blog and on Facebook and give her a follow too).

In early March, I had stopped into our local Goodwill and found two of these vintage 1970s soup mugs with the colorful recipe graphics on them - the tomato soup and the onion soup. I scored them for a whopping $1 a piece:


And then not even two weeks later, I came across matching vintage mushroom soup and chicken soup mugs at our local Megathrift for $0.50 each. (For what it's worth, they had a set of four there, but the other two were onion, which I had just bought and oxtail, which made me squeamish, so I left those for another treasure hunter.)


Here's an up close look at the graphics on the tomato soup mug - so pretty! And I knew exactly what I was going to do with these as soon as the weather got a little warmer.


I used them as pots to plant a windowsill herb garden! 

Each mug has an herb that you might use in the soup featured. In some instances, the herb is actually listed in the recipe on the side of the mug and in some instances, it is just a complementary herb. I've planted:

  • the tomato soup mug with basil
  • the onion soup mug with green onions
  • the mushroom soup mug with chives
  • the chicken soup mug with thyme
Here's a look at them with their herbs:


This is a really cute upcycling project and a fun way to grow fresh herbs in your kitchen. If you'd like to try your hand at growing herbs, be on the lookout for these vintage mugs to add a little retro flair to your own kitchen windowsill. 


This post contains affiliate links.

Tuesday, May 8, 2018

DIY Spring Wreath for Your Front Door

I think spring is at least STARTING in most parts of the country now. And it has been a long time coming after this past winter!

Do you want something new to decorate your front door for spring? I recently made this wreath with peonies (a favorite!) for my front door, and I thought I would share how to make a spring wreath like it. 

If spring-like weather hasn't quite hit your area yet, this project might encourage it a little bit (or at least give you something pretty to look at while you wait!).


Spring Peony Wreath

Materials:
1 grapevine wreath (choose whatever size you like - mine is 18" in diameter)
2 faux floral peony bushes (8 peonies total)
2 lamb's ear stems
1 pussy willow stem
1 eucalyptus stem
1 roll 2.5" wired ribbon
chenille stem or wire
1 decorative sign

Tools:
scissors or wire cutters
hot glue gun
hot glue sticks


  1. Cut the peonies off their stems and glue them in a random fashion on the left side of the wreath.
  2. Cut the lamb's ear and leaves from the peony bushes into smaller groups of 2-3 leaves each.
  3. Cut the eucalyptus and pussy willow into separate stems.
  4. Glue the longer eucalyptus and pussy willow stems near the ends of the last two peonies so that they begin to circle the wreath toward the right side.
  5. Glue the lamb's ear and leaves from the peony bushes around these stems and also in between the peonies.
  6. Make a bow from the wire ribbon and attach it to the wreath on the right side.
  7. Attach decorative sign beneath the bow.


Notes:


If you're not experienced with making bows, you can use this YouTube Bow Tutorial to help!

If you leave long tails on the wire that you use to secure the bow, you can use that same wire to attach the bow to the wreath.

My hot air balloon wood sign already had a wire attached to it (for hanging). I used that wire to attach the sign to the wreath. If your sign does not have a wire, you can hot glue it to the wreath.

Hope this wreath DIY project is one that you'll try for yourself! Happy spring!

This post contains affiliate links.

Tuesday, April 10, 2018

16 Free (or Cheap) Things for Your Garden

When we moved into our house 10 years ago, we knew that it had great potential. However, we also knew that we had a LONG way to go before it would be exactly what we wanted.


Not only were we going to need renovations inside, we were also going to have to do a serious makeover on the "landscaping."

Did you notice that I put landscaping in quotation marks? Well, there's a reason for that. When we first bought this house, we had some foundation shrubs (many were alive and seriously overgrown, but some were dying) and an abundance of trees and daffodils.


Do you see what is decidedly missing from these photos? That's right! Lush, green grass! And let me tell you, we spent quite a bit of time and effort just trying to grow grass for our yard. The backyard was a muddy mess if it rained, so we had to make that our first priority.

But now, we've moved on actual landscaping! Because we have so much area to cover in front, back, and side yards, we are taking on this task a little at a time.


With such a large, blank slate to work with, affordable DIY tips for gardening really come in handy. Here are a few tricks I've learned for updating your landscaping on a budget.

16 Ways to Get Free (or Cheap) Stuff for Your Garden


1. Compost is something that every yard can benefit from, and the best part is that you use things like lawn clippings, leaves, banana peels, coffee grounds, and vegetable scraps to build it. 

We don't even have a fancy container for ours. We drilled holes in the sides of three plastic garbage cans that came with the house. We use them for compost that is freshly started, compost that has "cooked" a little bit, and finished compost.

via Robin Clugston

2. If you need a jump start on your compost, consider visiting your local Starbucks. They package and giveaway used coffee grounds for free. While you might not want to put too much coffee in your compost, this is the perfect way to acquire this compost ingredient for free (especially if you don't drink a lot of coffee).


3. Seeds are easy to collect from certain plants (and even organic vegetables). I've had success with collecting and drying marigold seeds, zinnia seeds, and gaillardia. So, every time I plant a new plant now, I wonder if it will be a good candidate for collecting seeds to use the next season! Not only do you get free seeds for your garden, but collecting seeds is a fun project to do with the kiddos.

4. If you want to start your seeds indoors, look no farther than your recycling bin for seed starting containers! Rather than tossing yogurt containers, applesauce cups, or K-Cups, wash them and set them aside for seed planting time. You can recycle them after you've planted the seedlings  in your garden.


5. If you're starting a whole new garden bed, you might also want to save cardboard and grass clippings. We started a new bed in our backyard last fall, and we simply saved enough cardboard to cover the grassy area that was currently there. We laid the cardboard out in a double layer and then covered the entire area with about 12" of lawn clippings. 

Because we did this in the fall, the lawn clippings contained both grass and leaves. If you let this set until the following spring, not only will you have a brand new bed, but the grass (and any weeds) will be gone and you'll have much improved garden soil in that area.

6. What do you REALLY want when you start out, though? Free plants for your garden! You can divide many existing plants and replant them around your yard. Those daffodils that were the only flowers in our yard when we bought our home? They've been divided and replanted around the front and back yards. Next they'll be making an appearance in our side yard.  


Iris are another excellent candidate for dividing. At this point, the iris in my yard (that I brought from our previous home -  just 10 rhizomes!) have been divided and replanted all around my yard and shared with Daddy, Harris Sisters Deanna and Misty, my sister-in-law, and my mother in law. It's the Sisterhood of the Travelling Iris! 

This is our 2012 Easter photo, and as you can see, those 10 rhizomes that I brought to this house with the move had already multiplied by then.


7. Other plants are easy to propagate, which makes this the perfect experiment for the beginning gardener. Plants like roses, hydrangeas, camellias, azaleas, and succulents root well from cuttings. So, if you have a plant that you like and you'd like more of the same for other parts of your yard, this is a good way to get those plants for free.

8. Some fruits, vegetables, and herbs are easy to root from scraps. Green onions, celery, and pineapple are ones that I have personally grown in my kitchen windowsill from scraps. Others that are easy to root in water are lettuce, avocados, potatoes, garlic, cilantro, basil, and ginger. Not only is this a cheap way to get a start on your vegetable garden, it's also a fun little science project to do with the kiddos.

via Top 10 Home Remedies

9. Once you've planted your new seeds and clippings, you should mark your new plants so that they don't accidentally get pulled with actual weeds. Cough . . . .Ryan Walkush . . . cough, cough.

One of the cheapest ways I've found to make plant markers is to buy a big pack of clear plastic forks and write the plants' names on them with a Sharpie permanent marker.

You can stick the fork tines directly in the soil next to your plant, and because the forks are clear, they blend into the landscaping and aren't noticeable unless you are right next to them. Here are a few plant markers beside some newly planted Solomon's seal and hellebore.


10. You'll also need to mulch your new plants to help them retain moisture and to help control weeds. Check with your local Public Works Department and see if they offer free mulch. Our Public Works Department offers free mulch as long as you pick it up with your own truck and cover it with a tarp upon leaving.

11. We mulch in the springtime, but in the fall we use leaves as mulch. Remember all those trees that were on our property when we bought it? Well, they turned out to be very beneficial for our garden in the fall. If you have enough trees on your property, it is easy to blow the leaves into the natural areas to provide an added layer of free mulch for the winter.

12. You can reuse cooking water to water your garden. Instead of pouring it down the drain when your meal is cooked, just let it cool on the back of your stove, and then use it to water your plants. Once you've cooked vegetables or pasta in the water, the water contains additional nutrients. Just make sure you don't use any water that you've added salt to!

13. To save on watering your plants altogether, you can easily choose drought tolerant plants for your zone. Unless you live in a particularly rainy area, planting drought tolerant plants can save you the time, effort, and money associated with watering during dry times. Plants like sedum, yarrow, gaillardia, Russian sage, lavender, lamb's ear, and purple coneflower grow well even with a lack of water.


14. To make sure your plants come back year after year, choose perennials rather than annuals. Yes, annuals make a pretty splash of color in your yard, but after all that work planting them, you'll just have to buy and plant them again next year. 

If some of your favorites plants are annuals, save them for your potted plants, and make sure that the plants you put in your garden are perennial.

If you research the bloom time of the plants you want and plant a variety that bloom in different seasons, your garden will be colorful right up until winter. Some examples of easy-to-grow perennials that are colorful (just like annuals) are phlox, asters, astilbe, peonies, iris, daffodils, black-eyed susan, hibiscus, and daylilies. Make sure to check out what will work in your zone and growing conditions.


15. Don't overlook buying plants and bulbs at places other than garden centers. For example, our local Aldi starts selling garden items (including plants) around March. Last year I bought a bag of gigantic allium bulbs that were as large as my hand. These bulbs are selling at online retailers for as much as $11 per bulb, and Aldi had the same ones for $5 for a package of 3 bulbs.

16. For even cheaper plants, wait until after a holiday to purchase them. For example, the nicely potted Easter lilies, hyacinths, and tulips that are often on sale to give as gifts around Easter, will go on sale for 50% off the day after. 


You can plant these bulbs directly in your garden and they will bloom for you again for years to come. This is one group of hyacinths that I planted last year from an Easter pot. I've planted six more groups this year so that these won't be lonely.


Bonus Tips


17. If you are really starting from scratch and you don't have any plants to separate, make cuttings, or take seeds from, reach out to your family, friends, and neighbors. When they are separating their plants, I'm sure they'd be happy for you to come over and help dig some up. That's less work for them!

My side yard is planted with ferns and poppies from my mother-in-law. And just this past week the boys and I went over to a neighbor's house to dig up some plants that she wanted to thin out. We left with two large boxes full of Solomon's seal, blue flag iris, columbine, hellebore, sedum, and money plant.

This is a great way to start off our spring planting all for about 1 hour of our time!


18. If you are new to your neighborhood and haven't met too many of your neighbors yet, contact your HOA or your local government to see if there's a neighborhood garden club or a community garden club that you can join. 

Many garden clubs will exchange free information (which will be helpful to learn about growing conditions in a new area). And many times, they'll host seed and plant exchanges, which is a great way to try new plants in your garden for free.


Hope these tips about how to improve your garden for free or cheap will help you this spring. Happy gardening!

This post contains affiliate links.


You Might Also Be Interested In