Showing posts with label just for fun. Show all posts

Friday, October 25, 2024

Thrifted Halloween Painting Trend: Upcycling an Old Painting into Halloween Art

With Halloween right around the corner, I thought I would share a recent project that I've been working on.  The thrifted Halloween painting trend hit the scene hard last year.  The idea is to head to your local thrift store and find an old painting that you can upcycle into Halloween art.  I saw a lot of people doing this last year by adding subtle ghosts to landscape paintings and they all turned out so well.  It has taken me a year to get around to it, but I'm glad I finally jumped on board.  It was a fun project to complete. And while my results are definitely less subtle than a few ghosts scattered into a landscape, they are also most definitely Halloween-esque.  Let me show you. 

So I headed to my local Goodwill over the summer and snagged two canvases, both were by the same artist and they were both folk art. I saw the smaller canvas first and immediately knew exactly how I could turn it into Halloween art.  Then I spied a similar larger canvas, and I became convinced that it was meant to be.  I grabbed both pieces and headed to the checkout.  Honestly, both pieces of art have sat in storage for months, but I recently remembered them and pulled them out.  After a little debating, I decided to start on the larger piece first.  

This is what the canvas looked like when I began.  Nothing in particular about this canvas screamed Halloween.  On the contrary, it is a very traditional folk art, with lots of barns and houses, little Amish people, and horses pulling wagons.  But in the back of my mind, I knew what it could become. 


And here are some of the details from the original art. 

Notice the bright orange sun and yellow sky.  I knew that would have to be the first thing I changed. 


I also immediately knew that I would have to adjust all the bright white picket fencing.  


Notice too all those quilt squares painted on the buildings and barns.  I knew I would have to come up with a plan to change those as well. 


But it was all the little people scattered around this painting that excited me.  I adored this little lady hanging out her quilts, and the mom and daughter to her right.   I had a pretty immediate idea of how I would use all these people in a Halloween painting.  And I'll bet you are thinking the same thing. 


But my first order of business was to get the basic color scheme corrected.  I chose a dark blue for the sky and made that sun into a much bigger yellow moon. Then I adjusted all of the trees and bushes to reds, oranges, and yellows to replace all the bright green that we started with.  I also made all of the previously white picket fencing black.  


With those basic changes completed, I was finally able to move on to the fun part- converting all those little people into my Halloween cast of characters.  

The very first character I started on was the little fellow on the bicycle in the center of the painting.  I took one look at him and decided he HAD to become the Wicked Witch from the Wizard of Oz.   And with a few easy updates, he did.  

Here's the before and after. 


Since the bicycle already had a basket, it only made sense to add little Toto in there as well.  But this was only just the start.  


Next up was the little character on a tricycle.  I thought to myself, what character would be riding a tricycle?  And I knew it had to be a clown.  Here's that transformation. 


Then the inspiration struck for my favorite little lady hanging out the laundry on the line.  I thought I could make her into the main Sanderson Sister, Winifred, and naturally the little socks hanging on the laundry line turned into witch's stockings.  I covered all the quilts in white until I could come up with an idea.  The white actually sparked the idea that two of them could be plain white sheets/ ghosts and then I just turned the last one into a Halloween colored quilt with a few random patches.  I couldn't leave this little scene without coming up with a costume for the dog, so I made him into a pumpkin. 


Then I remembered the two ladies behind my little clown who were folding a quilt.  And I thought they should be the other two Sanderson siters, Sarah and Mary.  And I just turned their quilt into a sign that reads Hocus Pocus. So now all of the Sanderson Sisters are present and accounted for. 


Longtime blog followers may remember that The Harris Sisters paid homage to the Sanderson Sisters a few years ago.  


And it just kind of snowballed them there.  I incorporated all sorts of Halloween characters and costumes, some of which are specific to costumes that my little family has worn over the years.  Others are nods to some of the Harris Sisters' costumed endeavors, while others are just easily recognizable Halloween characters.   The biggest challenge was finding costumed characters recognizable enough that you would still be able to recognize in miniature form.  This is a large canvas but there is A LOT of subject matter in it, making each individual character around 2 inches tall if they are in the forefront, and closer to only an inch tall (or less) for those in the background. 

Here is a look at some of my favorite Halloween characters from the scene.

This little guy raising the flag in the forefront of the scene became Fred Flintstone. 


This was a nod to the year my family dressed as the Flintstones, which incidentally turned out to be the coldest Halloween on record.  We froze ourselves, but we looked good for this one photo.  


I turned a couple of tiny little characters into Woody and Jessie from Toy Story. 


This was a throwback to our Toy Story Era, when we dressed as Andy's famous toys back in 2018.


And remember that sweet mother and child?  I turned them into Snow White and a bunny, two things that may not seemingly go together. 


But there was, in fact, one Halloween I dressed up as Snow White. 


And Lexi wanted to be a rabbit. 


And these may win the prize for some of the smallest characters in this painting.  There was actually nothing in this space originally, but I wanted to include Raggedy Ann and Andy so I added them in this space. 


Of course, this was a nod to the year that Lexi and I dressed as those famous rag dolls all the way back in 2016. 


I turned this little guy into Harry Potter.


Our family has dressed as characters from Harry Potter for the last two years in a row.  Here is Lexi as Hedwig, Harry Potter's snow owl, from two years ago. 


And as the zany but loveable Luna Lovegood last year. 


I decided to turn a couple more characters into Dorothy and the Scarecrow from the Wizard of Oz to tie into the Wicked Witch I had already incorporated. 


And you may remember that The Harris Sisters all dressed as Dorothy a few years ago when we made our own trip down the yellow brick road


And I could not call this a Halloween transformation without adding my all time favorite Halloween characters, the Peanuts gang.  Did you notice the little boy and girl flying kites in the original painting?


They became Charlie Brown in his ghost costume (I had a little trouble with the scissors) and Lucy in her witch costume.  The kids with the kites were originally running in the church yard.  I felt like this area was screaming for a graveyard so I also added one and a few ghosts too. 


As for the kites themselves, I could not rest until I incorporated Snoopy flying on his doghouse.  So he became a kite, pulling a sign saying "Welcome Great Pumpkin".   And if you look closely, you will find Linus heading to the pumpkin patch on the left with his blanket.  That little detail was my daughter's idea. 


So this project really took on a life of it's own.  I worked here and there on all the little details over the course of about a month transforming all the little houses, people, and animals into their own sweet Halloweentown.  I added lots of pumpkins, candles, ghosts, lights, and signs throughout the scene to make the transformation complete.  Here is a look at the final finished painting. 


And here is a final look at how it all started. 


This was such a fun project and I would absolutely recommend.  But if you are a little hesitant to give it a go, I would definitely say don't start out as ambitious as I did.  Maybe working a few ghosts into a landscape is probably the better place to start.  And this trend doesn't have to just start and end with Halloween.  It might be fun to do something similar for other holidays or seasons.  In any case, next time you pass your local thrift store, I hope you will take a peek at the thrifted art and see what calls to you.  

Thursday, September 26, 2024

Taking Halloween Photos with Jack-o-Lantern Smoke Bombs

Smoke bombs have been around for a while.  They are commonly used for gender reveal parties and photographers use them for all sorts of fun effects.  But have you ever considered using one inside a carved jack-o-lantern for the perfect Halloween photo?  Well, the Harris Sisters recently did just that and have all the info you might need to recreate these magical photos for yourself at home.  Keep reading for all the details. 


Finding Smoke Bombs


Once you decide to give these smoke bomb photos a go, the first step is finding smoke bombs to purchase.  They are available online from a variety of vendors.  We purchased ours from Smoke Effect.  What I liked about their smoke bombs is that they come in a variety of sizes and colors.  And they are all activated with a simple pull-ring, meaning you don't have to light them.  The smallest smoke bombs burn for about 30 seconds, while the largest ones burn for about 90 seconds.  I purchased a few small ones to use as testers and then several 90 second smoke bombs to use in our actual photos.  The Smoke Effect has a smoke quiz you can take to tell you exactly what you will need to produce your desired effect, and they offer a 10 percent discount to new customers.  Just make sure you order your smoke bombs far enough in advance to account for shipping time.  Mine arrived quickly once they shipped. But since we are approaching Halloween time, now would be the time to purchase them if you are wanting to try your hand at smoke bomb jack-o-lantern photos. 


Prepping for Your Photos


For Jack-o-lantern smoke bombs photos, you will to first need to carve a pumpkin.  It needs to be a real pumpkin, not a foam one, since you will be putting the smoke bomb inside.  Whatever design you choose, make sure it has large openings that the smoke can escape from.  


You will absolutely need to take these photos outside.  Smoke bombs produce quite a bit of smoke, and some smell as well.  Since you will be taking these photos outside, you will want to check your weather conditions first.  Windy days would probably make taking these photos more difficult.  We chose a mostly sunny and fairly calm day to take these pics.  And we waited until the early evening so it wasn't quite so bright out- making the smoke the star of the show. 

What to Wear for a Jack-o-lantern Photo Shoot


The sky is the limit here.  If you have a Halloween costume ready to go, that would be a great place to start! Or if you want to be a little more subtle, you could opt to wear something in traditional Halloween colors or patterns.  From what I read before taking these photos, a few people mentioned being careful about what you chose to wear in case the colored smoke stained your clothing.  However, we didn't find that to be an issue.  Even still, I probably wouldn't wear my most prized possessions, just in case. 


Ready, Set, Shoot


Once you are all set and ready to start taking your photos, I would recommend that you have a few extra hands on deck.  We had one person hold the pumpkin with the lid off, while a second person activated the smoke bomb and sat it inside the pumpkin.  The first person quickly put the lid of the jack-o-lantern back in place (This step is essential, so the smoke is forced out of the carved openings on the front of the jack-o-lantern, and doesn't just escape through the top), and a third person started taking photos.  We used a couple 30 second smoke bombs to test this process and make sure we knew what we were doing before we started into taking our "real" photos.  Once we had the rhythm down, we used our first 90 second smoke bomb for our first set of actual photos. 

As soon as the smoke bomb is activated, things will happen quickly.  I would highly recommend that you set your camera to a high speed continuous shoot setting.  That way you can just click away and capture everything.  Ninety seconds is actually much longer than it sounds like.  You have more than a plenty time to get photos.  So don't worry if the smoke isn't cooperating the entire time.  Have the person holding the pumpkin gently move it around, and the smoke will move with it.  The photographer should be the one moving and let the subject mostly stay in one position. 


Other Helpful Tips


As a precaution, we kept water close at hand just in case we needed to douse our smoking pumpkin at any point.  We actually didn't need to, and we didn't think we would.  But it doesn't hurt to be careful.  These smoke bombs are a step or two up from sparklers.  They create a really dramatic effect but they are pretty harmless.   We did use a pair of tongs to take the used smoke bombs out of the pumpkin before inserting a new one. 

We used the same jack-o-lantern several times with several different smoke colors.  If you are doing the same, we would recommend that you start with your lightest color smoke first and move to darker smokes, until you end with your darkest.  The smoke bombs will stain the pumpkin, which actually creates a pretty cool effect itself.  But if you want to be able to see each color smoke properly, you would definitely want to start with your lightest.  


Overall, we were pleasantly surprised by how easy of a process this turned out to be.  And we ended up with some pretty cool pictures, and some pretty funny outtakes too.  If you decide to try this photo trend, please let us know.  We would love to see how your photos turn out too! 


Happy Halloween from The Harris Sisters 


Saturday, September 21, 2024

Mt. Airy, NC - Girls' Weekend 2024

The Harris Sisters have wrapped up another Girls' Weekend! Each year, we Harris Sisters spend a long weekend on a new location and spend lots of quality girl time together. We try to pick somewhere that we've never visited with each other before and then we always post a full write up with photos on the blog so that you guys can see if you'd like to visit there too. This year we set our sights on Mt. Airy, North Carolina and surrounding small towns in Virginia.  

While we were born and raised in North Carolina, none of us had ever visited Mount Airy before, and this trip presented the perfect opportunity! We've visited plenty of other locations in North Carolina for Girls' Weekend before (Asheville, Beaufort, Bryson City, and Boone), but we've never visited Virginia for a girls weekend getaway until this trip.


DAY 1 - Touring Mayberry R.F.D.

Day one of our itinerary was a tour of Mount Airy, NC, otherwise known as Mayberry to fans of the 1960s sitcom The Andy Griffith Show.

We started the day with a squad car tour in an early 1960's model Ford Galaxie squad car. We met our tour driver Mark wearing his blue service station shirt and his Buc-ee's cap, and we could tell from the start that we had gotten one of the best. 

While driving us around to all of the sites in the town, he told us the most fascinating details about how the town of Mount Airy was often mentioned in The Andy Griffith Show. He even ran the siren several times, did impersonations of some of the characters, and shared Andy Griffith's creative direction of the show.

It was a blast and we highly recommend this tour if you're in the area. The tour lasts about 30 minutes and ends with your tour guide taking photos of you in front of the squad car parked in front of Wally's Service Station.


After our squad car tour, we set off on foot to explore some of the highlights of Mt. Airy our tour guide had mentioned. 

First up is Wally's Service Station itself (where your tour starts and ends). This service station inspired Wally's Filling station, the only gas and automotive station in the fictional town of Mayberry.


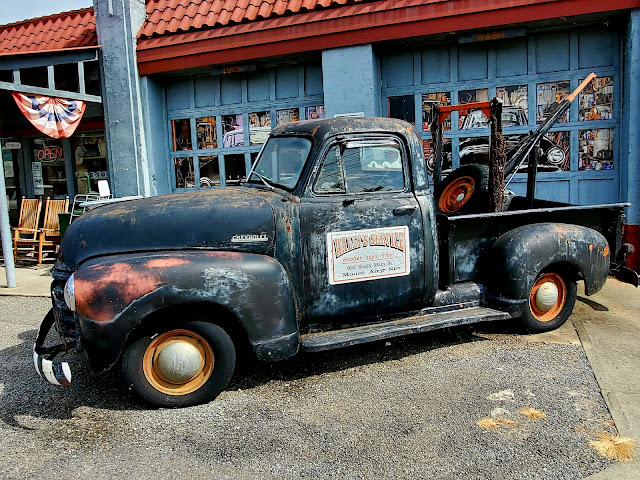
The Darlins truck is parked right next door to Wally's Service Station. This is a photo op not to be missed!


Next door are the Courthouse and the Jail. These are buildings built to look like the sets of the show. The actual sets were in California and burned down in a wildfire.

Fun fact: the clipboard on the desk is actually where you can sign in to say that you've visited, so make sure to leave your signature and date you visited. But bring your own pen or pencil with you because the pencils in the mug on the desk are unsharpened and for a photo-op only.

The keys to the jail cell are right on the wall and the cells are not locked, so you can let yourself into the jail cell for a photo (just like Otis)!

"I'm the sheriff around these here parts."

"Sarah, would you get me Aunt Bee?"


"I’m not as think as you drunk I am.”


Murals in Mayberry

There are lots of fun murals in Mount Airy. These first three colorful murals are located just outside of the Andy Griffith museum.

Hey from Mayberry Mural
218 Rockford Street
Artist: Madeline Matanick Art


Forever Mayberry Mural
218 Rockford Street
Artist: Madeline Matanick Art


Memories Made in Mayberry Mural
218 Rockford Street
Artist: Madeline Matanick Art


Five Faces of Andy Mural
212 Moore Avenue
Artist: Jeks


Coca-Cola Ghost Sign
Main Street


Andy Griffith Museum

Not to be missed while visiting Mount Airy is the Andy Griffith Museum. This houses the remaining set props, scripts, and costumes from the show. Our tour driver explained that in the 1960s, these items were routinely destroyed because people didn't realize how shows would gain popularity and how these types of items would eventually become collectibles.

Nowadays, props, costumes, and set pieces are saved for this reason for all shows (even those that never even become popular) "just in case."

The Andy Griffith Museum is world’s largest collection of Andy Griffith memorabilia and houses items collected by his childhood friend, Emmett Forrest.

Outside of the museum stands a bronze TV Land statue called Goin' Fishin' of Andy and Opie in their famous opening credits pose. A second one of this same statue appears in the capital city of Raleigh, NC. The Harris Sisters visited another TV Land statue (Samantha from Bewitched) at our Girls' Weekend Trip to Salem, MA last year.


The artist really captured Andy Griffith's and a young Ron Howard's likenesses in this statue.


On to the artifacts in the museum! First up is Sheriff Andy Taylor's uniform and badge, donated to the museum by Andy Griffith himself.


The original Sheriff and Justice of the Peace door signs used on the exterior of the Mayberry Courthouse, also donated to the museum by Andy Griffith.


One of Don Knotts' signature suits.


The original chair, gavel, eagle, and telephone from the interior of the Mayberry Courthouse. The gavel block has been autographed by Andy Griffith.


Costumes from Goober, Otis, and Earnest T. Bass.


Keys to the Mayberry Jail.


Lots of memorabilia from other parts of Andy Griffith's life are also included in the museum. 


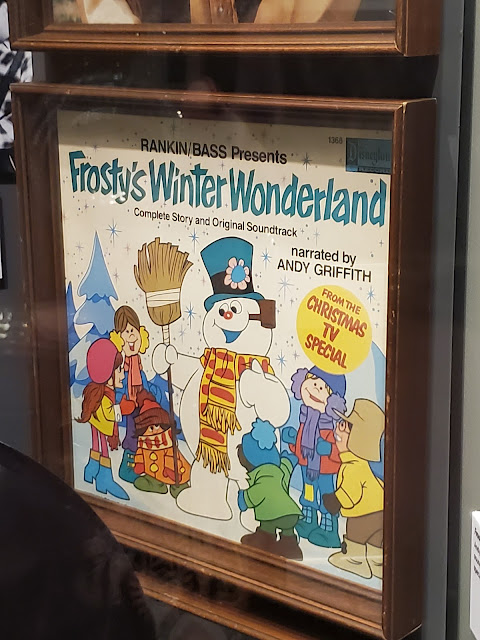
His many albums


We found this one particularly fascinating:


And of course, the museum ends with his Matlock days.


This is just a small sampling of everything the museum houses. While it is a small museum, it is a large collection of memorabilia for one person's career. And you get a free Mayberry Sheriff's badge sticker to wear while you're touring the museum, which makes a fun souvenir of your time in Mt. Airy. So if you're an Andy Griffith fan or a fan of The Andy Griffith Show, this museum a must-see.

Andy Griffith's Homeplace


After the museum, we drove over to Andy Griffith's Homeplace located at 711 E Haymore Street in Mt Airy. It is now operated as a bed and breakfast by Hampton Inn, if you would like to book a stay while you're in the area, but our tour guide warned us that you'd need to keep the blinds closed because it's such a popular tourist attraction that folks stop all hours of the day and night for a photo.


Shops in Downtown Mt. Airy


Before you wrap up your trip to Mt. Airy, make sure you visit some of the wonderful shops along Main Street. Plenty of places to grab a Mayberry souvenir if you're looking to take one home. One that caught our eye in particular was Opie's Candy Store, where you could buy old-fashioned candy by the pound.


DAY 2 - Shopping in Meadows of Dan, VA and Chateau Morrisette

For day two of our itinerary, we headed out to a small town called Meadows of Dan in Virginia. We visited quite a few of the shops there in the morning before heading over to Chateau Morrisette in Floyd, VA.

  • Concord Corner Store (lots of handcrafted items in a big store with a wrap-around porch)
  • Poppy’s (lots of yarn, knitted items, handmade jewelry, old books, and a shop cat!)
  • Poor Farmer’s Market (fresh produce, mums, handmade jams and jellies, and a Medicine Man fortune-teller machine like Zoltar)
  • Nancy’s Candy Company (fudge and old-fashioned candy)


Chateau Morrisette Winery


After the morning of exploring the shops in Meadows of Dan, we headed to Chateau Morrisette for lunch and a wine tasting. Chateau Morrisette is a pet-friendly winery, so that means that the owners' doggos can be found wandering the property and you can bring your dogs to visit too!

We had a wine tasting with Mr. Ray, who told us his birthday was the following Saturday, so he'll be 85 years young by this posting. He was a hoot! During our time with him, he regaled us with stories about his life, all the different jobs he's held at Chateau Morrisette (hint: every one except chef), his experiences ballroom dancing, how to keep cut flowers alive longer, and his recipes that he uses the wine with (hint: he uses the The Black Dog to make his spaghetti sauce and The Vidal Blanc to make his chicken and white bean chili). If you visit Chateau Morrisette Winery and do a tasting, make sure to look for Mr. Ray!


This is me petting up good boy Noble. He is one of the owners black labs and was just a sweetie!


DAY 3 - Visiting a Pumpkin Patch

For our last day, we planned to visit a pumpkin patch, and boy did we pick a good one. The one we visited is called The Farm in Dobson, NC. In addition to a full you-pick pumpkin patch, they also had a sunflower field, an apple orchard, a petting zoo, and lots of activities for kiddos if you decide to bring them along with you.

We found a pumpkin! What became of this pumpkin? See our cool pumpkin photos here!


And that's a wrap on our Girls' Weekend this year!


We spent the rest of our time this Girls' Weekend hanging out, relaxing, and planning exciting things for the blog. So stay tuned!

And if you have a chance to visit Mt. Airy, NC and the surrounding small towns, there are lots of things to do in the area for a fun weekend! And if you can only get away for one day, then you can easily condense this trip for just a day trip to Mt. Airy!

Make sure to check out our other Girls' Weekend posts for our photos, recommendations, and reviews on the other places we've visited in previous years.

You Might Also Be Interested In