Tuesday, April 30, 2013

(Fashion) History Repeats Itself

This isn't the first time I have regaled you all with my musings on how wonderfully ladylike I think Kate Middleton is and what a fine example I believe she sets, if for nothing more than her wonderful sense of style. I think we can mostly all agree on that.   By the way, it probably won't be the last time either.  I do tend to talk about many great and powerful women that I admire (can you say Dolly Parton?), and today's post actually features two of them. 

Kate Middleton was seen out and about last week at the National Portrait Gallery in London.  It is one of several charities she supports.  But the headline here (for me anyway) was the dress.  She wore a bespoke (custom made) dress by designer Emilia Wickstead, featuring textured crepe and a slight iridescent sheen.  It wasn't over the top by any means, but it was lovely and elegant, and the color was perfect on her.  She looks like such a lady.  


And she always makes me recall another ladylike fashion icon of the not-so-distant past, the one- the only, Jacqueline Kennedy Onassis. She was American royalty is there ever was.  Her pillbox hats and pearls were signature staples, and the world over was just in love with her, and her wonderful sense of style.  Now for the double whammy!  Jackie Kennedy buffs might also remember that she too once wore an eerily similar dress back in the early 1960s on an official tour of India. She is seen here in Life Magazine's photo sporting a nearly identical sleeveless baby blue froc, with her signature pearls and fabulous white gloves.  


Do you think Kate Middleton might have drawn her fashion inspiration from one of my all time fashion icons?  There's no way to tell, but one thing's for sure.  When a look is this clean and stunningly beautiful, it bears repeating.  Well done, ladies.  Good to know some things never go out of style. 

Monday, April 29, 2013

What Frankie Valli Doesn't Know About Laundry . . .

"Dawn, go away, I'm no good for you . . . "

Frankie, you might not be any good for Dawn, but you NEED Dawn if you want to save your laundry from dreaded grease stains (so don't push her away, hint, hint).


Now, I know you've seen on Pinterest that you can mix up some concoction of original Dawn, baking soda, and peroxide. Well, when I needed to clean a shirt recently, I didn't happen to have any peroxide on hand, I don't use original Dawn, and quite frankly, I was skeptical about what baking soda would do for a grease stain. So, I just gathered these materials - apple scented Dawn and a scrub brush.


Take a looky here at one of Aidyn's shirts - this is the before picture with a few grease stains on it. (I know I stay awake at night trying to figure out what in the world these kids are spilling all over their shirts, and I can't come up with anything.) For what it's worth, this had already been washed and dried so the stains are good and set in. Lucky me!


Squirt some Dawn (whatever type you have on hand) onto the stains. Don't be stingy!


Go all Tony Danza on it (and by that I mean to show it Who's the Boss) - I hope you're picking up that I'm telling you to scrub it with the scrub brush that you've gotten out here, people.


I usually let this sit while I do another load of laundry. For example, since this is a dark T-shirt. I let this sit while I did a load of lights. THEN, I washed this with the load of darks using regular detergent for the whole load. (If it matters to anyone, I use Kirkland brand Environmentally friendly scent-free detergent with Clorox 2 - so fancy!)

Looky at the finished product:


Now, I will tell you that I have done this before with other shirts and if the stains didn't come out completely, I just repeated the process. And the stain always comes out on the second try. (Just think of it as an opportunity to go Tony Danza AND Alyssa Milano on your stain.)

Anyhootle, give this a try the next time your kids or husband shows up with some unexplained greasy stain on an article of clothing. It works quite well!

Sunday, April 28, 2013

Ice Cream Floats

Well, I have to tell you, it has been ages since I have had an ice cream float. And, after a little research, I can tell you that this is just the generic name for them.

Apparently, the one that I tend to enjoy is called the Orange Float or Orange Whip.

Now, if you've never made a float before, you'll just need a few ingredients. These are so easy to make!


Ice Cream Float


Ice Cream (3 or 4 scoops - enough to fill to the top of a tall glass)
Soda of choice (enough to top off your glass after you've added the ice cream)


  1. Add the ingredients to a glass in the order given.
  2. If you want to be super fancy, add a pretty paper straw or a reusable swirly straw to your glass. (But that is totally optional.) Enjoy!

And the types of ice cream and soda that you mix together will determine the name of your final concoction.


Names of Different Types of Floats

  • Orange Float or Orange Whip: vanilla ice cream and orange soda
  • Root Beer Float: vanilla ice cream and root beer
  • Boston Cooler: vanilla ice cream and ginger ale
  • Purple Cow: vanilla ice cream and grape soda
  • Dr. Pepper Float: vanilla ice cream and Dr. Pepper (better known to us as the Ryan Barrett Walkush special)
  • Classic Coke Float: vanilla ice cream and Coca Cola


We recently tried the Classic Coke Floats on our Girls' Weekend trip to Helen, GA and they taste just like you would remember them!


There are other flavors out there, but these are probably the most popular. You can always choose to make your own unique flavor - the possibilities are endless!

The float was originally created in 1847 and quickly rose to popularity.

And if you ask me, it's still popular today. I mean you might not create them in your own home like this:


But maybe if you practice a lot over the summer . . . .


This post contains affiliate links.

Saturday, April 27, 2013

Go Big or Go Home

Today marks the day that I begin a new crochet project and it takes a little prep on the front end.  Behold:


I plan on crocheting a rag rug for our guest room and to do that you have to start by making rag yarn. Now, if I had started by showing you this photo:

 
You might have thought one of several things:
  1. Donna Walkush is breaking out of the Big House, the Hooscow, the Pokey, the Clink!
  2. Donna Walkush is mummifying someone. (Note: if you are a long-time blog follower, you would KNOW that we already did that for Halloween 2010 - it was yours truly!)
  3. I feel an uncanny urge to break out a rousing rendition of "On Top of Spaghetti." 
So, let's start at the very beginning.

How to Make Rag Yarn (Yarn from Fabric)
Fabric
Fabric Scissors
Ruler, yardstick, tape measure, or measuring tape
pencil


Lay the fabric out on a large surface. (I chose our basement floor so that I'd have plenty of room.) Place your measuring device along the short end of the fabric.


Use the pencil to mark fabric every 1 1/2 inches. (If you are not as particular as I am, you can skip the measuring device and just fly by the seat of your pants here. However, having grown up with a father who was an avid fisherman, I find that my best guess at 1 1/2 inches isn't really anywhere near that and the strips don't end up a uniform width, which is important.)


Make short cuts on the marks.


Now this is important. If you do nothing else, try to do this. Find a cute four year old and convince him that tearing fabric is fun. Boy! I crack myself up. Realistically, said four year old will tear three fabric strips and you will tear the other 87,000, but it never hurts to ask for help. :-)


Once you have a pile of fabric strips, you will need to join them in order to crochet with them. The first step is to overlap the ends of two strips by a few inches. I have shown two photos here. Photo 1 shows the two strips lined up next to each other and how much they should overlap. Photo 2 shows them overlapped.


You will then take both pieces of the overlapped section and fold them in half so that the overlapped ends are even with each other. This will form a "sandwich" of four layers of fabric.


Take your scissors and cut a small slit in the middle of the fold formed on the edge of the "sandwich."


Open the sandwiched fabric back up to your starting position and pull the other end of the top strip through the hole you just created in both layers. Make sure to bring this end of the strip through the hole from underneath as shown in the picture.


While holding both layers in one hand, use the other hand to pull the other end of the strip all the way through the hole until a knot is formed.


Continue joining strips and roll into a ball of rag yarn. With this method, you can also join as you go, which will enable you to change colors in your project rather easily.

Thursday, April 25, 2013

Throwback Thursday

My, my, my...  It sure is fun to walk down memory lane sometimes.  And sometimes it's even nicer to come right on back to reality!  My husband and I have been dutiful this year in our spring cleaning, and among the things I uncovered were my old high school yearbooks.  

So I give you Exhibit A in today's edition of Throwback Thursday.  Both Donna and I appear in this picture. We competed in the Roxboro Junior Miss pageant back in 1994, and here is the group shot of all the lovely contestants.  Donna is pictured on the far right of the front row, and I am on the far right in the middle row.  


Funny thing about this picture...   We actually wore the hideous fluffy white dresses in this photo in the pageant as well.  They were extremely hot and difficult to get on and off.  I am pretty sure they also featured a large unsightly bow on the butt.  I cannot confirm that now, as I have thankfully parted ways with this dress many moons ago.  Anyway, I ended up ripping my dress in one of many dress rehearsals, which is why I was asked to sit on the couch for this photo (so the damage to my dress couldn't be seen).  The other two also pictured on the couch with me had similar issues with their dresses.  So we united in our common loathe for these monstrosities, even as we smiled like there was no tomorrow.

Ahhh, memory lane.  Ain't it grand?

Wednesday, April 24, 2013

One Man's Trash... Silverware

You know what they say about one man's trash?  Well, it's true.  There are treasures to be found.  And, I am fortunate enough to have a husband who inherited a nose for a good deal, the ability to haggle, and the good judgement to know what's worth haggling over (and what's better off left on the table).  We have great fun together sniffing out deals.  And we find them all over- yard sales (he calls them rummage sales), flea markets, antique stores, and thrift markets.   And add to that a ton of additional finds that my father-in-law scopes out for us.  (That's where my husband gets it from.)  We have put together quite the collection of "treasures" over our years together. 

So I thought it might be fun to share with you all some of our latest and greatest finds in this new thread I will be calling "One Man's Trash".  So whenever you see that in the title of a post, just know that's what it's about.  

Today, I will start us off with a box of ratty old silverware we picked up at a yard sale a couple of weekends ago.  The box was marked $10, and I believe my hubby talked her into $5 for the whole lot.  You can see here that this silver is pretty tarnished and in need of some polishing.  No worries.  I can work on that.  I really do like the pattern on this silver.  I did some checking and found that this pattern is just silver-plated, so it's not worth a ton of money, but it will clean up nicely and I will tuck it away for a rainy day. 


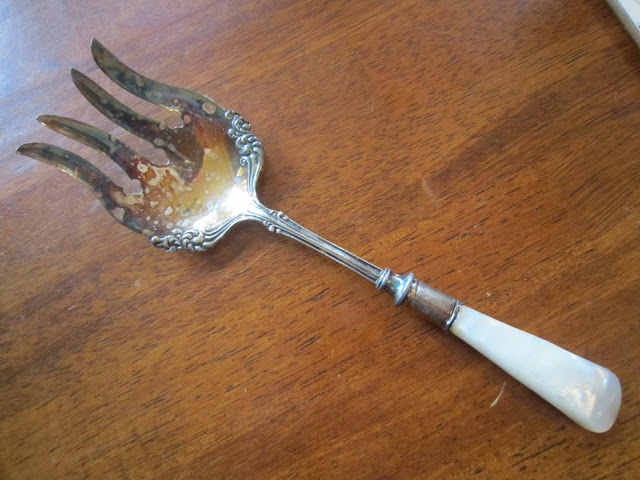
But there's more to this story.  Mixed into my $5 box of silverware was this big beautiful serving piece.  I noticed it didn't match the pattern of the rest of the pieces, so I picked it up and starting looking at it more closely.  It is clearly marked "Sterling" on the back side of the handle.  I may not know much about these things, but I do know that is quite different from silver-plated pieces.  So I did a little research on this piece, and it turns out that this one is actually solid sterling silver.  And at today's market rate for silver, it would be valued between $50 - $60 if we wanted to sell it just for the metal.  WOW!!!  


Now, we aren't planning to sell it.  In fact, I rather like it and I love that the value of this one piece alone could pay for the rest of the set 10 times over.  Now that's a deal worth making.  I would say this one definitely turned into quite the treasure. 

Sunday, April 21, 2013

Black Bean Salsa

Now that Summer is right around the corner and fresh vegetables will be out in full force, add this recipe to your repertoire. You'll be glad you did. It is so quick and easy, that is if you make sure to invite your friend Li'l Cuisey (your Cuisinart) to help you make it.


Black Bean Salsa
1 medium red bell pepper, finely chopped
1 medium red onion, finely chopped
1 medium cucumber, seeds removed and finely chopped
1 large tomato, diced
2 ribs celery, finely chopped*
1 large jalapeno pepper, finely chopped*
6 cloves garlic, minced
1, 15 oz. can corn, drained and rinsed
2, 15 oz. cans black beans, drained and rinsed
1 Tbsp dried cilantro
1 tsp dried thyme
1 tsp salt
1 tsp ground cumin
1 tsp chili powder
1/2 tsp black pepper
2 Tbsp olive oil
2 Tbsp balsamic vinegar
2 Tbsp lime juice
  1. Combine all ingredients in a large mixing bowl. Mix well.
  2. Cover and chill 2 hours. Store in refrigerator. Yield 9 cups.
Notes:
Because I exclusively use the Cuisinart food processor to make this recipe, it comes together in no time. I whirl one vegetable after another and dump them into the mixing bowl as they are diced.
Because the one jalapeno pepper is not large enough to process effectively in the Cuisinart, I always process with the two celery ribs.

This recipe makes for a "juicy" salsa (which consists of the juices from the vegetables plus the added oil, vinegar, and lime juice). It will be your preference whether you choose to serve the juice part with the salsa, but make sure to let the salsa sit in the juices so that the flavors meld.

The recipe makes approximately 9 cups of salsa, which is a lot. So, this is always a great recipe for a crowd (or you might just be surprised at how quickly your family can eat this up).

This post contains affiliate links.

Saturday, April 20, 2013

Doctored Cake Mix Cake with Buttercream Frosting

Ladies, do you ever have one of those days where your husband takes your four-year-old to the grocery store to get pineapple and comes home with . . . boxed cake mix? Dun, dun, dun (insert dramatic music here).

No? Well, then clearly this recipe is not for you. But, if you should find yourself in such a situation, then read on. This recipe will make any boxed cake mix taste better. It comes from a cookbook that I received as a wedding gift many moons ago: The Cake Mix Doctor. And surprisingly, just following these simple steps can make a world of difference in how a boxed cake mix tastes.


Doctored Cake Mix Cake
1 package cake mix
1 cup milk
1 stick butter, melted
3 large eggs
2 tsp vanilla extract
Buttercream frosting (recipe follows)

  1. Place a rack in the center of the oven and preheat the oven to 350 degrees. Grease and flour two 9 inch round cake pans. Set aside.
  2. Place the cake mix, milk, melted butter, eggs, and vanilla in a large mixing bowl. Blend with an electric mixer on low speed for 1 minute until ingredients are incorporated. Increase the mixer speed to medium and beat 2 minutes more. The batter should look well blended.
  3. Divide the batter between the prepared pans, smoothing it out with a rubber spatula.
  4. Place the pans in the oven side by side. Bake the cakes until they are golden brown and spring back when lightly pressed with your finger, 27 to 29 minutes.
  5. Remove pans from the oven and place them on wire racks to cool for 10 minutes. Run a dinner knife around the edges of the pans and invert onto the racks. Allow them to cool completely, about 30 minutes.
  6. Meanwhile prepare the frosting (recipe follows).
  7. Frost cakes after they have cooled completely.
Buttercream Frosting
1 stick butter, at room temperature
3 3/4 cups confectioners sugar
3 to 4 Tbsp milk
2 tsp vanilla extract

  1. Place the butter in a large mixing bowl. Blend with an electric mixer on low speed until fluffy, about 30 seconds.
  2. Add the confectioners sugar, 3 Tbsp milk, and vanilla. Blend with the mixer on low speed until the sugar is incorporated, 1 minute. Increase the speed to medium and beat until light and fluffy, 1 minute more. Blend in up to 1 additional Tbsp milk if frosting seems too stiff.
  3. Use to frost the top and sides of the cake of your choice.

Notes: 
This recipe makes batter that is more the consistency of a mousse, which may seem unusual, but your cake will still turn out perfectly.

This version of a "doctored cake" is for white, yellow, and (as pictured above) confetti cakes. There are other versions floating around for how best to fancy up chocolate cake mix, carrot cake mix, etc.

Friday, April 19, 2013

Peanut Dressing

Remember when we learned how to make Italian Dressing Mix? Why, yes, you use that to make Italian dressing, right???

Well, sure, if you want to throw together a quick dressing. BUT! If you want to be super fancy (as I am often known to do), you can make THIS dressing instead. It is delicious, and tastes just as good on a salad as on steamed vegetables.


Peanut Dressing
2/3 cup olive oil
1/4 cup balsamic vinegar
2 Tbsp water
1/4 cup soy sauce
2/3 cup Thai peanut sauce
1 tsp ginger
1 Tbsp granulated sugar
  1. Combine ingredients in airtight container and shake to combine. Store in refrigerator.
  2. Dressing will thicken and separate in refrigerator. Before using, remove from refrigerator and let come to room temperature before shaking again to combine.
Note: If you did not make your own Italian Dressing Mix, you may substitute a packet of Italian dressing mix from the store.

Thursday, April 18, 2013

Three Little Birds, Pitch By My Doorstep

Or at least we hope they will.

As part of our recent exterior beautification project (ahem, yardwork), we decided that since Jaxon is in LOVE with birds of all sorts, we'd best provide some sort of shelter for them to woo them to hang out at Casa Walkush.

So, we got to work putting up some bird houses. This one is the extra schmancy birdie mansion with room for not one but TWO nests:


And these two colorful beauties hang in the tree next to the birdie mansion:


What bird could resist living in a tree that blooms this beautifully? (Hopefully not too many of them for Jaxon's sake.)


To up the ante, I decided to put together this quick little DIY project that I saw on Pinterest. The previous homeowners left us with a suet feeder (which this vegetarian thinks is gross), so I gathered up all of my yarn scraps from my many crochet projects, stuffed them into the suet feeder, and fashioned a hook from a clothes hanger to hang it from the tree. 

The birds can have easy access to use the scraps to build their nests. You can see that they've already depleted some of the stash. Crocheters and knitters take heed: this is stash busting at its finest!


So, our little birdie oasis is complete.

♪♫•*¨*•.¸¸♥ ¸¸.•*¨*•♫♪
"Don't worry about a thing,
'Cause every little thing gonna be all right.
Singin': "Don't worry about a thing,
'Cause every little thing gonna be all right!"

Rise up this mornin',
Smiled with the risin' sun,
Three little birds
Pitch by my doorstep
Singin' sweet songs
Of melodies pure and true,
Sayin', ("This is my message to you-ou-ou:")

Singin': "Don't worry 'bout a thing,
'Cause every little thing gonna be all right."
Singin': "Don't worry (don't worry) 'bout a thing,
'Cause every little thing gonna be all right!"

Rise up this mornin',
Smiled with the risin' sun,
Three little birds
Pitch by my doorstep
Singin' sweet songs
Of melodies pure and true,
Sayin', "This is my message to you-ou-ou:"

Singin': "Don't worry about a thing, worry about a thing, oh!
Every little thing gonna be all right. Don't worry!"
Singin': "Don't worry about a thing" - I won't worry!
"'Cause every little thing gonna be all right."

Singin': "Don't worry about a thing,
'Cause every little thing gonna be all right" - I won't worry!
Singin': "Don't worry about a thing,
'Cause every little thing gonna be all right."
Singin': "Don't worry about a thing, oh no!
'Cause every little thing gonna be all right!
♪♫•*¨*•.¸¸♥ ¸¸.•*¨*•♫♪

Wednesday, April 17, 2013

Martha Stewart's Strawberry Preserves Recipe

It's finally strawberry season.  YAY!!  And if you are a strawberry lover like I am, then I don't think you will find an easier strawberry preserves recipe than this one.  It only calls for 3 ingredients, and 2 simple steps.  Can't get much easier than that.  Thank you, Martha Stewart.  I may even be able to pull this one off!


Ingredients

  • 2 pounds strawberries, hulled
  • 1 tablespoon plus 1/2 teaspoon, freshly squeezed lemon juice
  • 1 cup sugar

Directions

  1. Put strawberries and lemon juice in a large saucepan. Cook, stirring occasionally, over low heat until juices are released, about 40 minutes. Stir in sugar.
  2. Bring to a boil over medium heat. Cook, stirring occasionally, until mixture registers 210 degrees.on a candy thermometer, about 15 minutes. Let cool completely; skim foam from surface with a spoon. Preserves can be refrigerated in an airtight container, up to 2 months.


    Yield: 2 1/2 cups

    Recipe courtesy of www.MarthaStewart.com.  

Tuesday, April 16, 2013

Homemade Vitamin Water- Easy Recipes to Keep you Hydrated

When I saw this on Facebook today, I knew I had to share it with you all.   I am a big fan of water; I drink it all day every day, to the exclusion of almost any other type of drink (except for coffee- gotta have one vice). But my husband, like so many others, really doesn't care for water.  So whenever I see a neat new way to *disguise* water, I'm on it.   These look pretty yummy to me, and most look pretty simple.  


Here are 8 homemade vitamin water recipes to help you keep the water flowing!


1) The classic : Lemon/Cucumber:
Mix in a pitcher: 10 cups of water + 1 cucumber and a lemon, thinly sliced + 1/4 cup fresh finely chopped basil leaf + 1/3 of finely chopped fresh mint leaves. Leave in the refrigerator overnight before serving.

2) The granite : Strawberry/Lime or Raspberry/Lime
Mix in a pitcher : 10 cups of water + 6 strawberries or raspberries and one thinly sliced lime + 12 finely chopped fresh mint leaves. Leave in the refrigerator overnight before serving.

3) The digestive : Fennel/Citrus
First: infuse 1 to 3 grams of dried and crushed fennel in 150 ml of boiling water for 5-10 minutes. Allow to cool.  Mix in a pitcher: 10 cups of water + lemon juice (put the leftover lemon in the mix) + a small thinly sliced orange + 12 fresh chopped mint leaves + the infusion of fennel seeds. Leave in refrigerator overnight before serving.

4) The antiOX : Blackberry/Sage
Note that apart from berries, sage leaves have the highest antioxidant content.  Mix in a pitcher : 10 cups of water + 1 cup of blackberries that have been very slightly crushed + 3-4 sage leaves. Leave in refrigerator overnight before serving.

5) WATERmelon : Watermelon/Rosemary
Mix in a pitcher : 10 cups of water + 1 cup of watermelon cut into cubes + 2 rosemary stems. Leave in refrigerator overnight before serving.

6) The exotic : Pineapple/Mint
Mix in a pitcher : 10 cups of water + 1 cup of pineapple cut into cubes + 12 fresh mint leaves finely chopped. Leave in the refrigerator overnight before serving.

7) The traditional : Apple/Cinnamon
Mix in a pitcher : 10 cups of water + 1 cup of apple cut into cubes + 2 cinnamon sticks + 2 teaspoon of ground cinnamon. Leave in the refrigerator overnight before serving.

8) The zingibir : Ginger/Tea
In advance: heat 1 teaspoon of ginger in two cups of tea, let it cool down.  Mix in a pitcher: 10 cups of water with two cups of the ginger tea + 4-5 pieces of fresh ginger cut into cubes. Leave in the refrigerator overnight before serving.

STAY HYDRATED! ENJOY!

Monday, April 15, 2013

Mary, Mary, Quite Contrary...

How does your garden grow?  Well, ours is off to quite a good start, if you must know.  We've worked on it for the past two weekends straight, and I must say it's looking pretty darn good.  

Here's the mini-tour, starting with this pot of petunias.  No, these aren't those new-fangled wave petunias that everyone seems to be planting nowadays.  These are the good old-fashioned ones.  I mixed up a bunch of different colored ones and stuck them right in this pot.  In the background, you will see my chives and oregano (both originally planted years ago).  Who knew this stuff would come back year after year.  That was the best investment in herbs I've ever made.  Here's hoping I will never have to plant them again!


Speaking of plants magically returning after a long hard winter, look what else came back!!!  These are my $1 shamrocks I got on a deep discount after St. Patty's Day last year.  I was kicking myself for not bringing them in over the winter, and then I looked in their basket a couple of days ago, only to find quite a few clovers popping up.  Talk about the luck of the Irish!


I spent a lot of time on this particular bed last weekend.  I planted dahlias, marigolds, dianthus, and bacopa.  The bacopa are the white flowering plants up front.  They stay low but get really long and leggy, so I'm hoping they spill over the side of the rock wall they are planted on. 


I filled this big pot to the rim with lots of flowers, more bacopa to spill over the sides, and a spike in the middle to finish it off. 


And these are my favorites!  We have had amazing luck with gerber daisies over the years.  They must really like our hot summery climate and backyard full of all day sun.  


At the Nashville Farmer's Market last weekend, we learned that planting marigolds by your tomatoes helps to keep the bugs off.   And last year, one of the farmers told us that adding epsom salt to the soil at the base of your tomato plant helps it to produce more fruit.  Done and done. 


John added some nice new stepping stones and tree stumps to sweet Petunia's bunny mansion.  This will come in handy for me on days where it is muddy or wet outside.  And our pup, Izzie, has already been making use of those stumps to get a little closer to my sweet bunny. 


There has been so much more work done in this yard these past couple of weeks, I can't even describe it all.  But suffice it to say, our yard is ready for the Spring.  And we are too pooped to party after two straight weekends of some major yard work.  

Lest you think we are all work and no play, I leave you with this.  At least someone around here knows how to have a good time!


Sunday, April 14, 2013

Have a Coke and Some Style

When you're out thrifting, don't pass over any vintage soda bottles that you might see. You know that they are at nearly every place you frequent, and you probably pass them over every time in favor of searching for the thing that you're REALLY looking for. BUT look what you can do with them:


THIS is what I do with mine. I line these beauties up like little soldiers on my kitchen windowsill all year. The sun shines through them and they are beautiful in their own right. They remind me of times gone by when people used to sit on their porches and drink RC Colas and eat Moon Pies. (Note to Self: Secure an RC Cola bottle for windowsill.)

When Spring rolls around, they provide the perfect opportunity to root cuttings and hold a flower or two. The bottle on the end is currently holding a philodendron cutting and the one in the middle is serving as a vase for a Gerbera daisy.

This is just a photo of what my window looks like today, but imagine these beauties with a Gerber in each one. So bring a little retro flair into your kitchen with this idea. You'll be glad you did.

Saturday, April 13, 2013

Time for some Feel-good Weekend's Here Kind of Music

I don't know about you, but I love listening to beachy, summery tunes now that the weather is starting to warm up.  And so this is my latest favorite tune for some weekend relaxing.  It's called "Jump Right In" by the Zac Brown Band.  

There isn't an official video for this song, but take a listen and see if you don't agree that this song takes you away to somewhere tropical, warm, and fun. 


What's your go-to music for the weekend?  

The Adventures of SuperPEZ

Behold this hilarious vintage PEZ ad in all its glory:


Now, I know you must be thinking "Child, please, I can't read whatever language this ad uses." Fear not, loyal readers, it would be MY PLEASURE to translate this for you. Methinks it must say something like this:
  • If your breath is so bangin' that it can single-handedly take down a giant crocodile/lizard monster and clearly strangle him and make his eyes turn red, then you need Super Mint PEZ!
  • Additionally, if your breath is indeed as bad as described above, you have absolutely no need for a schmancy PEZ dispenser - PLEASE do everyone a favor and eat the Super Mint PEZ directly out of the pack. (I mean, the crocodile/lizard monsters' lives are at stake! They're dropping like flies, man!)
  • Side effects of Super Mint PEZ may include gallivanting around in orange underwears . . . .

You Might Also Be Interested In