Showing posts with label cakes. Show all posts

Wednesday, April 10, 2024

Pig Pickin' (Mandarin Orange) Cake

You might have seen this Pig Pickin' Cake called everything from Mandarin Orange Cake to Pineapple Mandarin Sunshine Cake to Pineapple Sunset Cake. This light and fluffy cake is easier than ever to make because it starts with a box cake mix. It has mandarin oranges beaten into the batter and pineapple is mixed into in the Cool Whip frosting.

Perfect for picnics, summertime potlucks, and BBQs, this old-fashioned cake originally got one its name from how popular it was to bring it along to Southern pig pickins. And, of course, North Carolina (the Harris Sisters' home state) is where this cake seems to have originated.


Pig Pickin (Mandarin Orange) Cake

Cake
1 box of yellow cake mix (plus ingredients the box mix calls for)
11 oz can mandarin oranges (drained)

Frosting
20 oz can crushed pineapple (drained)
3.4 oz box of instant vanilla pudding
12 oz Cool Whip

Garnish
marischino cherries (optional)
Mandarin oranges (optional)

  1. Preheat oven to 350 degrees. Spray a 9 x 13 baking dish with cooking spray. Set aside.
  2. Prepare cake mix according to package directions.
  3. Beat in the drained oranges until blended.
  4. Pour into greased 9 x 13 baking dish.
  5. Bake for 30-35 minutes or until a toothpick inserted near the center comes out clean. Remove dish from the oven and place on a wire rack to cool. Allow to cool completely.
  6. Once cake has cooled, prepare the frosting. In a bowl, combine the drained pineapple and dry vanilla pudding mix.
  7. Fold Cool Whip into the pineapple-pudding mixture.
  8. Spread the frosting over the top of the cake.
  9. If desired, garnish with additional Mandarin oranges and maraschino cherries just prior to serving.
  10. Store this cake in the refrigerator.


Notes


If you want larger pieces of oranges in the cake, gently mix or fold them into the batter in step 3.

You can also make this recipe as a layer cake in two 8 inch cake pans, baking for 23-27 minutes or until a toothpick comes out clean.

Keep the cake refrigerated until ready to serve. The cake can be out for about an hour, without direct heat. Refrigerate any leftovers. Cake is best 3-4 days after baking.

Thursday, December 7, 2023

Holiday Peppermint Cake

If you're looking for a new dessert to try this Christmas, look no further! This classic scratch-made white cake is infused with peppermint, topped with creamy peppermint buttercream frosting, and decorated with crushed candy canes.

This festive Christmas candy cane cake is perfect for the holidays! Why? Because Santa's favorite candy is peppermint! Just ask Louis Armstrong: 

"And you gonna flip when Old Saint Nick takes a lick on the peppermint stick." (from Cool Yule)


Holiday Peppermint Cake

Cake Ingredients

3/4 cup unsalted butter, room temperature

1 1/2 cups sugar

3/4 cup sour cream, room temperature

1 tsp vanilla extract

1 Tbsp peppermint extract

6 large egg whites, room temperature

2 1/2 cups all purpose flour

4 tsp baking powder

½ tsp salt

3/4 cup milk, room temperature

1/4 cup water, room temperature

Peppermint Buttercream Ingredients

2 cups unsalted butter, softened

5-8 cups powdered sugar

4 tsp vanilla extract

¼-½ tsp peppermint extract

1 tsp salt

2-4 Tbsp heavy whipping cream (optional)

Garnish

broken candy canes 

To Make the Cake

  1. Prepare three 8 inch cake pans with parchment paper circles in the bottom and grease the sides. Preheat oven to 350°F.
  2. In a large mixing bowl, cream butter and sugar together until light in color and fluffy, about 3-4 minutes. 
  3. Add sour cream, vanilla, and peppermint extract and mix until well combined.
  4. Add egg whites in two batches, mixing until well combined after each. Scrape down the sides of the bowl as needed to be sure all ingredients are well incorporated.
  5. Combine dry ingredients in a separate bowl, then combine the milk and water in a small measuring cup.
  6. Add half of the dry ingredients to the batter and mix until well combined. Add the milk mixture and mix until well combined. Add remaining dry ingredients and mix until well combined. Scrape down the sides of the bowl as needed to be sure all ingredients are well incorporated.
  7. Divide the batter evenly between the cakes pans and bake for about 21-23 minutes, or until a toothpick comes out with a few crumbs.
  8. Remove the cakes from the oven and allow to cool for about 2-3 minutes, then remove to cooling racks to cool completely.

To Make the Frosting

  1. Add butter to a large mixing bowl. Beat butter on high for 1-2 minutes, scraping down sides and bottom of bowl with a rubber spatula.
  2. Add powdered sugar one cup at a time, starting mixer on low speed. Slowly increase speed to high, mixing until smooth after each addition (about 30 seconds or so for each cup). Scrape down bowl every 2-3 cups. If mixture looks grainy, add a small splash of cream when you scrape the bowl.
  3. After adding 5 cups powdered sugar, add vanilla, ¼ teaspoon peppermint, and salt and mix until fully combined. Taste, adding more peppermint if needed. (Do so cautiously, as the flavor intensifies with time, especially in the refrigerator.) Depending on your brand of peppermint, you may need to use more than ½ teaspoon.
  4. Taste your frosting and keep adding sugar, this time ½ cup or less at a time, until it reaches your desired thickness. Add cream as needed, in small splashes, to smooth out the frosting. 
  5. Once you’re happy with the taste and thickness, scrape down the bowl again then beat on high for 3-5 minutes.
  6. Once the frosting is light and fluffy and fully blended, use a rubber spatula or wooden sppon to stir vigorously by hand for about a minute, or until you no longer see any air pockets as you stir.

To Assemble the Cake

  1. Once cakes have completely cooled, use the frosting to generously frost in between layers, the sides, and the top. 
  2. Sprinkle frosted cake with chopped candy canes before serving. (Candy canes can sometimes soften when exposed to moisture, so make sure to add them close to the time you are serving the cake.)


This Peppermint Buttercream Frosting Also Pairs Well with These Recipes

Some of these recipes will help you either make this cake faster (they're doctored recipes) OR will change your final cake with a different flavor. Give these recipes a try with the Peppermint Buttercream Frosting and crushed candy canes for a whole new Christmas dessert!


Sunday, February 5, 2023

Cheerwine Pound Cake

The star of this pink pound cake recipe is Cheerwine soda -  or more specifically "The South's unique cherry soft drink." While not everyone may be familiar with this soda, if you're from the South, you probably know all about the distinct cherry flavor of Cheerwine.

This cake capitalizes on that cherry flavor and adds in a complementary almond flavor to make a one-of-a-kind bundt cake. 

And it's pink, which makes it perfect for sharing with your Sweetie for Valentine's Day! Serve it up with some maraschino cherries and a side of Cheerwine and you've got a sweet date.


Cheerwine Pound Cake

1 1/2 cups butter softened (3 sticks)

3 cups sugar

5 large eggs

3 cups all purpose flour

1 cup Cheerwine

1/4 teaspoon salt

1/2 teaspoon vanilla extract

1/4 teaspoon almond extract

20 drops red food coloring

maraschino cherries to garnish


  1. Lower the middle oven rack to the next to lowest position (or raise the top oven rack to the next highest position). This will allow enough room for the cake to rise without hitting the rack above it. Preheat oven to 350 degrees. 
  2. In a large mixing bowl, cream together butter and sugar. Cream until mixture is light and fluffy.
  3. Add eggs to the mixture one at a time and beat well.
  4. Alternate adding flour and Cheerwine, and mix until incorporated.
  5. With mixer on low speed, add salt, extracts, and food coloring.
  6. Thoroughly grease a bundt pan and add batter to pan.
  7. Bake approximately 1 hour 10 minutes or until toothpick inserted into the center of the cake comes out clean.
  8. Allow to cool in the pan for about 10 minutes before flipping out onto wire rack. Glaze with Simple Vanilla Glaze, if desired (recipe follows).

Simple Vanilla Glaze

1 cup confectioner's sugar, sifted
1-2 Tablespoons milk
1 teaspoon vanilla extract 

  1. Combine sugar with 1 Tablespoon of milk. Add additional milk if needed for desired thickness.
  2. Drizzle onto completely cooled cake by the spoonful.

Notes:

This recipe makes a very thick batter.

While the Cheerwine itself lends some of the coloring to the cake, most of the pink color comes from the food coloring that you'll add. If you'd like a deeper pink, add more food coloring.

If you can't find Cheerwine in your area, you can substitute another cherry flavored soda, such as Cherry Coke, Cherry Pepsi, or Cherry Dr. Pepper.

The flavor that comes through the most in this cake is the almond extract. If you're a big fan of the cherry flavor of Cheerwine, you might want to substitute cherry extract for the almond extract. You can also add cherry extract to the glaze instead of vanilla, if desired.

We opted to make the cake without a glaze, and it was delicious!

Other Soda-Flavored Cakes You Might Like:

If you're a fan of cherries, make sure to check out these other cherry recipes too!

Friday, September 23, 2022

Chocolate Peanut Butter Poke Cake

If you're looking for a rich and decadent dessert that's sure to please all the chocolate and peanut butter lovers in your life, then look no further. This easy-to-make sheet cake recipe ticks all those boxes!

With tastes similar to a candy bar, a small piece of this delicious cake will do the trick!


Chocolate Peanut Butter Poke Cake

Cake

Box of chocolate cake mix

3.9 oz. box of instant chocolate pudding

an extra egg if box mix only calls for 2 eggs

Peanut Butter Sauce

16 oz. jar of creamy peanut butter

2 tablespoons butter

2 tablespoons water

Frosting

4 cups powdered sugar

1 cup butter, softened

1 teaspoon vanilla

2 tablespoons or more of milk

Toppings

2 tablespoons chopped peanuts

2 tablespoons chocolate sauce


  1. Preheat oven according to package directions. Spray a 9 x 13 baking dish with cooking spray and set aside.
  2. Mix cake according to package directions, adding a total of 3 eggs and the chocolate pudding mix. Bake at the temperature specified on box. 
  3. Remove cake when a toothpick inserted into the center of the cake comes out clean. Cool on a cooling rack. 
  4. Poke evenly spaced holes in the cake with the end of a wooden spoon.
  5. In a small saucepan, heat peanut butter, butter, and water to make peanut butter sauce. Stir until the peanut butter is melted and drips easily off a spoon.
  6. Reserve 2 tablespoons of the peanut butter sauce and pour the remaining amount over the cake.
  7. Put in refrigerator to set. (about 20 minutes)
  8. Meanwhile make the frosting by mixing powdered sugar, butter, vanilla, and milk together. Add more milk, if needed to get a spreadable consistency.
  9. Remove cake from refrigerator and spread the frosting on top of the cake. 
  10. Decorate cake by drizzling with reserved peanut butter sauce and chocolate sauce. Then sprinkle chopped peanuts over top of cake.

If you're a fan of doctored cake recipes, make sure to give these a try:


Wednesday, August 11, 2021

Hot Fudge Cake

If you're a fan of chocolate cake, but you'd like to try something new, then I've got the recipe for you! This hot fudge cake is surprisingly simple to make at home. Similar to chocolate lava cakes that are a staple of restaurant dessert menus, this cake has a crispy outside and on ooey-gooey inside. It's best served warm with a scoop of vanilla ice cream on top. I PROMISE this recipe won't disappoint!


Hot Fudge Cake

1 cup all purpose flour

3/4 cup sugar

6 Tablespoons cocoa powder, divided

2 teaspoons baking powder

1/4 teaspoon salt

1/2 cup milk

2 Tablespoons canola oil

1 teaspoon vanilla extract

1 cup packed brown sugar

1-3/4 cups hot water

Vanilla ice cream to serve, optional


  1. Preheat oven to 350 degrees. 
  2. In a large bowl, whisk flour, sugar, 2 Tablespoons cocoa powder, baking powder, and salt. In another bowl, whisk milk, oil, and vanilla until blended. Add wet ingredients to dry ingredients and stir just until moistened. Transfer to an ungreased 9-inch square baking pan. 
  3. In a small bowl, mix brown sugar and remaining cocoa powder. Sprinkle mixture over batter. Pour hot water over top. (Do not stir.)
  4. Bake 35-40 minutes. 
  5. Serve warm. If desired, top with vanilla ice cream.

If chocolate cake is your absolute favorite, give these other Harris Sister recipes a look-see:

Wednesday, April 7, 2021

Lemon Velvet Cake

We recently made this cake for Easter lunch, and it did not disappoint. This old-fashioned recipe for a lemon velvet cake hits the spot with not only the lemon flavors in the cake but also a creamy lemon cream cheese frosting. I cannot begin to tell you how delicious this cake was.

If you're looking for a new springtime dessert recipe now that warm weather is upon us, give this made-from-scratch cake a try.


Lemon Velvet Cake with Lemon Cream Cheese Frosting

Lemon Velvet Cake

2½ cups all purpose flour

1 teaspoon baking soda

1 teaspoon baking powder

1 teaspoon salt

1¾ cups granulated sugar

3/4 cup vegetable oil

1/4 cup butter, softened

2 eggs

2 teaspoons pure vanilla extract

1 tablespoon pure lemon extract

1 heaping teaspoon lemon zest (from 1-2 lemons)

1 cup buttermilk

1/2 teaspoon white distilled vinegar

1/3 cup hot lemon water (hot water mixed with 2 tablespoons fresh lemon juice)

6 drops yellow food coloring

Lemon Cream Cheese Frosting

2, 8 oz. blocks of cream cheese, softened

8 tablespoons unsalted butter, softened

1 ½ teaspoons pure vanilla extract

1 ½ teaspoons pure lemon extract

1 ½ heaping teaspoons lemon zest (from 2 lemons)

5 cups powdered sugar

2 teaspoons lemon juice

5 drops yellow food coloring


Lemon Velvet Cake

  1. Preheat oven to 325 F. Thoroughly grease and flour two 9-inch cake pans. Set aside.
  2. In a large bowl, sift together flour, baking soda, baking powder, and salt. Set aside.
  3. In another large bowl, mix together sugar, oil, and shortening.
  4. Mix in eggs one at a time.
  5. Mix in vanilla extract, lemon extract, and lemon zest.
  6. Combine dry ingredients into wet ingredients, alternating with the buttermilk.
  7. Mix together the distilled vinegar and hot lemon water and mix into the batter.
  8. Mix in the food coloring until you reach your desired shade of yellow.
  9. Pour batter evenly into prepared pans and shake pans to release any trapped air bubbles.
  10. Bake for 25-35 minutes, checking it at the 25-minute mark and adjusting the time, if needed. (See note below about timing.)
  11. When moist crumbs cling to a toothpick inserted into the center of the cake, remove cake from oven. Let cakes rest in the pans until pans are cool enough to touch. The cakes will continue to cook in the pans as they cool.
  12. Once cooled, carefully remove cakes from pans and place on cooling racks to cool completely.

Lemon Cream Cheese Frosting

  1. In a large bowl, mix together cream cheese and butter.
  2. Mix in vanilla extract, lemon extract, and lemon zest.
  3. Mix in powdered sugar until creamy, adding lemon juice one teaspoon at a time to thin it out (if needed).
  4. Mix in food coloring.
  5. Place frosting in the refrigerator to allow it to firm up a bit before frosting the cake.
  6. Stir the frosting until it's creamy and spreadable. Frost the cake.
  7. Decorate the cake with additional lemon zest if desired.


Notes

The batter for this cake is thinner than many cake batters. This is because of the addition of the hot lemon water, which adds to the lemon flavor of the cake.

Don't overbake the cake. The key is to take the cake out of the oven when moist crumbs cling to a toothpick inserted into the center and allow it to finish baking as it cools down in the hot pan. This timing will vary depending on your oven, which is why it's best to check the cake at the 25-minute mark.

Wrap warm cakes in plastic wrap to seal in moisture. (This step is optional and is not specific to this cake!) The plastic wrap traps warmth and creates a moist and tender cake. When the cakes are warm but the pans are cool to the touch, wrap them in plastic wrap for a few hours as they continue to cool (or even overnight if you can't frost the cake right away).


If you're looking for other tried and true dessert recipes for spring, make sure to give these Harris Sisters' favorites a try:

Enjoy!

Thursday, December 5, 2019

Mississippi Mud Cake

'Tis the season for all things sweet and sugary! If visions of sugarplums are already dancing through your head, but you'd like a new old-fashioned recipe to try, we've got one you might not have thought about in a while!

This scratch made Mississippi Mud Cake recipe is easy to make and because it's made in a 9 x 13 pan, it's also great to bring to any upcoming holiday potlucks or get togethers that might be on your radar this time of year.


Mississippi Mud Cake


Cake

1 stick butter
1/2 cup cocoa powder
2 cups granulated sugar
4 eggs
1 1/2 cups all purpose flour
pinch of salt
1 1/2 cups chopped nuts
1 Tbsp vanilla

Frosting

1 7 oz. container Marshmallow Creme
1 lb. confectioner's sugar
1/3 cup cocoa powder
1/2 stick butter, at room temperature
1/4 cup milk, plus additional to create correct consistency, if needed


  1. Preheat oven to 350 degrees. Spray a 9 x 13 baking dish with cooking spray. Set aside.
  2. Melt 1 stick of butter and 1/2 cup of cocoa powder together. 
  3. Stir in 2 cups of sugar and eggs. Mix well.
  4. Add flour, salt, nuts, and vanilla. Mix until thoroughly incorporated.
  5. Spoon batter into baking dish and spread evenly. Bake for 35-40 minutes, until toothpick inserted into the center comes out clean. Remove from oven.
  6. Spoon Marshmallow Creme onto cake as soon as it comes out of oven. Let it sit on top of cake to warm, and then spread evenly across cake.
  7. Use an electric mixer to mix confectioner's sugar, 1/3 cup cocoa powder, 1/2 stick butter, and 1/4 cup milk. Beat until smooth. Add additional milk 1 Tbsp at a time, if needed, to bring frosting to a pourable consistency.
  8. Pour frosting evenly over top of marshmallow creme. Swirl with the tines of a fork to create a marble effect.
Notes:

This cake is super-sweet, so a small piece will probably do the trick.

Because this version of the cake uses Marshmallow Creme instead of traditional marshmallows, it's safe for your vegetarian friends to eat too since Marshmallow Creme doesn't contain gelatin. AND you'll get to skip the step of returning the cake to the oven to melt the marshmallows. Win-win!

I chose to use walnuts in this cake, but pecans would also taste great. Use whatever you have in your pantry!

Enjoy!


Wednesday, November 13, 2019

Earthquake Cake

We made this doctored cake a few months ago and I'm just now getting around to posting it for you guys. It was ooey-gooey delicious, and it just might be the easy cake recipe you're looking for with upcoming holiday potlucks around the corner!

With just 6 ingredients, it doesn't get any easier than this, and you don't even have to make a separate frosting for it. A second "batter" gets baked into the cake and it kind of frosts itself!


Earthquake Cake


1 cup sweetened flaked coconut
1 cup chopped pecans
1 box Devil's food cake mix
1 stick butter, softened
1 8 oz. package cream cheese, softened
1 lb. confectioner's sugar
1 cup chocolate chips (optional)


  1. Preheat oven to 350 degrees.
  2. Spray a 9 x 13 baking dish with cooking spray and sprinkle with coconut and pecans. Set aside. 
  3. Mix cake mix according to package directions and pour over coconut and pecans.
  4. Cream together butter, cream cheese, and confectioner's sugar. Spoon this mixture randomly over top of the cake mix.
  5. Sprinkle chocolate chips over top of the cream cheese mixture if you're using them.
  6. Bake for 45 minutes. Enjoy!

Notes:

Some versions of this recipe call for you to swirl the cream cheese layer with the cake batter layer before baking. I opted not to do this because, quite frankly, dropping the cream cheese mixture into the cake batter and leaving it is what causes the "earthquake" effect when it bakes. Swirling the two layers together would create more of a marble effect.

This cake is supposed to be a gooey cake, so testing for done-ness with a toothpick in the center of the cake will not work. It will be a little jiggly in the center when you remove it from the oven, but the sides will be done. Look at this yummy cake!


The original recipe called for German Chocolate cake mix, but I substituted Devil's food cake mix and it did not disappoint!

I opted not to add chocolate chips because the recipe already looked pretty decadent. I can only imagine that they send it right over the top!

Wednesday, July 10, 2019

Glazed Cherry Breakfast Cake

We recently gave this new homemade coffee cake recipe a try. With its pretty red and white color scheme, we thought it was a pretty one to make for Fourth of July (but it would also make a pretty cake for your Christmas breakfast table too). We were surprised at how easy it was to make and how delicious it was! Even though you make it from scratch, the recipe is really easy and takes no time at all to make. We ate it as a breakfast pastry, but you could serve it for dessert too.

And the best part about this breakfast cake? It has cherry filling as the middle layer, so it tastes EVEN BETTER a day or two after you make it! This one didn't stick around our home long at all!


Glazed Cherry Breakfast Cake

Cake

1 cup butter (room temperature)
1 cup granulated sugar
1 tsp vanilla
3 eggs
2 cups all purpose flour
1 tsp baking powder
1 Tbsp milk
1 can cherry pie filling

Glaze

1 cup confectioner's sugar
2 Tbsp milk
1/2 tsp vanilla


  1. Preheat oven to 350 degrees. Grease 9 x 13 pan and set aside.
  2. In a large mixing bowl, use a mixer on low speed to cream butter, sugar, and vanilla. 
  3. Add eggs one at a time, beating well after each addition.
  4. Sift together flour and baking powder and mix into to creamed mixture.
  5. Mix in milk.
  6. Spread 3/4 of mixture into greased pan. 
  7. Spoon cherry pie filling on top of mixture and spread evenly on top.
  8. Drop remaining mixture by spoonfuls on top of cherry pie filling.
  9. Bake for 50 minutes.
  10. Remove the pan from the oven and place it on a wire rack to cool completely.
  11. Meanwhile, prepare the glaze. Place the confectioner's sugar, milk, and vanilla in a small bowl and stir until smooth.
  12. Pour the glaze over the top of the hot cake in the pan, spreading it to the sides with a spoon.
Look how pretty it comes out!


Notes:

If you don't particularly like cherries or if you'd like to try a different flavor, this recipe is easy to change by simply choosing a different flavor of pie filling! Try blueberry, apple, raspberry, apricot, strawberry, or peach!

Or you could always substitute our baked apples, which is one of our most popular (and easy) recipes on the blog.

If you are a fan of cherries, make sure to check out these other cherry recipes too!


Enjoy!
This post contains affiliate links.

Tuesday, May 14, 2019

Banana Pudding Poke Cake

If you're a fan of banana pudding, then you're going to love this take on it. This cake has all the traditional components of banana pudding: pudding, bananas, vanilla wafers, but it's layered with a yellow cake. What's not to love?

This cake tastes really yummy served cold straight out of the refrigerator, so it makes the perfect spring and summer time dessert. Whip this up for your next family get-together or barbecue! It won't stay around long!


Banana Pudding Poke Cake


Cake

1 package of yellow cake mix
1 stick of butter, melted
1 cup milk
3 large eggs
1 tsp vanilla

Pudding

5.1 oz package vanilla instant pudding mix
3 cups milk
4 Tbsp butter, cubed
2 tsp vanilla
3 large bananas, sliced

Topping

8 oz container Cool Whip
1/2 cup crushed vanilla wafer cookies (about 12 cookies)


  1. Preheat oven to 350 degrees. Spray a 13 x 9 baking dish with cooking spray and set aside.
  2. Place the cake mix, melted butter, milk, eggs, and vanilla in a large mixing bowl. Blend with an electric mixer on low speed for 1 minute until all ingredients are incorporated. Increase mixer speed to medium and beat 2 more minutes, scraping down the sides of the bowl if needed.
  3. Pour the batter into the prepared pan and smooth the top. Place the pan in the oven on the center rack.
  4. Bake the cake 30-33 minutes, until it is light brown and a toothpick inserted into the center comes out clean. Remove pan from the oven and place on a wire rack to cool. Allow to cool completely.
  5. While the cake cools, prepare the pudding. Place the pudding mix and milk in a medium saucepan. Stir in the butter and vanilla. Cook over low heat, stirring, until the butter melts. Remove pan from heat and let it cool for 5 minutes. Fold in the banana slices.
  6. Use the bottom of a wooden spoon to poke holes evenly across the entire cake (about 24 holes). Slowly pour the pudding over the cake, making sure to fill the holes. Use a spatula to spread the mixture out to all edges of the cake.
  7. Cover the pudding with Cool Whip, using a spatula to spread it evenly to the edges. (We always leave a little border of pudding peaking around the edges of the cake, just for aesthetic purposes.) Sprinkle crushed wafer cookies over top of the Cool Whip layer.
  8. Refrigerate for at least 4 hours or overnight.


Hope you give this recipe a try!

Tuesday, April 16, 2019

Toasted Coconut Sour Cream Cake

If you're a fan of coconut, you're going to love this recipe. Instead of a traditional layer cake, this one is a sheet cake, which makes it perfect for bringing along to potlucks, BBQs, and even Easter dinner (which is right around the corner)!

This cake is also a little special because the coconut on top of the frosting is lightly toasted, which makes it super yummy!


Toasted Coconut Sour Cream Cake

Cake

1 packaged yellow cake mix
8 oz sour cream
6.83 oz cream of coconut, mixed* (this is 1/2 of a 13.66 oz can)
1/4 cup vegetable oil
3 eggs

Frosting

8 oz cream cheese
3 3/4 cups confectioners' sugar
2 Tbsp milk
1 tsp vanilla

Topping

2 cups sweetened coconut


  1. Preheat oven to 350 degrees. Spray a 13 x 9 baking dish with cooking spray and set aside.
  2. Place the cake mix, sour cream, cream of coconut, oil, and eggs in a large mixing bowl. Blend with an electric mixer on low speed for 1 minute until all ingredients are incorporated. Increase mixer speed to medium and beat 2 more minutes, scraping down the sides of the bowl if needed.
  3. Pour the batter into the prepared pan and smooth the top. Place the pan in the oven on the center rack.
  4. Bake the cake 40-42 minutes, until it is light brown and a toothpick inserted into the center comes out clean. Remove the pan from the oven and place it on a wire rack to cool for 20 minutes. Leave the oven on to toast the coconut.
  5. Place the coconut in a pie plate. Turn the coconut so it toasts evenly with a spatula/turner. Bake 8-10 minutes or until coconut is golden. Make sure you keep an eye on the coconut so that it doesn't burn.
  6. Once the coconut is toasted, prepare the frosting. Place the cream cheese in a large mixing bowl and beat with an electric mixer set on low speed until softened, about 30 seconds. Then, add confectioners' sugar, milk, and vanilla. Beat on low speed until all ingredients are incorporated. Increase the mixer speed to medium and beat until well combined, about 2 more minutes.
  7. When the cake has completely cooled, spread the frosting on top of the cake. Sprinkle the toasted coconut on top of the frosting.


Notes

When you buy a can of coconut cream it will be separated into a thick creamy part and a liquid part. The easiest way to mix these together for the recipe is to dump the entire contents of the can into a small bowl and then mix it all together. Then, measure out about 1/2 of the blended mixture into the recipe. (If you happen to measure a little more or a little less than half of the can, the recipe will be fine.)

If you've never seen canned coconut cream in the grocery store before, I found it in the Asian foods section. 

Since you're only using 1/2 a can in this recipe, you're probably wondering what in the world do you do with the leftover coconut cream. You can add your remaining 1/2 a can of coconut cream to smoothies, shakes, or even your coffee for a treat!


If you're looking for more traditional coconut cake recipes that are layer cakes, give these tried and true Harris Sisters' recipe a go:


This post contains affiliate links.

Saturday, March 16, 2019

Pineapple Coconut Strawberry Cake

This is a fun twist on a traditional coconut cake recipe. In addition to the sweet coconut that is everyone's favorite, it's also got a yummy pineapple filling and it's topped with juicy, ripe strawberries! Who can beat that?

This would be the perfect cake to bring to your next family get-together.


Pineapple Coconut Strawberry Cake

2 cups all purpose flour
1 1/4 cups granulated sugar
1 Tbsp baking powder
1 tsp salt
1 stick butter, softened
1 cup milk
1 tsp vanilla flavoring
2 eggs

Pineapple Filling

8 oz can crushed pineapple
1/3 cup granulated sugar
1 Tbsp cornstarch

Coconut Cream Cheese Frosting

1 stick butter, room temperature
8 oz cream cheese, room temperature
4-5 cups powdered sugar
2 Tbsp regular milk
1 cup shredded sweetened coconut

Decorations

Additional shredded sweetened coconut for decorating cake, if desired
Fresh strawberries for decorating cake

Cake


  1. Preheat oven to 350 degrees. Grease and flour 2, 9" cake pans. Set aside.
  2. In a large mixing bowl, mix together flour, sugar, baking powder, and salt.
  3. Add butter, milk, and vanilla. Beat with a mixer on medium speed for 3 minutes, scraping the sides of the bowl if necessary. 
  4. Add eggs and beat for an additional 3 minutes.
  5. Divide batter into prepared pans and bake for 30-35 minutes or until toothpick comes out clean.
  6. Cool in pans on wire racks for 10 minutes. Then, loosen the sides of the cakes from the pans and turn out onto cooling racks for another 10 minutes.

Pineapple Filling

  1. Add ingredients for the pineapple filling to a medium saucepan over medium heat. Stir well to combine.
  2. Cook, stirring frequently, until mixture thickens and looks glossy, about 5-8 minutes.
  3. Pour filling into a storage container. Place a piece of plastic wrap gently over the top and allow it to cool.
  4. Once cooled, cover it with an airtight lid and refrigerate until you're ready to use it (up to 1 week).

Frosting

  1. In a large mixing bowl, beat butter and cream cheese together until smooth.
  2. Add powdered sugar and 2 tablespoons of regular milk. Mix until smooth and fluffy, about 3 minutes.
  3. Add a little more milk, to thin, or powdered sugar to stiffen, if needed, until you reach your desired frosting consistency.
  4. Stir in coconut flakes.

Cake Assembly and Decoration

  1. Place your first cake layer on a cake plate. Spread the pineapple filling over it, making sure not to spread it all the way to the edges. 
  2. Top with the second cake layer.
  3. Frost the sides and top of the cake. Sprinkle the top with extra coconut and press it into the sides, if desired.
  4. Refrigerate for at least 4 hours before serving. 
  5. Decorate the top of the cake with fresh strawberries before serving.

Notes

This cake only has one extra step of making a filling to go between the layers. (Most cakes just have the cake and the frosting.) But if that looks daunting to you and you want to simplify the recipe even further, there's nothing stopping you from using a yellow cake mix as the base of this cake.

This is an easy cake to make in advance and then decorate the next day. After your cake has cooled completely, place the layers in Ziploc bags and store them in the refrigerator (or even in the freezer for up to one month). Guess what? Frozen cakes are easy to frost!

You can place the pineapple filling and frosting in separate containers in the refrigerator until you're ready to use them. Remove the coconut frosting from the refrigerator about an hour before you’re going to frost your cake to allow it to come to room temperature.

You might be tempted to place the strawberries on the cake right after you frost it and just before you put it in the refrigerator to rest. However, they might bleed strawberry juice onto your pretty white frosting. This step is best left to do right before serving your cake.

Store this cake in the refrigerator. Refrigerate at least 4 hours before serving. It tastes better after it's been in the refrigerator. 


Wednesday, September 26, 2018

Chocolate and Peanut Butter Fudge Cake

My oldest son Aidyn just turned 13. And one thing we know for certain about him: he absolutely LOVES Reese's Peanut Butter Cups (and really anything that has both peanut butter and chocolate). So for his birthday cake, he wanted me to make him a chocolate cake with peanut butter frosting.


As a surprise, I decided to get a little creative with the decorations. The most fun part was adding Reese's Pieces around the sides of the cake! I wasn't exactly sure that it would work since they are heavier than sprinkles, but I just pressed them on by the handful and the placed the whole cake in the refrigerator to set the frosting. If you are a more professional baker than I am, you could also carefully line them up or even make a pattern around the cake with them.

It came out really cute! (And delicious - did I mention delicious?) The consistency of this cake is really more like a fudge brownie and the frosting recipe makes a generous amount so that you can just pile it on!


Chocolate and Peanut Butter Fudge Cake

I just happened to have two recipes that I've used for years, but I've just never put the two of them together in one cake. You'll need these recipes for this cake:


I have always made a chocolate frosting for the chocolate cake and a peanut butter cake to go with the peanut butter frosting. (Those recipes are included too - in case you want to try that!)


But, let me tell you - the Chocolate Fudge Cake with the Peanut Butter Fudge Frosting was a real winner! Doesn't that look yummy?


And here's a few photos of the cake with candles and the birthday boy blowing them out!


This makes for a really pretty cake that would be perfect for birthdays, fall, or Halloween since it is decorated with orange, yellow, and brown fall colors. And, since fall is the time of year for organizations to ramp up on bake sales and cake walks, this would also make a great contribution for one of these!

I hope you'll give this cake a try. If you have a Reese's lover on your hands - I promise they'll love it!

Monday, March 27, 2017

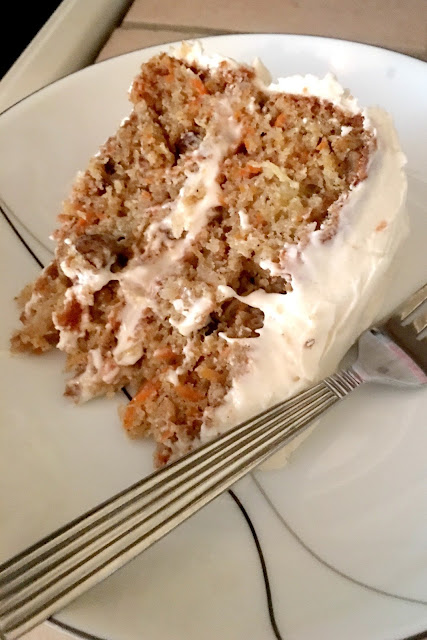
Carrot Cake with Cream Cheese Frosting

Spring is the perfect time of year to make a homemade carrot cake. With Easter right around the corner, this cake would be a perfect dessert for your Easter celebration. (Because what does the Easter Bunny like more than carrots? Carrot cake, right?)

And don't let a made from scratch carrot cake intimidate you! This recipe is really easy to make, and it tastes delicious!

Harris Sisters Carrot Cake

Carrot Cake

1¼ cups unsweetened applesauce
2 cups granulated sugar
3 eggs, room temperature
2 cups all­ purpose flour
1 tsp baking soda
1½ tsp baking powder
½ tsp salt
1 tsp cinnamon
2 cups grated carrots
1 cup shredded sweetened coconut
1 cup chopped nuts
1 tsp vanilla
1 cup crushed pineapple (not drained)

  1. Preheat oven to 350 degrees. Grease and flour two 9-inch cake pans. Set aside.
  2. In large mixing bowl, combine applesauce, sugar, and eggs. 
  3. Mix in flour, baking soda, baking powder, salt, and cinnamon. 
  4. Stir in carrots, coconut, nuts, vanilla, and pineapple.
  5. Divide cake batter evenly between two prepared pans.
  6. Bake for 40-45 minutes or until a toothpick inserted into the center of the cake comes out clean.
  7. Let cakes cool for 10 minutes in the pans. Then, remove to cooling racks and let cool completely.
  8. Prepare cream cheese frosting while cakes cool (recipe follows).

Cream Cheese Frosting

1 cup butter (softened)
16 oz cream cheese (softened)
2 tsp vanilla
2 lbs confectioners sugar

  1. Place the butter and cream cheese in a large mixing bowl. Blend with an electric mixer on low speed until fluffy, about 30 seconds.
  2. Add the confectioners sugar and vanilla. Blend with the mixer on low speed until the sugar is incorporated, 1 minute. Increase the speed to medium and beat until light and fluffy, 1 minute more. 
  3. Use to frost the top and sides of the cake of your choice.
  4. Refrigerate frosted cake for an hour before serving for best results.
Harris Sisters Carrot Cake


If you're looking for other recipes for your Easter get-together, give these tried and true Harris Sisters recipes a try:

Friday, December 23, 2016

Grandma Elizabeth's Oatmeal Cake

Just in time for Christmas, I'm sharing one of our Grandma Elizabeth's old-fashioned family recipes. This one is straight out of our cherished family cookbook, and it does not disappoint. It's an oatmeal cake with a brown sugar, coconut, and pecan frosting that offers a break from the all-chocolate, all-the-time Christmas treats that you may be experiencing this time of year.

Harris Sisters Girltalk: Grandma Elizabeth's Old-Fashioned Oatmeal Cake


This recipe is truly a treasure, and you might already have all of the ingredients in your pantry to whip it up today!


Harris Sisters Girltalk: Grandma Elizabeth's Old-Fashioned Oatmeal Cake

Grandma Elizabeth's Old-Fashioned Oatmeal Cake

1 1/2 cups water
1 tsp salt
1 cup old-fashioned oats
1 cup granulated sugar
1 cup brown sugar
1 tsp cinnamon
1 1/2 cups self-rising flour*
2 eggs
1/2 cup oil


  1. Preheat oven to 350 degrees. Spray a 3 quart casserole dish with cooking spray and set aside.
  2. Add 1 1/2 cups of water and 1 tsp of salt to a small pot and bring to a boil. Remove from heat and add oats. Let stand while mixing remaining ingredients.
  3. Mix together in a large mixing bowl sugars, cinnamon, and flour. Add oil and eggs and stir until incorporated.
  4. Add oats and water mixture and stir until entire mixture is combined.
  5. Bake in preheated oven for 35 minutes or until toothpick inserted into center of cake comes out clean.
  6. Remove cake from oven and let cool on a wire rack.
  7. While cake is cooling, prepare frosting.

Frosting

1 stick butter, softened
1 1/2 cups brown sugar
1 tsp vanilla
1/2 cup milk
7 oz. sweetened coconut
1 cup chopped pecans**

  1. Place the butter in a large mixing bowl. Blend with an electric mixer on low speed until fluffy, about 30 seconds.
  2. Add the brown sugar, 1/2 cup milk, and vanilla. Blend with the mixer on low speed until the sugar is incorporated, 1 minute. Increase the speed to medium and beat until light and fluffy, 1 minute more.
  3. Add coconut and nuts and blend on low speed until incorporated.
  4. Frost oatmeal cake while still warm.
  5. If desired, put cake in oven under broiler to brown top.


Harris Sisters Girltalk: Grandma Elizabeth's Old-Fashioned Oatmeal Cake

Notes:


If you do not have self-rising flour on hand (I did not), you can make this substitution for the 1 1/2 cups of flour required for the recipe:

Add to one measuring cup:

  • 2 1/4 tsp baking powder
  • 3/4 tsp salt
  • enough all-purpose flour to fill the cup

PLUS another 1/2 cup all-purpose flour

You can substitute walnuts in the recipe for pecans if you'd prefer.

If you enjoyed this old-fashioned recipe, make sure to check out the other old-fashioned recipes we've posted:


Saturday, October 8, 2016

Pumpkin Crunch Cake

This pumpkin cake recipe is an oldie but a goodie, so if you haven't tried this fall time recipe yet, I urge you to give it a try today.

Never a better time to put it into your rotation! This is a quick and easy recipe, and it has all the pumpkin spice flavors of fall that we love.

Pumpkin Crunch Cake

Pumpkin Crunch Cake

12 oz. evaporated milk*
3 eggs
1 1/2 cup sugar
4 tsp pumpkin pie spice
1/2 tsp salt
1 box yellow cake mix
1 cup chopped pecans
1 cup melted butter


  1. Preheat oven to 350 degrees. Grease bottom of 9 X 13 casserole dish. Set aside.
  2. In a mixing bowl, combine pumpkin puree, evaporated milk, eggs, sugar, pumpkin pie spice, and salt. Mix until incorporated, then pour it into your prepared dish.
  3. Sprinkle dry yellow cake mix evenly over pumpkin mixture.
  4. Sprinkle chopped pecans evenly over the cake mix.
  5. Drizzle melted butter evenly over top of pecans and cake mix.
  6. Bake for 55 minutes or until top is golden brown. 
  7. Cool completely before serving. Refrigerate leftovers.
Note: Can substitute coconut milk for evaporated milk in the recipe if desired.

Take a look at these drool-worthy photos. Doesn't it just look yummy? And perfect for your fall pumpkin cravings?

Pumpkin Crunch Cake Closeup

Pumpkin Crunch Cake

If you're looking for more fall recipe inspiration, make sure to check out these tried and true Harris Sisters' recipes:

Pumpkin


Apple


Saturday, August 20, 2016

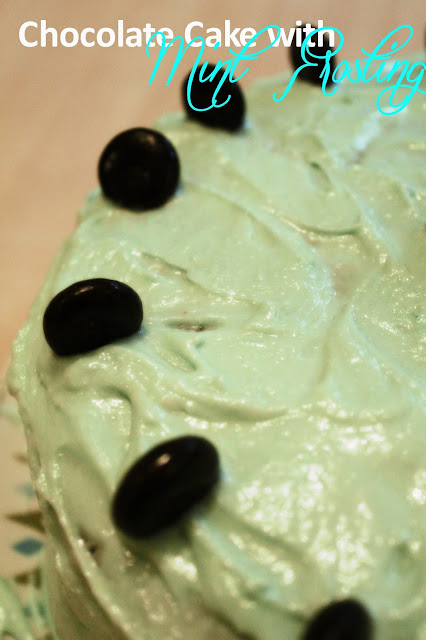
Chocolate Cake with Mint Frosting

We've just finished celebrating Jaxon's birthday again this year. Fun fact about Jaxon: he was born on 8/8/08. The number 8 is considered to be lucky in China, and this year was his eighth birthday, so we've joked that this was his "lucky" birthday.

So, what did the lucky birthday boy request for his birthday cake this year?

He wanted a chocolate cake with mint frosting. Since this was no ordinary cake, I decorated it with Junior Mints for our Birthday Boy and it was delicious! This scratch cake was simple to make and you'll be able to make one for yourself in no time flat. Lucky you!

Homemade Junior Mints Chocolate Cake with Mint Buttercream Frosting

Chocolate Cake with Mint Frosting
(Junior Mints Cake)


CAKE


FROSTING

1 cup butter, softened
3 cups powdered sugar
2 Tbsp milk
1/2 tsp peppermint extract
4 drops of green food coloring

GARNISH

22 Junior Mints candies

  1. Prepare Hershey's Perfectly Chocolate Cake as directed. Let cool.
  2. In a large bowl, combine the butter, powdered sugar, milk, and peppermint extract. 
  3. Beat on medium speed until smooth. Add the food coloring. Beat until blended. 
  4. Use to frost cake as desired. 
  5. Arrange 15 Junior Mints candies around outside perimeter of cake. Place one Junior Mint in the center of the cake and arrange the remaining 6 Junior Mints around that candy to create a flower pattern.
  6. Refrigerate cake.
Homemade Junior Mints Chocolate Cake with Mint Buttercream Frosting


The Hershey's Perfectly Perfect Chocolate Cake is a tried and true Harris Sisters recipe. Harris Sister Deanna has it every year for her birthday cake.

It might also taste good with these other frosting recipes - give them a looksee:


Tuesday, May 10, 2016

How to Make Mickey Mouse Cupcakes

These little cupcakes come together so easily, and are just the cutest EVER for a Mickey Mouse lover, like our little one.  We made these to celebrate her second birthday, and they were a huge hit!

Vanilla Cupcakes


2 cups all purpose flour
2 tsp baking powder
1/2 tsp salt
1/2 cup butter, softened
3/4 cup granulated sugar
2 eggs
1 cup milk
1 tsp vanilla extract

(yields 24 cupcakes)


  1. Preheat oven to 375 degrees and line cupcake pan with cupcake wrappers. 
  2. Cream butter and sugar until light and fluffy. 
  3. Add eggs one at a time. 
  4. Add flour (mixed with baking powder and salt), alternating with milk.  Beat well.  Stir in vanilla. 
  5. Divide evenly among pans and bake for 18 minutes. 
  6. Let cool completely in pans.

Buttercream Frosting


1/2 cup unsalted butter, softened
1 1/2 tsp vanilla extract
2 cups confectioners sugar
2 Tbsp milk
Food coloring, as needed (optional)


  1. Cream room temperature butter until smooth and fluffy. 
  2. Gradually beat in confectioners sugar until fully incorporated. 
  3. Beat in vanilla extract. 
  4. Pour in milk and beat for an additional 3-4 minutes. 
  5. Add food coloring, if using, and beat for 30 seconds until smooth or desired color is reached. 

Decorating Your Cupcakes


As you can see, the decorations are what make this cupcake special.  So here are the finishing touches you will need to make your Mickey Mouse cupcakes take on that Disney magic!  

For the final touches, you will also need:

  • Red polka dot cupcake wrappers 
  • Red food coloring (I used an entire bottle to color my batch of frosting.)
  • Red sprinkles
  • Oreos
  • Mini oreos
  • M&M's (You will only need the yellow ones, which luckily leaves you with lots of extras!)
To complete your cupcakes, follow the directions for making the cupcakes and frosting.  Your frosting will need to be red.  So I completed the steps for adding food coloring to my frosting.  I did use an entire bottle of red to achieve the color you see here.  Once you frost your cupcakes, add red sprinkles to the top of each one.  Then add two yellow M&M's to mimic Mickey's buttons.  The Mickey Mouse ears are made using Oreo cookies.  You will need to carefully separate the Oreos so the cream filling remains on the back of the cookie.  Then attach the two mini Oreos, using the cream filling (or some extra cupcake frosting) to hold the Mickey Mouse ears in place.  Carefully place your Mickey Mouse cookie creation into the frosting of each cupcake. And voila!  There you have it!


They say a picture is worth a thousand words; I told you they were a hit!  


This post contains affiliate links.

You Might Also Be Interested In