Showing posts with label Beauty. Show all posts

Monday, November 22, 2021

The Best Lip Products for Dry, Chapped Lips

Fall is one of my absolute favorite seasons. But as the leaves start to change colors and the temperatures start to drop, every year - without fail - my lips start to dry out and get chapped. I am always on the hunt for the best lip products for dry, chapped lips. 

Also, wearing masks seems to have made the situation worse for me as far as I can tell. Last fall brought with it the worst chapped lips I've seen in a very long time, so I kicked my quest for the perfect lip product into high gear. I was determined to have better results this fall season! So, since I have been searching to find the best solution to prevent chapped lips, I thought I would share the products that have worked for me.

This is a review of my tried-and-true recommendations for those with dry, chapped lips. I did my best to include as many different price points as I could. All of these products have worked wonders for me, but not everyone will have the same results. I hope you will find this post helpful!


Best Recovery Lip Balm for Severely Chapped Lips


I'm starting with the big guns. If you have severely chapped lips that need repair and healing, this is is the lip balm I would start with. Lanolips Original 101 Ointment Multipurpose Superbalm is a super-thick lip balm that penetrates your dry, cracked lips and seals in moisture. Made from humanely sourced, ultra medical grade lanolin, this cruelty-free lip balm gives the absolute best hydration for extremely dry and chapped lips. 

In addition to the traditional Lanolips 101, it also comes in flavor options such as strawberry, peach, green apple, and lemonaid, as well as tinted options like rose gold, bronze gold, and rhubarb. If you're looking for a tinted lip balm, this might be the best option for you.


Best Everyday Lip Balm


This lip product was at the top of my list to try simply because it's been around for decades and the formula has not changed. I wanted to find out if it lived up to all the hype - and boy did it ever! 

For severely chapped lips, Vermont's Original Bag Balm makes a great everyday lip balm because it contains ingredients like petrolatum and lanolin to lock in moisture. The Bag Balm formula has remained the same since 1988 (with only 4 ingredients and no added fragrances, colors, alcohol, parabens, or phthalates). Because this is the original, cruelty-free Bag Balm formula (only in a convenient lip balm sized tube), you can use it on any part of your body that is dry, chapped, or cracked.

If you don't need the lip balm sized tube for on-the-go use, you can order the larger sized Bag Balm in the tin. The ingredients are the same.


Best Lip Balm with SPF


Stick with me on this one - it's actually from a men's skin care line. But as far as I'm concerned, if a product works, it works. And since there's nothing inherently "male" about this (or any) lip balm, it can really work for anyone. 

Jack Black Intense Therapy Lip Balm offers SPF 25 sun protection; skin conditioners like beeswax, shea butter, and lanolin; and antioxidants that soothe and relieve dry, chapped, irritated lips. This cruelty-free lip balm also comes in flavor options such as natural mint, black tea & blackberry, grapefruit & ginger, mango & mandarin, lavender, and pineapple mint. If UVA and UVB sun protection are at the top of your list for skin care products like lip balms, then this is the right product for you! 

Best Nighttime Lip Balm


The name of this product says it all: My Favorite Night Balm. It truly is my favorite. And if you're a daytime lipstick wearer, then this product is definitely one I'd recommend for you because it works all its magic at night. Can't get any better than that!

This deep moisturizing lip balm helps repair seriously dry lips while you sleep with ingredients such as shea butter and lanolin. Apply this 8-hour recovery balm liberally before bed to hydrate your lips overnight. Developed by C.O. Bigelow, the oldest apothecary in America, it's available at their flagship store in Greenwich Village in New York City, at their online store, or at other online retailers like Bath & Body Works or Amazon. 

This is actually the only product to make my list that I've been using for YEARS. I went back to the drawing board on all of my daytime lip balm products, but I couldn't find anything to hold a candle to this nighttime lip balm. It's the OG of night balms in my book!

BONUS - Best Lip Scrub


As an added bonus, I thought I'd share another favorite lip product: Eco Lips Lip Sugar Scrub. Use this to exfoliate your lips once a week to help prevent them from getting chapped in the first place. It instantly reveals softer, smoother lips after just one use (and another bonus: it tastes good too). 

Use it at night to exfoliate dry, rough lips with sugar while conditioning them with coconut oil to get them smooth and ready to apply your nighttime lip balm. Pure and 100% gluten-free and organic, this lip scrub is made in the USA, is Fair Trade Certified, is cruelty-free, and is earth-friendly. It's available in your choice of brown sugar, mint, vanilla bean, or mint truffle flavors. Pair one of these flavored lip scrubs with an exfoliating lip brush and you're in business!


Useful Stocking Stuffer Ideas

When they say that the best things come in small packages, in this case, it's absolutely true. Don't forget that these must-have lip balms and scrubs are small enough to easily fit into a stocking, so they make great Christmas gift ideas too! They're all under $20 and some are below $10 (with discounts for buying multipacks). So it's easy to buy for everyone on your list. Fill everyone's stockings this year with something they'll love (and actually use). 

This post contains affiliate links.

Tuesday, March 13, 2018

Dry Your Hair in Half the Time!

I found a new product that I have tried out recently, and I have to share it with you all.  It's a hair towel that actually delivers on its promise to help cut your hair drying time in half.  A little hard to believe, I know, but it really does work!


I have super fine hair, but a lot of it.  And I have color treated my hair for years.  Apparently that combination is the perfect one for hair that takes forever to dry.  My hair just holds onto water, even when I towel dry it first.  It still takes way too long with the blow dryer.  So when I found this magic towel on Amazon, I swooped it up.  It has well over 2000 reviews and still gets close to 5 stars.  People were swearing by its claims.  I figured if it didn't do what it promised, I would just return it. But that never happened.  It was awesome right out of the gate, and well worth the asking price.


So here's how I use it.  After I wash my hair, I squeeze out the excess water and then twist it right up into this towel.  **I should point out that this is not a full sized bath towel.  It is smaller, but just the right size for my hair.**  I then proceed on to my after-shower moisturizer routine, etc.  I probably leave my hair in this towel for somewhere in the neighborhood of 3 to 5 minutes before taking it down.  Then I give it a quick towel dry with the same towel and just start blow drying.  It used to take me at least five minutes before I would notice even the smallest amount of drying of my hair once I started blow drying. Now, I notice my hair is starting to dry almost as soon as I turn my hairdryer on! It really is amazing!  In fact,  I liked this towel so much, I bought a second one for my daughter, and it's working wonders on her hair too!

Just wanted to share this new-to-me product with you guys.  It's the real deal, and I bet you all will love it too.


This post contains affiliate links.

Thursday, October 13, 2016

Product Review: e.l.f. Tone Adjusting Face Primer

I bought this e.l.f. Tone Adjusting Face Primer on a whim recently. I have used other makeup primers here and there.  And I always think the same thing every time.  I should really use makeup primers more often.  I mean I use makeup almost every day of my life.


And a makeup primer prepares your skin to receive the makeup.  It creates a silky soft smooth layer over your skin so your makeup just glides right on over top.  It really does make an incredible difference.

But this one has an added little bonus feature to it.  It does some skin tone correcting too! I have a slight red/ pinky undertone to my skin, so I chose the green primer.

The green tint helps to neutralize your skin's natural redness, making you look all fresh faced and evened out.  Wow, who knew $6 could do all that?!?!

In the bottle, this one looks the color of pistachio green, but once you pump it out onto your hand, it looks more the color of the Wicked Witch of the West.

Fear not, it actually goes on clear, but that green tint works it's magic and leaves you looking more like Glenda, my pretties!


The smart folks at e.l.f. also created this primer in a brightening lavender, a radiant glow, and a clear, in addition to the tone adjusting green that I show here, :)  Not all good things have to be super expensive.  This one sure isn't and it's a winner!

This post contains affiliate links.

Friday, September 16, 2016

Sleeping on Silk

For years now, I have heard that silk pillowcases are the secret weapon for preventing wrinkles- both in your skin and your hair.  And I have often thought- hmmm, that's interesting.  I should look into that.

And then I promptly forget all about it and move on to something else.  Well, this summer I actually took the plunge and purchased a silk pillowcase for my favorite pillow.  So let me just tell you how it's working out so far. 


My primary interest in silk pillowcases was for my hair.  You see, I have the softest hair known to man.  It is very impressionable, shall we say.  It bends and crimps at my slightest little movement each and every night.

And I usually awake to very weird hair that I have to spend time flattening and straightening to work back into it's usual shape.  When I started looking into silk pillowcases, people were reporting that they kept their hair super smooth all night.  I thought perhaps it could do the same for me, and I was very excited to give it a try. 

I've had my pillowcase for about a month or so now.  And I have to agree with the reviews that I read. It does indeed protect your hair from frizzies and wrinkles.  I awake (most) mornings to very smooth and straight hair, which saves me a lot of time getting ready in the morning, and I can't tell you how much I appreciate that. 

People also swear that sleeping on silk also helps to prevent skin wrinkles.  It is far too soon for me to accurately report on that.  However, I can say that I have not awoken to any weird pillow marks on my face or neck since I've been using my new pillowcase, and that's a definite plus.  Those marks take forever to fade, and always give the impression that you just rolled out of bed no matter how long you've been awake.

Overall, I do love my new silk pillowcase.  It feels like a dream- very cool and comfortable to sleep on.  And I love the effects it has had on my hair (and presumably on my skin too) so far.  I purchased my silk pillowcases on Amazon, and carefully read all the reviews first.

A Couple of Words of Warning 


Satin is not at all the same as silk.  If you are looking to take the plunge on this endeavor, make sure you are buying the right thing.  It has to be SILK.

And you will need to hand wash and air dry your pillowcase so don't just throw it in the laundry with the rest of your things when it's time to change your bedding. 

Happy sleeping!

This post contains affiliate links.


Friday, August 5, 2016

A Beginner's Musings on Retin-A

Earlier this summer, I started using Retin- A cream for the first time, and I thought I would share my thoughts about it with you.  Before I began, I did a lot of research but it seemed that most people who were talking about Retin-A had been using it for a long time, and didn't necessarily remember the early days when they were just starting out.  Well, I would say that I'm still in those early days, but it's been several months now and I feel like I have a few pointers of my own to pass along for other first time Retin-A users. So here goes....


I should begin by saying that Retin-A is a prescription drug.  Your doctor can prescribe it for you and answer any specific questions or concerns you may have.  I am not a medical professional- just a lay person passing along my personal experiences and what has worked for me.  :)

Retin-A was traditionally prescribed to help treat acne (and still is today).  However, over the years, medical professionals discovered that it also has the added benefit of improving the appearance of your skin by minimizing fine lines and wrinkles.  Thankfully, I haven't needed acne medication in many years, but since turning 40 earlier this year, I thought it was a good time to start some serious skin care, and so I turned to Retin-A in that quest. 

1.  Start low and slow: Retin-A comes in three prescription strengths: 0.025%, 0.050%, and 0.100%, with the 0.025% being the weakest and 0.100% being the strongest.  I have started with the 0.025% and I would recommend the same to anyone just starting out.  Remember, this is a drug.  It is strong, even in it's weakest form.  There is no need to jump in full strength.  That's something you can work your way up to over time.  You have the rest of your life to use this product so it's best to take your time and see how your skin will react.  Lots of people report redness, peeling, flaking, and even scabbing when they first start out with Retin-A.  Fortunately, I did not experience any of these things. However, I took it really slow and easy.  I started by applying Retin-A once every other night, instead of immediately starting out with a nightly application.  I also began by applying a layer of moisturizer to my skin first to make a buffer between my skin and the Retin-A.  Once I saw that I wasn't experiencing redness, burning, or flaking, I slowly worked my way up to a nightly routine and eventually ditched the moisturizer too.  I would say after the first two weeks, I was applying Retin-A as directed, with zero side effects.

2.  Be patient: As your skin adjusts to the use of Retin-A, you may experience more breakouts than usual.  Remember, it is also an acne treatment medication, and it works by drawing impurities from deep within your skin to the surface.  I did experience a little of this in the first couple weeks.  It was nothing major, and I was aware that that was a possibility so I wasn't terribly concerned.  It took a couple weeks for everything to even out, and I haven't had any breakouts since. And even though I didn't experience any major redness or flaking, that is very common to new Retin-A users, even if you take things slow and easy.  If you do experience those types of things, it is reasonable to back off on your application to once every few days or even once a week until your skin becomes more used to the product. 

3.  A little goes a long way:  It only takes a pea sized amount of Retin-A to treat your entire face. Just divide it between your cheeks, chin, and forehead and rub it in evenly.  Apply at bedtime directly onto clean skin and that's it.  My only skin irritation that I've experienced was when I applied too much and my skin just felt angry.  It didn't look angry, but it sure felt it.  It felt tight and itchy and almost the way a sunburn feels.  I haven't overapplied since and I haven't had any more issues.

4.  Keep away: Retin-A is not intended for use around your eyes, and certainly not in your eyes.  The skin under your eyes is just too thin to tolerate it well.  Same goes for your eyelids.  The closest you should try to get are near the edges of your eyes where your eyes naturally crinkle- the crow's feet area.  And just dot it on and then rub it in well.  I have accidentally gotten too close to my eyes a time or two and awoke with red eyes in the morning.  No bueno.

5.  But don't miss a spot: Don't forget about your neck and decolletage!  I use a pea sized amount on my face and another pea sized amount for my neck and upper chest area.  One tube of Retin-A cream is prescribed for 45 days, and I have had no issues with staying within 45 days per tube even with 2 pea sized amounts per application. 

6.  Wash up: This one may be obvious.  Or maybe not.  But be sure to wash your hands once you finish applying your Retin-A.  I cannot overstate enough that you should not get this in your eyes, and if you just leave it on your hands when you are finished, you are definitely taking a risk that you might accidentally rub your eyes and transfer it.

So that's a little of what has worked for me.  I am really enjoying Retin-A, and my skin is looking so healthy!  It's an amazing product that I intend to use for years to come.  I've also added a few new skin care products to my morning routine as well, and will fill you in on those in another blog post. More to come!  


Monday, May 2, 2016

The Best Drug Store Clinical Deodorant EVER!

Let's get personal.  The weather is starting to warm up, and for me, that usually means switching to some sort of clinical strength anti-antiperspirant/ deodorant to ensure I still maintain the proper level of freshness despite rising temps outside. 

I am no stranger to clinical strength deodorant.  I have used it for years, and switched between all the major players, looking for the perfect one.  Last summer, I finally decided to research them a little more, and found that TONS of women were talking about this one- Certain Dri.  I had never tried it before, but reviewers swore by it, saying it was far better and more effective than all the others. So I decided to give it a try for myself. 


After having used it for a while last summer, and again recently, I am reminded how effective this one is.  And I thought it was time to share.  It is hands down better than any other deodorant I have ever used. I use the roll on version pictured here, but it is also available in the solid.  Reviewers I previously read mentioned the roll on version specifically, so that's where I started and have stayed.  

The key is applying it at night- before bed time.  All deodorants actually work better when you apply at night, because that is when your sweat glands open and "absorb" the deodorant.  Make sure you apply sparingly. Otherwise, it may burn or itch a little.  And I always avoid applying immediately after I shave for the same reason.  It doesn't wash off in the shower so no worries there.  In the morning, I use my regular go-to deodorant, and voila!  I'm good to go.  Even on the hottest and steamiest day, no issues AT ALL!  I cannot say the same for other clinical strength brands.  This one takes the cake. I should also mention that is has no scent, which I LOVE!  So many of the scented deodorants just aren't to my liking.  And it claims to last for up to 72 hours; many reviewers say they only use it a few times a week with full protection.  I can't say that exactly because I still use it every day only because that's just what I do.  Old habits die hard.  But it's worth a mention.  

And this stuff is worth a try.  It's a drug store cheapie that REALLY works!

This post contains affiliate links.

Wednesday, October 7, 2015

Product Review: Jamberry Nail Wraps

Hello, friends!  It's been a little while since I've done a good product review for you, and this is one that I hope you will find helpful.  Whether you are a Jamberry beginner (like me) or a pro, I've got some insights, tips, and tricks to share with you.


I recently bought a set of Jamberry Nail Wraps for the very first time to support a friend of mine who was hosting an online Jamberry Party.  Though I had heard of the company and seen their wraps before, I had never actually tried this product until now.  And I will admit that I was a little skeptical at first.  The instructions seemed really easy (almost too easy) and people online were claiming that it took them as little as 10 minutes to apply a full manicure that would end up lasting two weeks or more.  Hmmm, I couldn't imagine. 


I mean, I have found a wonderful lady to do my nails in the past year or so, and she applies a perfect gel manicure in 30 minutes flat for $25.  That manicure always lasts me about 2-3 weeks.  And until now I couldn't picture anything faster or more affordable for a manicure that would last that long.  So after reading many reviews and researching the product itself, I bit the bullet and gave it a try myself.  But honestly, even the online reviews I read (and there were many) had me wondering whether they were legit or just people trying to boost their own sales.  You just never know.  So before I begin, let me first say that I am in no way being compensated for my review in dollars or in products.  The Jamberry wraps that I used were ones that I purchased myself at full retail price.  I am just a regular person who was interested in trying a new product and sharing my findings with you.  So here we go.   
 
To begin, if you read the story of how this company was launched, you will find that it was in fact started by three sisters (sound familiar, anyone?).  My curiosity was instantly piqued.  They decided that salon manicures were far too pricey, time consuming, and limiting of their color and pattern choices, so they took action and ended up developing Jamberry Nail Wraps.   Incidentally, they have been around since late 2010.


If you take a look at their online catalog, you will see what I mean by choices.  There are a slew of colors, patterns, designs, and everything in between to mix and match.  Whew wee, the selections almost made me dizzy so I opted for my good old standby look to start the ball rolling: a classic French manicure.  And yes, they sell that in addition to lots of other solid color looks.  Not everything is a wild pattern.  There really is something for everyone. 


So How Much Do They Cost and What Do You Get for Your Money?

 
The sheet of wraps that I purchased cost $15, and they were running a promotion for a fourth free sheet with the purchase of three.  So, in other words four sets would have cost $45, or $11.25 each.  I assumed that each sheet would provide one manicure.  Even so, if it held up for the two weeks that it claimed, I would still be saving $10- $15 off the cost of my normal gel manicure. 
 
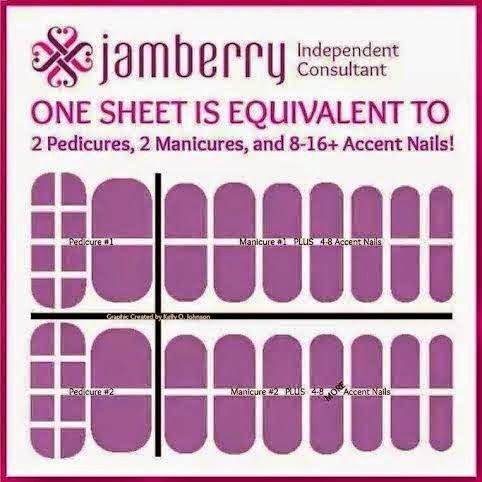
But after a little research, I quickly discovered that each sheet contains 18 wraps, and each wrap is plenty big enough to be cut in half, thus providing even more manis and pedis per sheet.  The wraps come in different sizes so you can select the ones that best fit your nails.  The larger wraps are typically used for pedicures, whereas the smaller wraps are generally used for manicures.  By my estimation, I can easily get two full manicures and one full pedicure out of a single sheet of Jamberry wraps.  I'm sure if you get more creative with how you cut them and/or mix them with polished (non-wrapped nails) you can stretch a sheet even farther.  But let's just go with my conservative number for the sake of this math.  If I paid $15 for a single sheet and each sheet will get me two manicures and one pedicure, that's only $5 per application.  So far, I'm liking the numbers!
 
After drawing my own conclusions, I found this handy diagram that shows how to make your wraps go even father.  Sweet!  I will be saving this for my own future reference.
 
 
 Now that we've got that all settled, let's move on to application.
 

How Do You Apply Nail Wraps and How Long Does it Really Take? 

 
1.  To start, you need to make sure your nails are clean and either coated with a fresh coat of polish or wiped down with rubbing alcohol.  I opted to start with clean dry nails that I swiped a little alcohol swab over. 
 
2.  Next, work on those cuticles.  Push them back with a cuticle pusher.  I trimmed mine too, but it's not called for.  Just what I do.  Actually, if you are starting with polished nails, I suppose you would do this step first.
 
3.  Now your nails are ready for the wraps.  Choose the wrap that best fits your nail and remove it from the sheet.  It is better to use a wrap that is slightly smaller than your actual nail than one that is too large.  (Remember you can cut these in half to save the other half for another manicure.)  Apply heat from a hair dryer to the adhesive side for a few seconds until it is pliable.  And carefully lay the wrap down on your nail.  I started by laying the wrap down closest to my cuticle base and stretching it over my nail until it was covering my nail completely.  Apply pressure to get it to stay in place where you want it.  It will likely still extend past your actual nail at this point. 
 
4.  Trim the wrap to fit your nail.  The instructions call for you to cut the wrap with scissors, however, I found that using nail trimmers actually made for a much cleaner cut and one much closer to my actual nail.  Once you have made your cut, use an emery board to file the edges smooth to your nail, using a downward motion over the edge of your nail.
 
5.  The final step is to secure your wrap by blasting it with a final shot of heat from the blow dryer again.  A few seconds on each nail will do the trick.  That's it.  Repeat nine more times and your manicure is complete. 
 
So how long did this process take me?  The people online who said 10 minutes were giving it a minute per nail.  Mine didn't go quite that quickly because it was my first time, but it still only took me about 20 minutes for my very first application.  And the second hand went much faster than the first.  Now that I understand the process better, I know it won't take me that long next time. 
 

Other Helpful Hints and Tips

  • You cannot destroy these wraps so don't feel like you have to be super careful with them.  You cannot overheat them.  In fact, I think a little extra heat helps to make them super pliable and ready to set.  Don't forget to "stretch" them over your nail for a clean and smooth application. 
  • Trimming them with nail clippers was such a game changer for me.  In fact, if your nails are longer to start with, you can actually trim away a small bit of nail with the extra part of the wrap and you will have the cleanest cut possible.
  • In retrospect, I don't think I would have chosen a French manicure for my first application if I had considered what that actually meant.  For the French manicure to look as nice as possible, it is essential that the white part of the manicure is consistent in length on all your nails.  In trying to make that happen, it adds a little more time and care to the process.  Whereas a single color or all over pattern would not create the same issue.
  • Oh, and from everything I read (and now from my own experience too), the first 24 hours of your application will be the most critical.  People who said their wraps peeled prematurely almost always said they had one that came off within the first day or so.  Your wraps need time to "set" and adhere to your nails.  So keep that in mind when choosing when you apply your manicure.  I chose to apply mine right before bedtime so I knew I wouldn't be stressing out my newly applied manicure over the next several hours.  I also wouldn't apply a new manicure right before I washed a sinkful of dishes, or my car, or my dog.  You get the picture.  Choose wisely!
So how did my manicure turn out?  Well, the next day my husband asked me if I had gotten my nails done!  Ha!  I'd say that speaks well to the finished product.  I am very happy with how they turned out, especially since this was my first attempt at using Jamberry nail wraps. 
 
Here's the final look.  Izzie looks especially interested in all this, doesn't she?


Alright, so I'm not a hand model.  I'm ok with that!  But I will tell you that these wraps really do look like a gel manicure.  They are shiny and smooth, and they feel totally secure on my nails. I feel like I have a little too much "white" on my ring finger so I will trim it a little more.  But that's the nice part- I can do that and it won't ruin anything!


So there you have it (for now).  I will update this post when it's time to remove them for more details on that process and how long they ended up lasting. Until then...  I'm giving these wraps high marks so far, so stay tuned for more!

UPDATE:  My first set of wraps lasted for eight days, but only because I took them off at Day 8 with intentions of doing a new set for the weekend.  They held up great with no peeling at all.  I am now on my second set of wraps and they have also been on for about a week now.  I think I'm hooked!
 

Friday, December 19, 2014

Farmer's Almanac Grow Days

If you are like me, and almost every other woman I know, then you are constantly trying to grow your hair longer.  Oh, I've tried all the tricks in the book, but this one was a new one on me.  At a recent hair appointment, my hair stylist clued me in on Farmer's Almanac grow days.  I had never heard of such before (at least in reference to anything hair-related).  Have you?


Apparently, the fine folks at the Farmer's Almanac not only predict weather patterns and the best dates to plant your vegetable garden.  They also predict the best dates to cut your hair to increase growth.  Who knew???  Apparently, all the stylists at my salon.  My stylist told me that they all trim each other's hair on these prized days.  No wonder they all have fabulous locks!

You can get the next 60 days worth of dates online, but if you are planning your hair appointments farther out than that, then you will need to invest in the good old fashioned hard copy publication.

If you are reading this entry today, the following are the best dates to cut your hair to increase growth for the next 60 days, and some of these are coming up, so start making your hair appointments now!

December:  22, 23, 26, 27, 30, 31
January: 3, 22, 23, 26, 27, 31
February: 1

Likewise, they also list the best dates to cut your hair to retard growth.  Hmmm, might want to avoid those dates if you are shooting for maximum growth.  Is there anything to all of this?  Who knows.  I cannot personally vouch for this system, but what can it hurt?  I'm certainly willing to give it a try. Marking the calendar now!  Who else is with me?

Wednesday, March 12, 2014

DIY Hair Treatment That Really Works!

I have been using coconut oil as a treatment for my hair for about the past month, and yes, I can really tell a difference when I use it.  Recently, my hair stylist suggested using it to help combat my hair's natural tendency toward dryness in the winter.  It just so happens we already had some in the cupboard, so I went for it.  Read on for the details.


There are lots of pros to using coconut oil as a conditioning treatment for your hair.  It's super easy- no mixing or fussing with lots of ingredients.  Coconut oil actually smells good so you don't mind it sitting on your hair for a while.  And it's readily available from your local grocery store.  What's not to love?

I usually use it about once a week on a morning when I have a little extra time to let it sit on my hair and work for a while.  You simply scoop out a good handful of coconut oil from your jar and work it into dry hair.  I only use it from mid-shaft to the ends of my hair, so the roots don't get greasy.  Once you have it on, I would either finger comb it through or use a wide tooth comb to work it down to the ends.   I usually just let my hair hang loose, but that's completely up to you. If your hair is longer, you might want to pin it up out of your way while it's working it's magic, or you can tuck it under a shower cap. 

I let it sit on my hair for at least an hour, sometimes two, and then wash it out in the shower.  I start with a warm water rinse, and then follow with shampoo (repeat if necessary), and finish with a light conditioner.  That's it.  Super simple. And you should notice an immediate difference.  My hair is always so much softer, shinier, and more manageable after this treatment.  

So there you have it.  Do you have any other hair treatments that work well for you?  As always, leave your comments below.


This post contains affiliate links.

Wednesday, August 21, 2013

Tan in a Can: Self Tanning and Bronzing Products that Really Work

All summer long, I have had people ask me about my "tan", so I thought it was high time I shared my secret with the masses instead of just one by one.  For those of you who know me, you will already know that any tan that I sport is certainly not courtesy of the sun.  My skin scoffs at the sun.  I freckle, I burn, I peel, but never under any circumstances do I tan.  Never have, never will.  Such is life.  We must all play the hand we are dealt.  

So rather than shock people with my scary white skin, I choose to self-tan.  And I have tried them all. Remember when self tanners first became popular?  They all had a scary orange tint to them, and they were usually pretty streaky too.  Oh, and the smell.  Ick, it was awful.  But, I was right there- front and center with the orange streaky skin- struggling to find some color for my otherwise colorless skin.  

Thankfully, instant tanners have improved by leaps and bounds since those days.  Today's self tanners are smooth, bronzy-colored, and odor-free.  And I have finally settled on one that I love.


Tanwise is an aerosol spray tanner.  I love it so much more than lotion tanners.  It literally goes on the color that it's going to be so you can see exactly where you are putting it.  There is no room for streaks with this stuff (unless you choose to spray yourself down in the dark).  And unlike lotions, you don't have to wait for the color to develop.  Like I said, it instantly tans, and it dries quickly too. Oh, and there is zero smell.  I have found that even the best lotion tanners still have a hint of self tan "smell" and I'm just not a fan.  I usually apply this every other day or so, and that's just about perfect for me.

So where do I buy this this little beauty secret?  I find it locally at Sally's Beauty Supply.  You can buy it online too, but that's my go-to source for my tan in a can.

Now, I do not personally use tanner on my face.  I know plenty of people who do, and I suppose there's nothing wrong with giving that a try too if you like.  But for me, I prefer to use a bronzer for a summery facial glow.  My go-to bronzer this summer has been Betty-Lou Manizer by the Balm.  And I can't say enough good things about it.  I apply this bronzer with a big fluffy powder brush over my regular powder.  The color is perfect- a little shimmery and a lot of pretty bronze glow.  It is oil-free so it doesn't ever make you look too "dewy".  And what's more, I am in love with the packaging for this product.

You will also see it pictured above with it's counterpart, Mary Lou Manizer by the Balm. This product is not a bronzer, but rather a luminizer and highlighter.  It gives your skin a soft and pretty glow without being too over the top.  Sadly, I broke this compact into a million pieces, that is before I discovered how to repair broken powders.  But I did save the case because it is just so darn cute.  For now, I am using it as a mirror for my purse, but I've got to get some more of this stuff!

I initially found the pair of these Balm products sold as a set at TJ Maxx for less than $10.  I had no idea what a good deal that was when I bought them, but I'm glad I did.  You can find them at lots of online retailers too.  :)  And they are usually sold individually.

So, that's about all folks.  As our summer winds to an end, keep your color going for a bit longer and consider giving these fine products a try.


This post contains affiliate links.

Wednesday, August 7, 2013

Product Review: Vaseline Spray & Go Moisturizer

Has anyone else had a chance to test drive the new Vaseline Spray & Go Moisturizers yet?  Well, I have, and let me be the first to share my thoughts on this new take on lotion. 


I will begin with a confession.  Moisturizing is one of those beauty rituals that I absolutely hate, and if I have to skip a step in my morning routine to save some time, that's always the one I skip.  I should say I do religiously moisturize my face, morning and night, but I'm talking about lotioning my arms, legs, and all the rest.  It just takes time to do and time to dry.  And that's usually time that I just don't have.  And before you judge me for this little confession, just ask yourself what is the step in your beauty routine that you can do without.   I mean do you always shave your legs every day in the wintertime?  When is the last time you curled your eyelashes?  Or your hair for that matter?  Ok, so maybe we are just talking about me again.  I should really get back to my review before I incriminate myself further.  :)

As I was saying, I recently came across this new Vaseline product and decided to take it for a spin. As you can see, this moisturizer comes in three scents: original, aloe, and coconut.  I choose the original scent for myself.  And it works very much like spray on sunscreen.  You just point the nozzle toward your skin and spray in one continuous motion.  It goes on lightly and quickly, and you just give it a quick rub to work it in, and voila, you are done!  It does dry incredibly fast, so you are able to pretty much put your clothes right on without waiting around for it. 

I was a bit hesitant at first as to how well it would moisturize since it does go on so lightly and dry so quickly.  But it really does leave your skin feeling soft and conditioned.  So if you are like me, this might just be one to try. 

As with most new products, there are also usually plenty of coupons floating around out there too.

Overall, I'd say this is a pretty nifty new take on lotion.  Will I completely replace all my moisturizers with Vaseline Spray & Go?  Probably not, but on days where time in tight and I'm tempted to skip this step, I'd say I've found my solution.


This post contains affiliate links.

Friday, July 26, 2013

How to Fix Broken Eyeshadow

We've all done it- accidentally dropped and broken an eyeshadow, a blush, a bronzer, or a powder.  In my case, that was just the list of last week's casualties.  Normally, I just chalk this up as a complete loss and toss the shattered powder into the trash as I add a replacement to my shopping list.  Until now...


Thanks to Free People's recent blog entry, we now have the answer we have all been waiting for, and it's super simple, and uses a product you already have in your bathroom cabinet.  Are you ready for this? RUBBING ALCOHOL!!!

The trick?  Simply add enough plain rubbing alcohol to the broken cosmetic offender- enough to saturate it, and then blend it with your finger until smooth.  Leave it to dry for a few hours and it should be as good as new again.

This post contains affiliate links.

Wednesday, July 17, 2013

Trader Joe's- It's Not Just for Groceries Anymore

Many of you already know and love good old Trader Joe's for their specialty grocery items that don't cost an arm and a leg like most specialty food stores.  But what you might not know about Trader Joe's is that they actually carry a pretty impressive bath and body line as well.    

Here is a look at a few of the items I recently scored for my shower.  Those large bottles are a full 16 ounces of shampoo, conditioner, and body wash.  Each was around the $3 mark, which I found to be quite reasonable.  But now that I have started using them, they have me jumping for joy even more so.   


I am in LOVE with the smell of their "Tea Tree Tingle" line.  It is unbelievably refreshing and energizing for your summertime showers; it's just so minty and fresh.  And again, at that price point, I'd say it's a pretty good deal too.  I usually am willing to pay a little more for hair care products, but these are doing the job quite nicely.  The conditioner is creamy enough to do a nice job, but light enough that it doesn't weigh my hair down. 

I will also personally give a ringing endorsement to the "Coconut Body Butter" you see here as well.  I am a long time fan of body butter over lotion anyway.  Most lotions evaporate into nothing as soon as you apply them.  But honestly, a lot of body butters are so thick they don't absorb that well.  If you have also been caught in the middle of this dilemma, look no further.  This body butter absorbs instantly and smoothly, but it leaves your skin so incredibly moisturized.  What a concept?!?!  But even better than all of that is the way it smells.  It is like a slice of coconut creme pie (maybe not quite that sugary smelling, but you get the idea).  It is rich and buttery, and of course, I love the smell of coconut for summer.  Oh, and the price?  It rang in at $4.99 for this big tub.  

I think we are onto something here, ladies.  And I think I will be heading back to the bath and body aisle of Trader Joe's before too long to see what else they have in store.  So far, you can color me impressed. 

Tuesday, May 14, 2013

Making Your Eye Makeup Stay in Place- MAC's Painterly Paint Pot

As I have mentioned before, nothing bugs me more than smudges and smears from my eye makeup. I'm not really a smokey eye kind of girl.  Even if I was, there is a big difference between an intentional smokey eye look and one where your makeup just falls apart on you.  And I much prefer neat and clean eye makeup anyway.  Don't get me wrong; I wear mascara, eyeliner, and eyeshadow daily, but I want it to stay exactly where I put it, and not take off on a weird tangent.   And sometimes that just happens, no matter how hard I may try.  Until now...

This weekend, after a quick visit to the MAC counter, my life will be forever changed. Yes, that sounds pretty dramatic, but thanks to a girl's day with my mother-in-law and sister-in-law a few days ago, I have discovered MAC's Painterly Paint Pot.  


It works like a makeup primer.  You just smooth it on your eyelids before you apply any of your eye makeup, and sit back as your eye makeup just glides right on.  It's a fairly thick product, so the best part of all of this is it holds all of your makeup firmly in place ALL DAY LONG!  No more smudges. No more smears.  No more creases.  Just flawless application and flawless staying power for all your eye makeup.  And it comes right off at the end of the day with regular makeup remover. 

What else I really liked about this product was the value.  It comes in a fairly decent sized glass pot.  By the looks of things, it will take me quite a while to get through this whole pot, even using it daily. Overall, I couldn't be happier with this product.  Finally, it's what I've been waiting for!  MAC has done it once again!

This post contains affiliate links.


Wednesday, May 1, 2013

Gel Eyeliner- The Good, The Bad, The Ugly

Oh, I wish I had a better review to share with you.  But let me back up.  If you haven't heard, gel eyeliners are all the rage.  EVERYONE seems to be jumping on the bandwagon.  The top cosmetics companies have all had a go at creating their own versions right on down to every drug store brand you can think of.  And consumers *seem* to have pretty good reports.  Not this one, though.  Read on for the good, the bad, and the ugly of it all. 


I thought I would love gel eyeliner.  And I couldn't wait to give it a go.  I wear eyeliner every single day.  And to this point, I have been a really big fan of liquid liner.  Yes, it can be a bit messy if you don't have a steady hand, but it looks flawless.  Anyway, back to the gel version.  I tried both L'Oreal and Maybelline's versions of gel liner, and found the two to be pretty comparable in every way, from price point to application to finish.  

So here's the skinny from one very honest reviewer.

The Good:  Both get high marks for packaging and application.  As you can see pictured, gel eyeliner almost always comes in a little pot and you apply it with a tiny brush.  It might sound harder than it is.  Let me tell you, I have never experienced such a smooth and easy application for eyeliner.  Gel really gets tops marks for that.  It's almost like melted crayons.  There is zero pulling, tugging, etc to get it on.  It just spreads on like hot butter.  

The Bad:  They fade!!  Maybe not everyone expects as much out of their eyeliner as I do, but I apply my makeup in the morning, and don't take it off until the very end of the day.  I expect, if not demand, that it stay in place.  And there are some things you expect to touch up during the course of day, your powder, your lipstick, but I have never ever had to touch up my eyeliner.  Both of these gel eyeliners faded over the course of the day from the black color I started with to a dull gray and in some cases just faded away altogether.  Sorry, I can't have that.  Maybe if I only wore it for a few hours on a date, I wouldn't have even noticed it at all.  And, maybe that's not an issue for everyone.  But for me, it's a deal breaker.  Sorry.

The Ugly:  Smudges and smears.  Ick.  Even if I could put up with the fading, I absolutely draw the line with smudgy smears and streaks on my eyelids.  And let me tell you, there is a big difference between a smokey eye and one where the makeup just fell apart on you.  I have seen other reviewers comment on smudges occurring on application.  I didn't have that problem.  I am a makeup aficionado, after all.  But over the course of the day, it did smudge out on me and left me feeling messy.  

Will I try others?  Nope.  I think I've had my fill of this trend.  So back to my trusty liquid liner I go.  If you've had success with this trend, please let me know.  I would love to hear all about it.  Until then, I will be loving the one I'm with.  :)

Friday, March 22, 2013

Nude Eyeliner- a surprisingly easy way to perk up your eyes

I'm always on the lookout for any product that will perk up my eyes.  Whenever I'm tired (almost every morning of every day of my life), my eyes give it away first.   That, and my inability to speak until the first cup of coffee is flowing through my system.  :)

So anything that brightens up those peepers is worth a try.  I recently discovered the joys of nude eyeliner.  As shown here, you use it on the inner rim of your lower lid, and ta da!
an instant picker upper!

It works by reflecting the whites of your eyes, making them look a little bigger and a lot more open.  


Now how's that for instant gratification?  

Wednesday, February 27, 2013

Drug Store Alternative to Pricey Mascara

I don't know about you, but I have hunted high and low for a mascara that actually makes my lashes full, thick, long, strong, voluminous, and just plain pretty.  And over the years I have tried them all.  If you have ever spent much time looking at mascaras in the stores, you might have noticed what I have- most brands of mascara promise only one thing- either that they will thicken your lashes, lengthen your lashes, volumize your lashes, or whatever- but very few promise to do ALL those things.  And that's exactly what I want, dang it!  Why can't a girl have it all?

But there is good news!  I have found the one that does do it all.  And even better news is that it's a drug store brand- so it's a low cost alternative to those pricey department store brands.  So which one is it?

Drumroll please....   L'Oreal Voluminous Mascara


And the one pictured in exactly the one you are looking for.  Like most brands, this one comes in lots of different varieties.  Choose the one that days "Original" right on the package.  It is a good value no matter where you shop, and it's literally the best mascara I have ever worn.

This one is a good one, ladies.  So get out there and doll up those eyes.

This post contains affiliate links.

Monday, February 18, 2013

It's All a Blur- and that's a good thing!

It's been a while since I have reviewed a beauty product, but I have a new one for you, and it was worth the wait.  The product?  L'Oreal RevitaLift Miracle Blur, and it's a winner!


I was recently offered a free sample of this while out shopping, so I grabbed a couple to give a try before I really even knew what it was supposed to do.  No matter- it was free, and I do use (and love) other L'Oreal RevitaLift products, so I took it home to figure out.  

After a little light reading about this new product, I discovered that it is primarily touted to blur out the appearance of fine lines and other skin imperfections.  As I have mentioned before, my primary skin imperfections aren't really fine lines (yet- fingers crossed) as much as skin tone imperfections.  I have dark circles, and a face full of freckles.  Now, I'm not a huge fan of either but after 30-some years of living with them, I've become pretty adept at figuring out how to make my skin look as flawless as possible- thanks in large part to quite a bit of spackle that I will never give up.  But let's face it, there are some situations where a fully made up face just doesn't make sense- the beach, the pool, the gym, working in the yard, etc. 

And that's where this product comes in.  I used my samples for a couple of early morning gym visits, and I have to say that my bare face has never looked better!  It literally blurs out all of the skin imperfections and makes your skin look (and feel) really fabulous.  Usually, I have to be on my death bed before I will leave the house without makeup- and I guess if I were on my death bed, I wouldn't be going anywhere anyway, but you get the idea- this product is a game changer.  Now, to clarify, I will NEVER show up at the office, a speaking engagement (what I do for work), or most any other worthwhile venture without being made up first.  But for those trips to the gym or the pool, I have found my new best friend!  Oh, and It does contain a fair amount of sunscreen too, which protects your skin on days you are outside.

Other reviewers have also said that they use this as a makeup primer because it also makes your skin feel incredibly smooth, so I can certainly see why people might decide to use it for that.  But for this reviewer, I am more than content with using it alone and letting it work it's magic all on it's own.  

It is relatively new to the market, so you may have a little trouble finding it in stores just yet.  I did. So I ended up ordering my full size product from Amazon.  So head's up just in case. 

I'm so glad I gave this product a try; it's one of the few that really does all it says it does.   

I'm a happy girl. :)
 

This post contains affiliate links.

Saturday, October 20, 2012

Maybe She's Born With It...

If you mean dark circles, then yes, I was certainly born with it!  I don't think that was what Maybelline was talking about when they coined that slogan, but hey, you have to play the hand you're dealt.  :)  And I have looked high and low for years for a concealer that would do a good job covering them.  Ladies, if you too struggle with this pesky genetic trait, look no further.  Maybelline has created the best concealer EVER!!


It's called Instant Age Rewind Eraser, and it does the job better than any concealer I have ever tried.  Yes, it's a drugstore makeup, so it's fairly inexpensive, but I promise I would pay twice the asking price on this.  It's that good.

You dispense the concealer by winding the tube, forcing the concealer into the soft spongy applicator and then just spread it on.  The coverage is flawless.

As with any concealer, you want to choose a shade a little lighter than your skintone.  I use the lightest shade of concealer they make (Creamy Ivory Light, 120) since I have a light complexion to begin with.  It comes in 12 shades, and I always see it when I visit my local drugstore, so it should be in your area too.

Incidentally, my sister-in-law (who doesn't know anything about dark circles) is the one who introduced me to this product.  She has nearly perfect skin, and would never have a need for this type of makeup, but she heard about it from friends who tried it and loved it.  Don't you just love a good product endorsement?  Apparently, when it first hit the stores, they couldn't keep it in stock. It was instantly that popular.  Eek!  Glad I haven't run into that issue.

So ladies, give it a try.  I promise it will be some of the best money you ever spend.  :)
 

This post contains affiliate links.

You Might Also Be Interested In