Sunday, December 22, 2019

Harris Family Christmas Traditions

This year instead of writing a parody of 'Twas the Night Before Christmas, I thought I'd write about our family traditions. Some have been around for ages, and some are newer ones that have developed over the past few years but are sure to stick around for years to come.


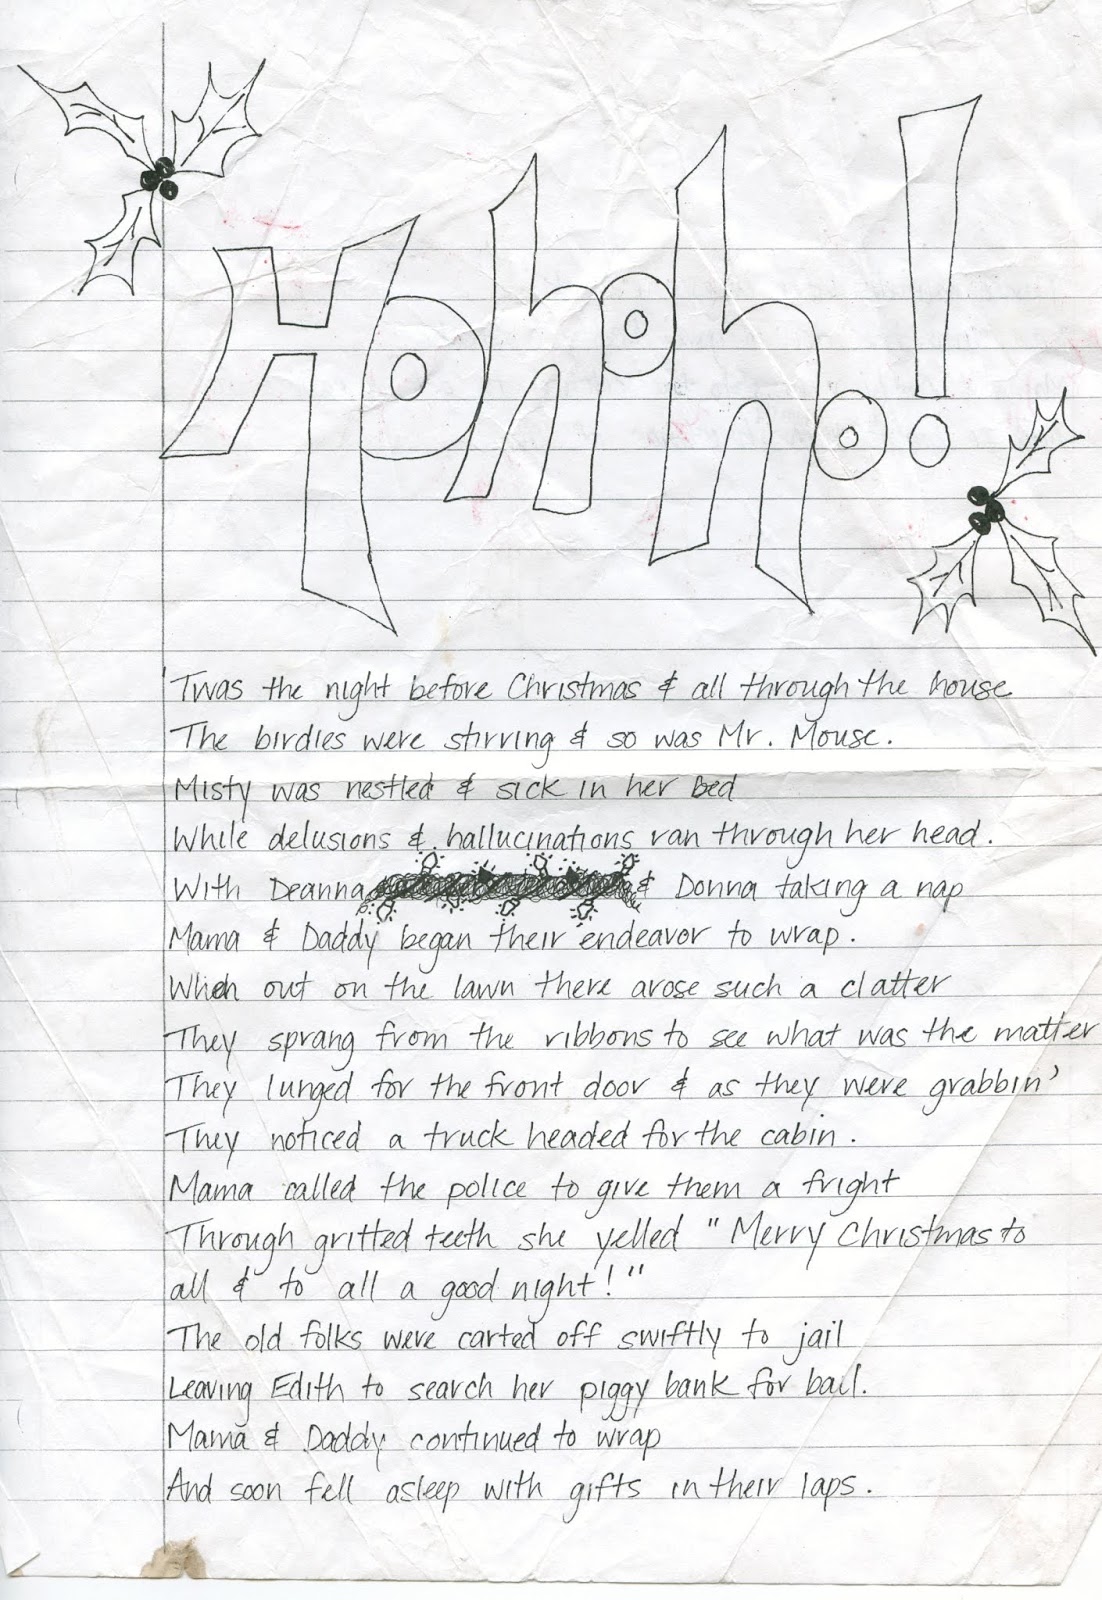
'Twas the Night Before Christmas Parodies

This is a Harris Family tradition that dates back to the days of yore (back to the 1900s as the boys like to say). These were originally created with good old fashioned pencil and paper while sitting at the kitchen bar on Christmas Eve night.

They DO take a little time to go over the highlights of the year, put them in some semblance of an order, AND make them rhyme. So, even though I didn't have the chance to pen a fresh one for you this year, I found a few scans of two original, hand-written ones from 1996 and 1997!


Seems like 1996 was a banner year, as Mama and Daddy apparently called the police on some suspicious looking neighborhood activity whilst wrapping presents on Christmas Eve night! Never a dull moment in the Harris household, I tell you!

The Legend of the Burn Barrel

If you were reading closely in the second parody above, you might have caught the second tradition:  the burn barrel. This is something that we Harris Sisters have always joked about, especially at Christmastime. Have an entire living room full of crumpled wrapping paper, tissue paper, and bows? Never fear! Daddy will burn it in the burn barrel! Of course, we grew up in a different era when burning trash was not discouraged like it is now.

Over the years, we have moved the actual unwrapping Christmas presents to my house instead of Daddy's house. But we have never let that interfere with the legend of the burn barrel. The grandkids are all familiar with it. Instead of feeding it with wrapping paper as we did growing up, Daddy keeps a pile of kindling and logs outside just so that they can make a fire in it when we visit at Christmastime. The legend lives on! Here are a few photos of us around the burn barrel.


National Lampoon's Christmas Vacation

If you look closely at the t-shirts we're wearing in the photo with Daddy above, you'll see that they say "Fun, Old-Fashioned HARRIS Family Christmas" and they feature the station wagon with the infamous giant Christmas Tree from the National Lampoon's Christmas Vacation movie.

We watched this movie every year at Christmas growing up and we still love it to this day. Misty had these t-shirts custom made for us one year and they were a big hit.

Deanna and John have a set of the Moose mugs that are featured in the movie. Perfect for drinking egg nog:


And so do we (don't hog the nog, man!)


But we also identify with the next door neighbors in the movie, Todd and Margo.


And Daddy? Well, he wears his custom Griswold 00 Blackhawks jersey at Christmastime to celebrate! In this picture he's holding his absolute favorite gift: chocolate cherries. We wrap them like Mr. Shirley's L-Shaped Christmas gifts that he receives from multiple employees. (Who the heck even knows what those gifts even were?)


But nothing tops the year we planned an entire Christmas Vacation Themed party. That was a hoot!


Eat at a Mexican Restaurant

OK so this is a newer tradition that has sprouted up over the past few years, but we are running with it! It might be one that our children continue with their own families. My boys certainly ask about it every year, so it is firmly planted in their heads already!

Every year The Harris Sisters converge on our hometown of Roxboro, NC in the days after Christmas to visit with Daddy, see the Christmas decorations downtown, visit the small shops on Main Street, and start our official Harris Family Christmas celebration.

Harris Sister Misty's daughter, Emma, has a birthday on December 27. So, we have taken to going out to dinner at the local Mexican restaurant. We get to have a wonderful meal as a family and celebrate her birthday at the same time.

You might notice that we check in with you guys on Facebook in these days and post pictures of what we're doing. If it ever looks suspiciously like we've got a bar behind us in the photo, well, we do!

Feliz Navidad, Peeps!


Take a Group Family Photo

Even though some members of your family may have traveled a long way to visit, and even though not everyone may be able to stay for the same amount of time, we figured out a long time ago that there's no better time to take a family photo than when everyone is together for the holidays.

We usually choose to take our photos outside for the best lighting (and to avoid piles of presents, wrapping paper strewn about, etc., in the background). We will take them inside if there's rain or snow, but we find that with a group as large as ours, we can spread out more and just get an all-around better photo outside.

And we always take the photo with whomever was able to attend. No excuses of "so-and-so wasn't able to make it this year, so we're not taking the photo" or "I didn't know we were taking a photo, so I don't like what I'm wearing." Guess what? 10 or 20 years from now, even the most fashionable person in that photo will question his or her fashion choices/makeup/hairstyle, but everyone will be glad you were in that photo.

We use a digital camera set on a tripod to take the photo and we set it to automatically take 10 photos so that everyone who did come can be in the photo (no one is missing from the photo because they were taking it). If you have the camera, but not the tripod, you can buy one on Amazon for cheap!

And these photos make great gifts too! We usually collect the photos we take throughout the year and compile them into a calendar for Daddy as a Christmas present. If you get one great group shot, you could also frame it as a gift.

We try to make sure that if we don't get a group photo at Christmas, we get one in the fall when we visit each other. We shoot for at least one or two group photos a year. We take different combinations (whole group, Daddy with daughters, Daddy with grandkids, etc.). Here are some group shots we've taken over the years - you'll notice how our family has grown!


Hope you've enjoyed reading about some of our family's Christmas traditions! Merry Christmas from The Harris Sisters!


This post contains affiliate links.

Saturday, December 14, 2019

Classic Cheese Ball Recipe

Our family makes this recipe every year around Christmas time. We usually make it on Goodie Baking Day (along with all of the other cookies and candies and sweets) even though it's technically a savory party appetizer.

This easy recipe makes enough for two large cheese balls or three small cheese balls, depending on how you divide and shape them. We usually make two and then put one in the refrigerator to use right away and freeze one to use later.


Classic Cheese Ball

Cheese Ball

16 oz shredded sharp cheddar cheese
8 oz cream cheese (softened)
1/2 small onion (grated fine)
1 Tbsp grated bell pepper
1 Tbsp pimento
1 tsp lemon juice
1 clove garlic (minced)
1 tsp mustard
1 cup mayonnaise
2 tsp Tabasco sauce
pinch salt

Decorations

8 oz chopped pecans (finely chopped)
maraschino cherries
pecan halves

Serve With

assorted crackers
  1. Start by combining all ingredients except shredded cheese together in a mixing bowl. Combine until the mixture is a smooth, creamy consistency without any lumps.
  2. Add the shredded cheese to the mixture and stir it together. 
  3. Cover the mixing bowl with plastic wrap and set it in the refrigerator to cool and firm a little. This helps with the shaping process.
  4. While the mixture is cooling, use a food processor to finely chop your pecans. Pour the finely chopped pecans onto a plate.
  5. Once the cheese mixture has firmed up enough that you can shape it, divide the mixture into two or three even sections (depending on how many cheese balls you want to make). Shape each section into a ball with clean hands that you've sprayed with cooking spray to prevent sticking. 
  6. To coat in nuts, roll each cheese ball on the plate of pecans with one hand and use your other hand to gently scoop the chopped nuts and press them into the cheese ball.
  7. Once the outside of the cheese ball is completely covered in finely chopped nuts, move it to a small plate or dish for serving. Repeat with the remaining cheeseballs until all are covered in nuts and plated.
  8. If desired, decorate the top of your finished cheese balls with maraschino cherries and pecan halves.
  9. Serve with an assortment of crackers. 

Notes:

You can either mix this recipe by hand or with a handheld electric mixer.

In our family, we always flatten the cheese ball after plating and before decorating, and storing in the refrigerator or freezer. This is optional, but it makes storage a little easier. (Perfectly round cheese balls take up a little more space vertically.)

To freeze a cheese ball, wrap it tightly in two layers of plastic wrap and place in the freezer. A cheese ball stays good in the freezer for about one month. Thaw the cheese ball for a full 24 hours in the refrigerator before serving.

Many cheese ball recipes have the ingredient of Worcestershire sauce, which is made from anchovies. But this one doesn't, so feel free to share this appetizer with your vegetarian friends.

Make sure that you include cheese spreading knives on your cheese ball platter. If your guests dip their crackers straight into the cheese ball, they might break their crackers into pieces!
    The grated bell pepper and pimento not only add flavor to the recipe, but when your guests cut into the cheese ball, they'll notice the classic red and green colors of Christmas!

    Enjoy!

    This post contains affiliate links.

    Thursday, December 5, 2019

    Mississippi Mud Cake

    'Tis the season for all things sweet and sugary! If visions of sugarplums are already dancing through your head, but you'd like a new old-fashioned recipe to try, we've got one you might not have thought about in a while!

    This scratch made Mississippi Mud Cake recipe is easy to make and because it's made in a 9 x 13 pan, it's also great to bring to any upcoming holiday potlucks or get togethers that might be on your radar this time of year.


    Mississippi Mud Cake


    Cake

    1 stick butter
    1/2 cup cocoa powder
    2 cups granulated sugar
    4 eggs
    1 1/2 cups all purpose flour
    pinch of salt
    1 1/2 cups chopped nuts
    1 Tbsp vanilla

    Frosting

    1 7 oz. container Marshmallow Creme
    1 lb. confectioner's sugar
    1/3 cup cocoa powder
    1/2 stick butter, at room temperature
    1/4 cup milk, plus additional to create correct consistency, if needed


    1. Preheat oven to 350 degrees. Spray a 9 x 13 baking dish with cooking spray. Set aside.
    2. Melt 1 stick of butter and 1/2 cup of cocoa powder together. 
    3. Stir in 2 cups of sugar and eggs. Mix well.
    4. Add flour, salt, nuts, and vanilla. Mix until thoroughly incorporated.
    5. Spoon batter into baking dish and spread evenly. Bake for 35-40 minutes, until toothpick inserted into the center comes out clean. Remove from oven.
    6. Spoon Marshmallow Creme onto cake as soon as it comes out of oven. Let it sit on top of cake to warm, and then spread evenly across cake.
    7. Use an electric mixer to mix confectioner's sugar, 1/3 cup cocoa powder, 1/2 stick butter, and 1/4 cup milk. Beat until smooth. Add additional milk 1 Tbsp at a time, if needed, to bring frosting to a pourable consistency.
    8. Pour frosting evenly over top of marshmallow creme. Swirl with the tines of a fork to create a marble effect.
    Notes:

    This cake is super-sweet, so a small piece will probably do the trick.

    Because this version of the cake uses Marshmallow Creme instead of traditional marshmallows, it's safe for your vegetarian friends to eat too since Marshmallow Creme doesn't contain gelatin. AND you'll get to skip the step of returning the cake to the oven to melt the marshmallows. Win-win!

    I chose to use walnuts in this cake, but pecans would also taste great. Use whatever you have in your pantry!

    Enjoy!


    Wednesday, November 20, 2019

    Southwest Stuffed Acorn Squash

    You might still have a few different types of fall squash in your grocery store produce section. If so, this would be a fun new recipe for you to try out. We recently posted about Broccoli and Cheese Stuffed Spaghetti Squash, which is a new and different spin on Italian cuisine.

    But, this easy recipe is a way to incorporate Southwest flavor with a fall squash. And just like the other recipe, you serve it right in the squash, so it makes a lovely presentation for your fall table!


    Southwest Stuffed Acorn Squash


    2 acorn squashes
    2 tablespoons olive oil
    1 3/4 cups vegetable stock
    1 cup brown rice, rinsed
    1 tablespoon olive oil
    1/2 red onion, diced
    1 clove garlic, minced
    1/2 teaspoon salt
    1/4 teaspoon pepper
    1 teaspoon chili powder
    1/2 teaspoon cumin
    1/2 teaspoon paprika
    1/4 teaspoon onion powder
    1/4 teaspoon cayenne pepper
    1/4 teaspoon dried oregano
    15 oz can black beans, drained and rinsed
    11 oz can corn, drained and rinsed
    10 oz can roasted diced tomato
    1/2 cup shredded cheese blend
    avocado slices (optional, for garnish)
    sour cream (optional, for garnish)


    1. Preheat oven to 400 degrees.
    2. Cut off the ends of each squash and then cut each squash in half horizontally. Scoop out seeds with a spoon.
    3. Drizzle squash halves with olive oil and sprinkle with salt and pepper to taste. Place cut-side up on a parchment paper-lined baking sheet.
    4. Bake for 40 minutes, or until tender.
    5. In a medium saucepan, add vegetable stock and rice. Stir and bring to boil over high heat.
    6. Cover and simmer for 45 minutes. Remove saucepan from heat.
    7. Heat olive oil in a large saucepan or skillet over medium heat.
    8. Add onions, stirring frequently until translucent.
    9. Add garlic and cook until fragrant.
    10. Add salt, pepper, chili powder, cumin, paprika, onion powder, cayenne pepper, and dried oregano. Stir until spices are evenly distributed.
    11. Mix in black beans, corn, tomatoes, and cooked rice.
    12. Fill squash halves with rice mixture and sprinkle with cheese.
    13. Bake for 5 minutes, or until cheese is melted.
    14. Top with avocado slices or sour cream before serving.

    Notes:

    The 1/2 teaspoon of salt and 1/4 teaspoon of pepper are added with the other spices to the onion and garlic mixture. When salt and pepper are mentioned previously in the recipe, just season the squash halves to taste.

    The ingredient list may seem off-putting at first glance, but 8 of the ingredients are spices. This is not a terribly difficult recipe to put together. My son Jaxon helped!


    You may have additional rice mixture left over after stuffing the squash halves. This will be dependent on the size of the squashes you use. The rice mixture is also good eaten by itself as a side dish, or as a stuffing mixture for tacos or burritos.

    The recipe as written makes enough for 4, with each person getting 1/2 of a stuffed squash as a serving.


    If desired, rather than serving the rice mixture in individual "squash bowls," you could scoop out the cooked squash, mix it with the rice mixture, and bake it in a casserole dish for the last 5 minutes.

    To make the recipe vegan, omit the final cheese garnish and serve with only avocado slices as a garnish.

    Enjoy!


    Wednesday, November 13, 2019

    Earthquake Cake

    We made this doctored cake a few months ago and I'm just now getting around to posting it for you guys. It was ooey-gooey delicious, and it just might be the easy cake recipe you're looking for with upcoming holiday potlucks around the corner!

    With just 6 ingredients, it doesn't get any easier than this, and you don't even have to make a separate frosting for it. A second "batter" gets baked into the cake and it kind of frosts itself!


    Earthquake Cake


    1 cup sweetened flaked coconut
    1 cup chopped pecans
    1 box Devil's food cake mix
    1 stick butter, softened
    1 8 oz. package cream cheese, softened
    1 lb. confectioner's sugar
    1 cup chocolate chips (optional)


    1. Preheat oven to 350 degrees.
    2. Spray a 9 x 13 baking dish with cooking spray and sprinkle with coconut and pecans. Set aside. 
    3. Mix cake mix according to package directions and pour over coconut and pecans.
    4. Cream together butter, cream cheese, and confectioner's sugar. Spoon this mixture randomly over top of the cake mix.
    5. Sprinkle chocolate chips over top of the cream cheese mixture if you're using them.
    6. Bake for 45 minutes. Enjoy!

    Notes:

    Some versions of this recipe call for you to swirl the cream cheese layer with the cake batter layer before baking. I opted not to do this because, quite frankly, dropping the cream cheese mixture into the cake batter and leaving it is what causes the "earthquake" effect when it bakes. Swirling the two layers together would create more of a marble effect.

    This cake is supposed to be a gooey cake, so testing for done-ness with a toothpick in the center of the cake will not work. It will be a little jiggly in the center when you remove it from the oven, but the sides will be done. Look at this yummy cake!


    The original recipe called for German Chocolate cake mix, but I substituted Devil's food cake mix and it did not disappoint!

    I opted not to add chocolate chips because the recipe already looked pretty decadent. I can only imagine that they send it right over the top!

    Thursday, October 31, 2019

    Into the Upside Down: Our Stranger Things Group Halloween Costume

    It's that time of year again! The boys chose characters from the popular Netflix TV show Stranger Things for our group Halloween costume this year.

    Stranger Things Group Costumes


    If you're not familiar with the show, it's set in the 1980's in Hawkins, Indiana and features a group of teenage and preteen kids who battle alien/other worldly creatures with the help of their parents. The 1980s nostalgia ALONE was what initially drew Ryan and me to the show. They just finished season 3, so many of our costumes focused on what the characters wore specifically this season.

    Here we are ready to battle a Demogorgon as the characters Steve Harrington (Aidyn), Eleven (me), Hopper (Ryan), and Dustin (Jaxon):


    Here's a closer look at all of the costumes.

    Aidyn called dibs on Steve Harrington first thing and we purchased his costume at Spirit Halloween. It is a very well made costume that includes the shirt, shorts, embroidered hat, and pin-on Steve name tag. This represents the uniform that he wore at the Scoops Ahoy Ice Cream shop for the entire Season 3:


    Jaxon wanted to be Dustin Henderson. While they sell an "official" Dustin costume, I did not think that one looked particularly well made. Instead, I opted to piece this costume together from items that I purchased on eBay (hat, socks, and Roast Beef t-shirt), items we already owned (shorts), and one hand-sewn item (the vest).

    You can sew your own Dustin Season 3 vest with the step-by-step tutorial that I used last year to create a Han Solo vest. The process is the same, you will just need to start with a chambray shirt instead of a black shirt. To create the "patch" I purchased 1/8 of a yard of NASA Cotton Fabric Patches on Blue and appliqued on the Spacelab patch. This was a pretty good match to the 1985 Discovery mission patch on Dustin's vest because it included a lot of the same elements (flag, space shuttle, Earth).


    The two choices for me this year were either Eleven or Joyce. While Joyce would have probably been a better fit with Hopper, we thought it would be a little hard to pull off a Stranger Things group Halloween costume without an Eleven. So, I chose the "battle scene" outfit from Season 3. This costume is also one that is available for purchase, but it included a shirt and black suspenders (which I already owned from when we dressed as Minions for a trip to Disney at Halloween), and I would have still had to purchase pants for the costume. So, I also ended up piecing this one together from vintage items I purchased on eBay (shirt, high waisted pleated jeans) and items I already owned (suspenders, belt, and high top Reeboks from a previous 1980s costume).


    Ryan was a natural choice for Jim Hopper. The biggest endeavor for his costume is that he has been growing his hair out and growing a beard (which has now been trimmed into a mustache) for the longest time. Hopper's look for Season 3 was that he was a fan of Magnum PI and wore a Hawaiian shirt. They do sell an official Hopper costume shirt, but we were able to pick up a Hawaiian shirt with similar colors on our 20th anniversary vacation in Hawaii this year, so we used this one instead. We added some light wash jeans, boots, and a watch to complete the look.


    And you didn't think we'd forget our pups Smitty and Chance did you? Their costumes were really easy to put together! While you might naturally think that a Demogorgon (or Demodogs as they were called for a while on the show) would be right up their alley, our pups really don't like wearing costumes THAT much. So, I opted for easy Stranger Things t-shirt dog costumes for them. I purchased red t-shirts at the craft store and spent a little time with my Cricut machine designing shirts for them so they could both be the character of Billy, who was a lifeguard at Hawkins Pool.


    But Wait! There's More!


    We have even more Halloween magic up our sleeves this year! Bet you didn't think that was possible, did you?

    Because all of the Harris Sisters are creative in their own rights, we seldom discuss our Halloween costumes with each other, so imagine our surprise when just days before Halloween, we found out that we had another set of Stranger Things costumes this year! Harris Sister Misty's daughters also dressed as Stranger Things characters so check out their awesome costumes too.

    Charlotte nailed Robin, who works as the other clerk at the Scoops Ahoy Ice Cream Shop with Steve:


    And Emma was also Eleven and is wearing the romper that she wore in the shopping scenes at Starcourt Mall. (And I have to say, she has got that Eleven stare down-pat.)


    And isn't this one just the cutest - Baby as a teeny Eleven from Season 1 wearing Nancy's smocked pink dress, a blonde wig, and yellow and green tube socks!


    The Devil's in the Details


    • Many of these costumes are available at your local Halloween store, but they're also not hard to piece together yourself from your own closet or from your local thrift store.
    • To get that true 1980s look for your boys, have them start growing their hair out as soon as you settle on costumes. They make wigs that you can purchase, but those are oftentimes uncomfortable to wear and they add to the expense of large group costumes. Aidyn, Jaxon, and Ryan have missed SEVERAL haircuts, and Ryan has been growing out his facial hair too so that he could have a mustache. They're all looking forward to haircuts on November 1!
    • Use props for your photos to give them that extra "oomph" - Steve (Aidyn) is wielding a baseball bat that I wrapped with duct tape that I poked screws through to mimic the spiked bat he uses in Season 1, Dustin (Jaxon) is wielding a can of Farrah Fawcett hairspray that I created for him - this is just a piece of paper printed out and taped around a real can of hairspray, Hopper (Ryan) of course has a toy gun, Robin (Charlotte) is using a dry erase board with the You Rule/You Suck tally marks, Eleven and Robin (Emma and Charlotte) are eating ice cream presumably from Scoops Ahoy Ice Cream Shop, and Eleven (Baby) is proudly hugging two boxes of Eggos (Eleven's favorite breakfast food).

    How Many Times Have We Worn the Same Costumes as Each Other?


    Great minds apparently think alike! Whether planned or by surprise, it turns out sometimes we have worn the same costumes as each other. If this happens to you, rather than getting upset, round up everyone with the same costume or same theme and get a big group photo! In fact, we were hoping to be able to get our families together to get some big group photos, but we didn't have enough time this year.

    We know if we find any Joyces, Mikes, Barbs, Lucases, Alexis, etc. on Halloween night, we're definitely going to take photos with them! (PS we're also on the lookout for a yellow convertible!)

    Here's a list of some of the times the Harris Sisters have dressed alike:


    We wish you the happiest of Halloweens from the Walkush and the Turner families!

    Friday, October 11, 2019

    Broccoli and Cheese Stuffed Spaghetti Squash

    I don't know about you, but once the fall season rolls around, my grocery store produce section is overflowing with all kinds of different squash and pumpkins! And every year, I think I should really be more adventurous and try out some new recipes with these different types of fall squash.

    So, today I'm sharing with you a recipe that our family tried this week and we're definitely going to make again. It uses spaghetti squash and incorporates broccoli, cheese, and spices to make it into a wonderful Italian meal. And you know what else? It's low carb and gluten free too! Can't beat that!


    Broccoli and Cheese Stuffed Spaghetti Squash

    2 2½- to 3-pound spaghetti squash, halved lengthwise and seeded
    2 Tbsp olive oil
    3 bunches broccoli, chopped
    4 cloves garlic, minced
    1/2 tsp crushed red pepper
    4 Tbsp water
    2 cups shredded mozzarella cheese, divided
    1/2 cup shredded Parmesan cheese, divided
    1 1/2 tsps Italian seasoning
    1 tsp salt
    1/2 tsp pepper


    1. Position racks in upper and lower thirds of oven; preheat to 450 degrees. 
    2. Halve squash lengthwise and remove seeds. Place squash cut-side down in a microwave-safe dish. Add 2 tablespoons of water to the dish. Microwave uncovered on high until flesh is tender, about 10 minutes. Repeat with other squash.
    3. Meanwhile, heat olive oil in a large skillet over medium heat. Add broccoli, garlic, and red pepper (if using). Cook, stirring frequently, for 2 minutes. Cover and turn heat down to low. Cook until the broccoli is tender, about 3 to 5 minutes more. Transfer broccoli to a large bowl. 
    4. Use a fork to scrape the squash from the shells into the bowl. Place the shells in an oven safe baking dish. 
    5. Stir 1 1/2 cups mozzarella, 4 tablespoons Parmesan, Italian seasoning, salt, and pepper into the squash and broccoli mixture. Divide it evenly between the shells. Top with the remaining mozzarella and Parmesan. 
    6. Bake on lower oven rack for 10 minutes. Move to upper oven rack, turn the broiler to high, and broil until the cheese starts to brown, about 2 minutes. Make sure to watch the squash carefully while broiling.


    Notes:

    I used a small 8 1/2" X 11" Pyrex casserole dish to microwave the squash and turned off the turntable while microwaving. Turn the dish halfway through cooking to make sure the squash cooks evenly.

    I used the same casserole dishes that I used for microwaving the squash to bake the squash in for easier cleanup!

    The recipe as written makes enough for 4, with each person getting 1/2 of a stuffed squash as a serving. Add some homemade bread and a salad for a full meal.

    This makes a pretty presentation served in the squash shell, but after you've mixed together the spaghetti squash, broccoli, cheese and spices, you could also add it all to a casserole dish and bake it that way too!

    You Might Also Be Interested In