Showing posts with label summer. Show all posts

Wednesday, April 10, 2024

Pig Pickin' (Mandarin Orange) Cake

You might have seen this Pig Pickin' Cake called everything from Mandarin Orange Cake to Pineapple Mandarin Sunshine Cake to Pineapple Sunset Cake. This light and fluffy cake is easier than ever to make because it starts with a box cake mix. It has mandarin oranges beaten into the batter and pineapple is mixed into in the Cool Whip frosting.

Perfect for picnics, summertime potlucks, and BBQs, this old-fashioned cake originally got one its name from how popular it was to bring it along to Southern pig pickins. And, of course, North Carolina (the Harris Sisters' home state) is where this cake seems to have originated.


Pig Pickin (Mandarin Orange) Cake

Cake
1 box of yellow cake mix (plus ingredients the box mix calls for)
11 oz can mandarin oranges (drained)

Frosting
20 oz can crushed pineapple (drained)
3.4 oz box of instant vanilla pudding
12 oz Cool Whip

Garnish
marischino cherries (optional)
Mandarin oranges (optional)

  1. Preheat oven to 350 degrees. Spray a 9 x 13 baking dish with cooking spray. Set aside.
  2. Prepare cake mix according to package directions.
  3. Beat in the drained oranges until blended.
  4. Pour into greased 9 x 13 baking dish.
  5. Bake for 30-35 minutes or until a toothpick inserted near the center comes out clean. Remove dish from the oven and place on a wire rack to cool. Allow to cool completely.
  6. Once cake has cooled, prepare the frosting. In a bowl, combine the drained pineapple and dry vanilla pudding mix.
  7. Fold Cool Whip into the pineapple-pudding mixture.
  8. Spread the frosting over the top of the cake.
  9. If desired, garnish with additional Mandarin oranges and maraschino cherries just prior to serving.
  10. Store this cake in the refrigerator.


Notes


If you want larger pieces of oranges in the cake, gently mix or fold them into the batter in step 3.

You can also make this recipe as a layer cake in two 8 inch cake pans, baking for 23-27 minutes or until a toothpick comes out clean.

Keep the cake refrigerated until ready to serve. The cake can be out for about an hour, without direct heat. Refrigerate any leftovers. Cake is best 3-4 days after baking.

Monday, August 16, 2021

Lemon Blueberry Quick Bread

When our recent blueberry picking excursion left us with a huge bounty of blueberries, we started looking for yummy ways to incorporate them in quick and easy recipes.  This lemon blueberry bread came together quickly and was a huge hit with the whole family.  I love this bread for breakfast with coffee, while the rest of my family enjoyed it as a dessert bread.  Either way, it's a winner.  Bonus points if you make two and freeze one for later.  You will thank yourself!  


Lemon Blueberry Quick Bread

1/3 cup butter, melted

1 cup sugar

3 Tablespoons lemon juice

2 large eggs, room temperature

1 1/2 cups all purpose flour

1 teaspoon baking powder

1/2 teaspoon salt 

1/2 cup 2% milk

1 cup fresh or frozen blueberries

1/2 cup chopped nuts

2 Tablespoons grated lemon zest


Glaze: 

2 Tablespoons lemon juice

1/4 cup sugar


  1. Preheat oven to 350 degrees. 
  2. In a large bowl, beat butter, sugar, lemon juice, and eggs.  In another bowl, combine flour, baking powder, and salt. Stir into egg mixture alternatively with milk, beating well after each addition.  Fold in blueberries, nuts, and lemon zest. 
  3. Transfer to a greased loaf pan.
  4. Bake 60-70 minutes, or until a toothpick inserted in the center comes out clean. 
  5. Cool for 10 minutes before removing from pan to a wire rack. 
  6. Combine glaze ingredients; drizzle over warm bread.  Cool completely. 


And if all this has you wishing for more blueberry recipes, we've got you covered.  Check these out: 

Monday, July 12, 2021

How to Create Your Own Summer Camp at Home

Now that the summer is in full swing, I thought I would share with you a little trick we tried recently.  We created our own summer camp right here at home, and let me tell you- IT WAS A HIT!  We have a big busy summer of travel, family plans, pool time, fun activities, playdates, and on and on and on.  So when we finally slowed down for a week, and had a little time to spend at home, it was a welcome change of pace.  BUT, I didn't want my kiddo to just veg out on screen time all week either.  So I had a brilliant idea.  Why not do our own summer camp at home?  So that's just what we did.  


Here are my top tips for you if you want to give it a go at home this summer too. 

Camp T-shirts


Nothing says camp like a good camp t-shirt.  Lexi and I like to match each other to begin with.  So our closets are already filled with matching t-shirts.  Each day, I picked which shirts we would wear and we matched all week long.  If you don't already have matching t-shirts, you could totally make some for a fun camp activity.  Or, pick a theme or color scheme instead.  For example, you could all wear super hero t-shirts one day.  Or wear your red, white, and blue.  The sky is the limit.  Matching shirts made it fun for us.  Every single day, Lexi woke up and asked which shirts we were wearing today!  Here's a look at some of our matching looks from camp week.


Planning is Key


I figured out pretty early in this process that making a plan for the day worked best for us.  I planned each day just one day at a time.  That way if an activity took longer than expected, we could easily shift things to another day without upsetting a week's worth of plans.  My kiddo really likes arts and crafts.  And we have lots of craft kits at home.  So I knew that I would include time on our schedule each day for something arty or crafty.  I enjoy field trips, and Lexi likes to do fun things that are new, exciting, or that we just plain haven't done in a while.  So I also made sure we had time each day for a fun activity outside the house. Each night before going to bed, I plotted out the next day's camp activities and printed off a little itinerary for Lexi to find the next morning.  We began each camp day around 8:30 am and wrapped around 3 pm.  She kept us on track and marked things off our to-do list as we completed them.  This schedule worked great for us, but it's your camp- so you can design your schedule around your schedule.  That's the beauty of it!

Kids Pick for Lunch

For me, this was a no-brainer.  I knew Lexi would enjoy having the freedom to make the lunch decisions for us.  So our lunches consisted of things like Happy Meals, PB&J picnics in the back yard, and trips to the Sonic drive-in.  I was completely ok with those choices.  If you prefer to have a little more control on the lunch decisions, you could alternate kid pick and mom pick days.  Or you could provide a list of choices and let the kiddos pick from your mom-approved list.  Again, it's all up to you.  But letting Lexi pick her own lunches was super fun for her, and we ended up having some really fun meals together.  


Choosing your Activities


Your days at your summer camp can be as simple or as well planned as you like.  We began each day with projects at home ranging from art projects to making crafts to cooking up treats in the kitchen.  Once we were all finished and cleaned up from our morning activities, we had lunch and then a field trip in the afternoon. I came up with a list of all sorts of fun things for us to try our hand at.  Again, some activities were super simple, some were a little more involved, and some didn't actually make it into production.  

Here's a look at some of the things we chose to do.

Arts and Crafts


Paper Fortune Tellers


If you are a child of the 80s, you will remember these.  Although, if you are anything like me, you will also have long forgotten how to actually make one.  Thank goodness for YouTube.  Click here for the tutorial we used.  But there are ton of them out there.  We had so much fun making these, especially the fortunes.  And when we were done, we decorated them with markers and stickers.  Lexi is still asking everyone she comes across to pick a color and then a number, and then doles out their fortune to them.  


Sunprint Paper Art 


We have actually had this kit and have used it before but it's always a fun activity and one that comes together quickly.  The idea is that you collect leaves and flowers and such from the garden, then arrange them on a piece of sunprint paper.  You layer a piece of clear plexiglass on top and sit the whole thing in the sun for just a few minutes.  Once the paper has changed color, you know it's ready.  You run the paper under water and let it dry.  Your sunprint develops like magic.  It's a really cool project and the kids always enjoy it!  These kits are readily available from Amazon.


Summer Selfie Art Project 


We are long-time followers of Cassie Stephens.  She is a local art teacher right here in our part of the world.  And last year, when the world shut down, she created all sorts of art tutorials for kids and posted them on YouTube and Instagram.  We made all kinds of art with her last year.  So a quick search on her YouTube channel was just what we needed to come up with a fun art project for one morning of our summer camp week.  This is the tutorial we used to create these summer selfies.  But once you are on her channel, plan to do some poking around, because she has the best ideas for kids' art projects.  Just pull one up and go step by step through it.  Pause where you need to catch up, and resume when you are ready to move on.  So fun and so easy.  


I also printed off lots of fun and free word searches, crossword puzzles, and coloring sheets at the beginning of the week, and when we had a little extra time we worked on a few of those.  I had lots of different ones to choose from, and we completed quite a few.  They were a big hit too!  Sometimes simple is good too.   

Field Trips and Fun Outings 


Story Bus


Our school district offers a wonderful (free) summertime reading service called the Story Bus to anyone who wants to participate.  The Story Bus parks in a grocery store parking lot three times a week, and while the little ones visit the Story Bus for some reading fun, parents can get their grocery shopping knocked out.  


So we visited one day of our summer camp, and Lexi had a ball!  One of her teachers was on the bus, and Lexi lit up seeing her again!  


They picked some books and read to each other from the comfort of some pretty cozy looking bean bag chairs.  


And when it was time to go, they sent us away with bagged lunches, cartons of milk, Sonic coupons, and a free book.  It's worth a check to see if your local district does something similar, but if they don't, check with your local library.  Almost all of them offer some sort of summer reading program for kids.  They are almost always free and lots of libraries offer storytime and other fun activities throughout the summer.  

Roller skating


One afternoon, I surprised Lexi with a trip to our local roller skating rink, and it was the best time.  She is just learning to skate, and I haven't skated in years, so we ended up being a great team.  


Our roller skating rink plays fun games and has races for all age groups.  When they announced a race for kids age 9 and under, Lexi was the first one to the starting line. 


And she made a great run at it, even with that kiddy walker thing.  She wasn't first place, but she wasn't last place either.  I love her confidence! 


Between skating and racing, we played some arcade games and wouldn't you know, Lexi ended up winning the jackpot.  She cashed in all her hard earned tickets for a cute stuffed hamster, and all was right with the world.  We skated until they were literally turning off the lights for the day.  I'd say this outing was a success. 


Swimming Pool


One especially hot afternoon, we made a trip to our local swimming pool for a little fun in the sun.  


We swam and floated, and found friends, and Lexi showed me every single trick she knows in the water.  It was the perfect way to spend the afternoon.


I also have other splash pads and local water parks on my list for later this summer.  

Exploring your Town


When this mural was installed a month or so ago, I knew I was going to take Lexi for a few pictures, so I put it on one of our itineraries one day. 


There are all sorts of murals in our area and we have had fun doing this for years.  It also makes for a fun scavenger hunt.  Tell your kiddos what you are looking for and see if they can spot it.  


Other Fun Things to Try at Home


Manicures and Pedicures


We spent the better part of one camp morning having an at-home spa experience.  We picked nail colors and I polished fingers and toes with all sorts of glitter and sparkle.  You could also play with different hairstyles, or do a foot bath, test out all your lip glosses and pick your favorite flavor.  So many fun ways to play spa.  


Tie Dye


We had never done tie dye before our camp week at home, but we tried our hand at it and I have to say, the tie dye kits they sell make it super simple for even beginners like us.  We took a small field trip to our local craft store to buy our supplies and then worked on making matching t-shirts at home.  Just make sure you have newspaper down to protect your surfaces and wear gloves to keep your hands clean.  


Our shirts turned out great!  I added our names with the help of my Cricut and some iron on vinyl.  Now we have more matching t-shirts for our next camp week, or to wear anytime just because they are awesome!


Other Fun Ideas for your DIY Summer Camp


As I said, we didn't actually complete all the items on our summer camp bucket list, so we have lots of ideas left for other summer camp weeks.  Here are some of our ideas for future summer camps: 

  • Paint your own pottery
  • Make an iMovie
  • Have a picnic at the park
  • Set up water slide in the back yard
  • Go for a bike ride
  • Afternoon at Chuck E Cheese
  • Go bowling
  • Visit the local flower truck and make a flower bouquet
  • Plant wildflowers
  • Find a pen pal and start writing letters
  • Berry picking
  • Visit the local bounce house
  • Go for a creek walk
  • Indoor rock climbing
  • Horseback riding
  • Make sweet notes/ drawings for neighbors and friends
  • Splash pad
  • Lego party
And if that doesn't give you enough ideas, check out this Harris-Sister approved list of 100 Things to do this Summer,   

Overall, we give Summer Camp at Home a 10 out of 10.  My kiddo is still asking me when we are going to do it again.  Soon, my dear.  I promise, soon.  I hope you all are enjoying your summer too!  And if you decide to give this idea a go, comment below to let us know how you spent your time.  We would love to hear from you!

This post contains affiliate links.

Tuesday, June 22, 2021

Blueberry Jam

Around these parts, it's berry-pickin' season. And that means all new recipes for fresh picked berries! With a harvest of fresh blueberries at our disposal, the boys and I set off on our very first jam-making adventure. I surprised even myself at how easy it was - the jam set perfectly and the water bath canning method wasn't as difficult as I expected. As long as you follow the step-by-step instructions, your jam will come out just fine. So don't let jam or jelly recipes intimidate you! This one is a winner!

Printed water bath canning directions are usually included in each package of pectin, and you can also find the complete instructions online. If you have never used a water bath canning method to can jams or jellies before, I suggest that you read these instructions before you start making your jam recipe.

Blueberry Jam

4 pints fresh blueberries

Zest and juice of 2 lemons

7 cups sugar

1/2 teaspoon butter, to reduce foaming (optional)

1 pouch liquid fruit pectin (3 ounces)

10 half pint (8 oz.) glass preserving jars with lids and bands

1 4 oz. glass preserving jar with lid and band

  1. Put half of the berries in an large, deep enamel or stainless cooking pot and crush the berries, making juice.
  2. Stir in the remaining berries, lemon zest, and lemon juice. 
  3. Add the sugar and butter and bring to a full rolling boil, stirring constantly. Pay careful attention to the pot to ensure that it does not boil over.
  4. While the berries are rapidly boiling, quickly add the fruit pectin and stir for exactly one minute.
  5. Remove from heat and ladle into sterilized jars. 
  6. Follow water bath canning directions to complete the canning process. Process Blueberry Jam 10 minutes.
  7. Recipe yields 10 half pint jelly jars plus 1, 4-oz. jar for taste-testing.


Notes:

Don't double the recipe. Doubling the recipe will cause the jam to not set.

Measure the full amount of sugar listed in the recipe using a dry measuring cup. If you want to use less sugar, use a recipe specifically developed for low sugar. If you just use less sugar in a jam recipe, it won't set correctly.

Use the type and amount of fruit specified. If you want to make a recipe that includes strawberries and blueberries, for example, use a recipe specifically developed for mixed berries. If you just change the fruit content in a jam recipe, it won't set correctly.

If you do not add butter to reduce foaming, skim and discard the foam from the top of the jam mixture  before adding to sterilized jars.

This post contains affiliate links.

Wednesday, April 7, 2021

Lemon Velvet Cake

We recently made this cake for Easter lunch, and it did not disappoint. This old-fashioned recipe for a lemon velvet cake hits the spot with not only the lemon flavors in the cake but also a creamy lemon cream cheese frosting. I cannot begin to tell you how delicious this cake was.

If you're looking for a new springtime dessert recipe now that warm weather is upon us, give this made-from-scratch cake a try.


Lemon Velvet Cake with Lemon Cream Cheese Frosting

Lemon Velvet Cake

2½ cups all purpose flour

1 teaspoon baking soda

1 teaspoon baking powder

1 teaspoon salt

1¾ cups granulated sugar

3/4 cup vegetable oil

1/4 cup butter, softened

2 eggs

2 teaspoons pure vanilla extract

1 tablespoon pure lemon extract

1 heaping teaspoon lemon zest (from 1-2 lemons)

1 cup buttermilk

1/2 teaspoon white distilled vinegar

1/3 cup hot lemon water (hot water mixed with 2 tablespoons fresh lemon juice)

6 drops yellow food coloring

Lemon Cream Cheese Frosting

2, 8 oz. blocks of cream cheese, softened

8 tablespoons unsalted butter, softened

1 ½ teaspoons pure vanilla extract

1 ½ teaspoons pure lemon extract

1 ½ heaping teaspoons lemon zest (from 2 lemons)

5 cups powdered sugar

2 teaspoons lemon juice

5 drops yellow food coloring


Lemon Velvet Cake

  1. Preheat oven to 325 F. Thoroughly grease and flour two 9-inch cake pans. Set aside.
  2. In a large bowl, sift together flour, baking soda, baking powder, and salt. Set aside.
  3. In another large bowl, mix together sugar, oil, and shortening.
  4. Mix in eggs one at a time.
  5. Mix in vanilla extract, lemon extract, and lemon zest.
  6. Combine dry ingredients into wet ingredients, alternating with the buttermilk.
  7. Mix together the distilled vinegar and hot lemon water and mix into the batter.
  8. Mix in the food coloring until you reach your desired shade of yellow.
  9. Pour batter evenly into prepared pans and shake pans to release any trapped air bubbles.
  10. Bake for 25-35 minutes, checking it at the 25-minute mark and adjusting the time, if needed. (See note below about timing.)
  11. When moist crumbs cling to a toothpick inserted into the center of the cake, remove cake from oven. Let cakes rest in the pans until pans are cool enough to touch. The cakes will continue to cook in the pans as they cool.
  12. Once cooled, carefully remove cakes from pans and place on cooling racks to cool completely.

Lemon Cream Cheese Frosting

  1. In a large bowl, mix together cream cheese and butter.
  2. Mix in vanilla extract, lemon extract, and lemon zest.
  3. Mix in powdered sugar until creamy, adding lemon juice one teaspoon at a time to thin it out (if needed).
  4. Mix in food coloring.
  5. Place frosting in the refrigerator to allow it to firm up a bit before frosting the cake.
  6. Stir the frosting until it's creamy and spreadable. Frost the cake.
  7. Decorate the cake with additional lemon zest if desired.


Notes

The batter for this cake is thinner than many cake batters. This is because of the addition of the hot lemon water, which adds to the lemon flavor of the cake.

Don't overbake the cake. The key is to take the cake out of the oven when moist crumbs cling to a toothpick inserted into the center and allow it to finish baking as it cools down in the hot pan. This timing will vary depending on your oven, which is why it's best to check the cake at the 25-minute mark.

Wrap warm cakes in plastic wrap to seal in moisture. (This step is optional and is not specific to this cake!) The plastic wrap traps warmth and creates a moist and tender cake. When the cakes are warm but the pans are cool to the touch, wrap them in plastic wrap for a few hours as they continue to cool (or even overnight if you can't frost the cake right away).


If you're looking for other tried and true dessert recipes for spring, make sure to give these Harris Sisters' favorites a try:

Enjoy!

Thursday, May 30, 2019

My Memorial Day Weekend in Pictures: 2019

It has become somewhat of a tradition to share my Memorial Day Weekend in Pictures with you all.  So in keeping with tradition, here we go.  Lexi just turned 5 and here she is getting into the swing of things.  I LOVE some red, white, and blue for all things summer, festive, and Americana.  But for some reason, I also seem to include yellow (or gold) in many of my festive summertime color schemes.  In any case, we didn't really plan on that for this picture, but somehow it still screams Americana to me.  


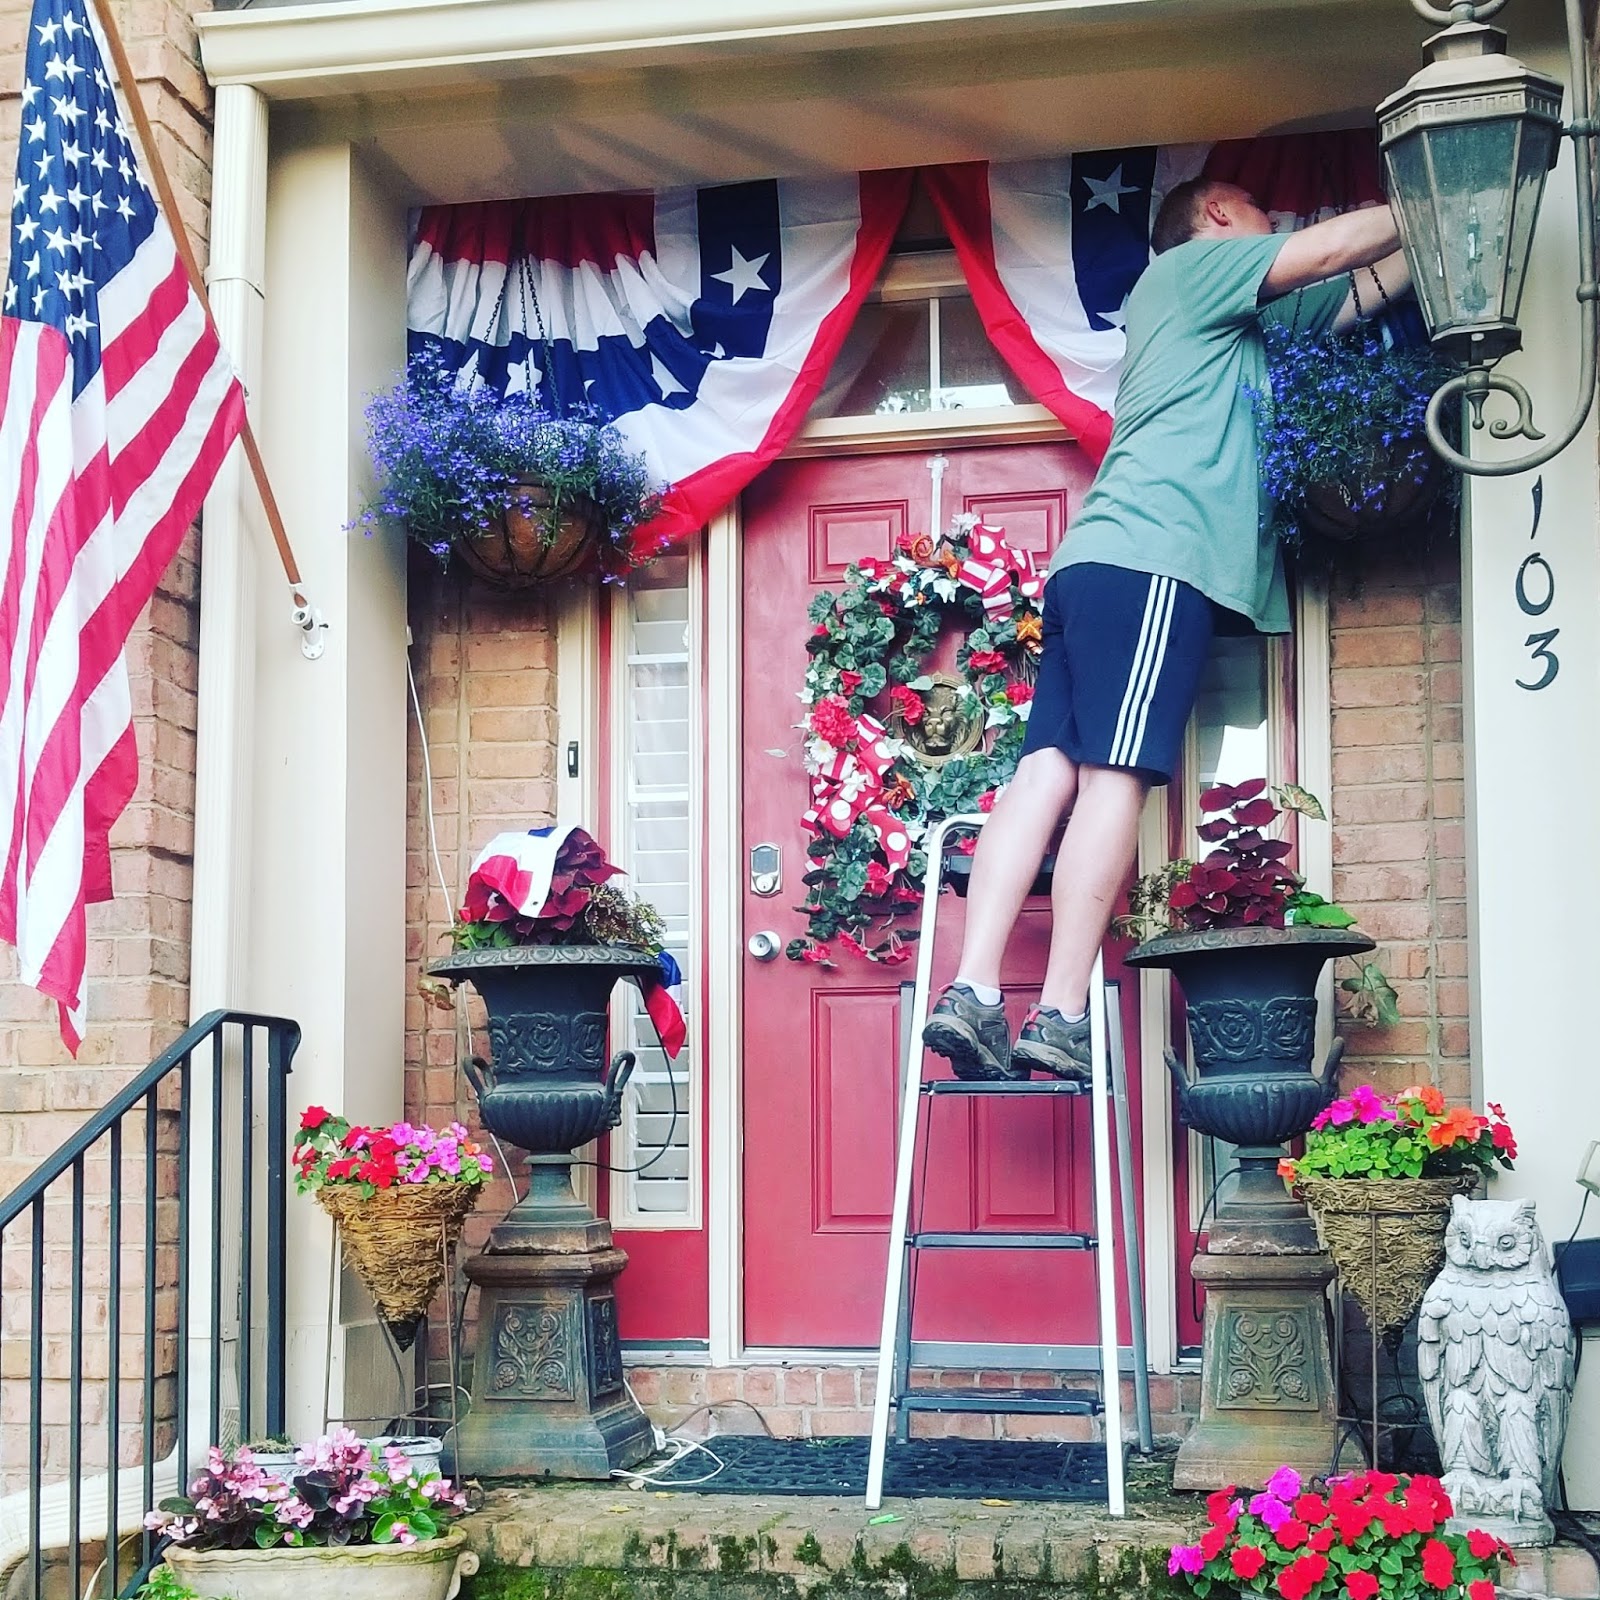
Leading up to the weekend, I knew we had to start hanging our flags and banners.  We display them all summer long.  Here's a look at John in action. 


And here's the finished product.  Banners hung, flags waving, ready to go for the summer.  This photo was taken on Memorial Day 2019.  And this is what I wore all day.  The dress wasn't a true red- more muted, but it worked and I thought the style and pattern fit the bill.  Our flowers and plants are already taking off for the season but by mid-summer, they will be overtaking the front steps.  


But back to how we spent our weekend.  Oh, what a special start to an always fun weekend....  LEXI GRADUATED FROM PRE-SCHOOL!!!


She has spent two wonderful years at the most amazing pre-school.  She has been loved on, and learned so much.  She has made wonderful friends.  In truth, so have I.  But she is moving on up to Kindergarten in the fall, and this really made it official. 


On Friday morning, she and her fellow graduates gathered on the big stage for a big send off.  They sang us a sweet little song.  They each came up and received their diploma.  And then the teachers put together a real tear-jerker of a slide show for their big send off.  I only cried A LOT!


Dada brought flowers to our graduate, and I'm sure she wondered what in the world we were all making such a big deal over.  Precious Babydoll.  We are so proud.  


Later on Friday night, we decided to continue our tradition of sneaking up to 12 South in Nashville for the best barbecue in town at Edley's.  We go there almost every Memorial Day weekend, but this was a HOT one. A heat wave settled in just in time for the weekend.  And even though we sat in the shade, our table on the patio was a bit warm.  In any case, the food was wonderful as ever.  I had pulled pork, but steered away from my usual sides, opting for the daily specials- black eyed peas and corn.  Both were so goooood.


We had planned to walk about after dinner to see and photograph the many many murals that have popped up all over 12 South.  But alas, the heat got the doll pretty quickly, and our night was cut short.  It really was super hot, and I couldn't disagree with the call to head home early.  We did manage to get one festive shot of Lexi girl with the blue and white stripes gracing the side of Draper James.  This wall has become fairly famous in Nashville, so I was happy to get this pic.  Then we were on our way. 


Saturday brought the promise of another warm and sunny day.  But that didn't stop John and Lexi from getting out the old convertible and taking her for a spin.  The two of them have special plans every Saturday morning for the next several weeks.  More on that in a moment.  When they left, John was driving....


But apparently, that didn't last long. 


They made their way to the Waffle House for breakfast.  This cutie could be the poster girl!


Looks like they had a pretty good time there. 


So this is what they are working on.  Lexi takes dance classes weekly, and it's almost recital time again.  There is always an opportunity for the dads to take the stage for a special dance with their daughters.  John and Lexi did this last year and it was a huge hit.  So they are back at it this year.  Here's the cast of characters from Saturday.  They will be practicing their routine for the next several weeks getting ready for the big dance. That's Lexi, second from the left on the front row.  And John is fourth from the left on the back row. 


After all that dancing and rehearsing, they were ready for a dip in the pool.  All the pools are open for the season, and we were excited to get back to our summer pool routine. 


Normally, Memorial Day weekend starts our summertime pool visits, but the water is usually still a little too cold for me to venture into.  However, this year, we have been experiencing a bit of a heat wave, and even I got right in.  The water was a bit cold but it felt good compared to our unusually hot temps for this time of year. 


Lexi girl donned her new goggles, and took straight to the water.  This kid has always loved the water. 


There was a DJ spinning tunes, burgers on the grill, and people playing and having fun everywhere.  There was a shark attack game going in the pool, and Lexi ended up catching one of the sharks.  She was so proud of herself.  It was a fun fun way to spend the afternoon. 


By the time Saturday night rolled around, it was time for our annual neighborhood crawfish boil.  Here are our two hosts for the evening.  That's our neighbors, Mike and Doug, serving up the feast. 


And these lovelies are the hostesses.  That's our neighbors, Natalie and Cheryl.  


People from all over the neighborhood come with their lawn chairs and side dishes.  There is music.  Kids running and playing.  Cornhole.  Laughter.  Catching up with friends and neighbors.  And of course, the food. 


Here is the main fare.  That's a combo of crawfish and shrimp, with the traditional corn and potatoes. 


And one of my neighbors MADE these cookies that were picture perfect for the occasion.  I scored a couple of them, along with this picture early on.  I knew they wouldn't last long and they didn't.  I live in a super-talented neighborhood full of super talented women.  These were amazing!


Our contribution is always popcorn. We wheel the popper out and pop the night away.  Here are John and Lexi hard at work.  John said he ended up popping over 7 pounds of popcorn.  Now that's a lot of corn!  He was in charge of popping it, and Lexi was our server extraordinaire. 


Time out for a quick photo with Mama. 


And then after dinner, Lexi switched to a swimsuit and hit the slip n' slide with many of her friends from the neighborhood.  Here she is with her friend Ellie from across the street.  They will both start kindergarten this fall.  Sweet sweet girls. 


And here's one last photo from the night.  This is me with my girlfriends from our cul-de-sac.  That's me on the left, Natalie and Cheryl in the center (our hostesses with the mostesses!) and Besty on the right.  I am so lucky to have these wonderful ladies.  And check out Cheryl's earrings- crawfish!!  Couldn't get any more perfect!!  What a fun night.  We always look forward to the crawfish boil every year!


Sunday brought another trip to the pool.  It was busy.  Lots of kids and fun all over again!!  And wouldn't you know it.  Lexi found a friend.  This is actually one of her pre-school friends who just happened to be there.  They palled around all afternoon long and had a big time.  


Sunday evening brought a movie in the backyard with friends, and although I didn't get any pictures (darn it!) it was a good night.  More popcorn, more friends, and more outdoors.  The fun just kept rolling. 

Monday was Memorial Day and John's parents invited us to their house for a barbecue.  We made a pit stop at the splash park on the way, and it was so much fun. 


Lexi has been visiting this splash park since she was a baby, and she still loves it.  


But remember, we were on our way to a barbecue.  We feasted on hamburgers from the grill, homemade potato salad and baked beans, corn on the cob, and some of the best lemonade I've ever had. 


For dessert it was homemade strawberry shortcake!


And then there was time outside for a while.  Lexi loved checking out all of Grammie and Papa's flowers.  Their garden is gorgeous, as always. 


Then it was home again, home again to wind down another long holiday weekend.  We had such a fun time.   And I hope you did too!   I hope you've enjoyed this little photo tour of how we spent our weekend.  Now that summer has officially (unofficially) started, it's sure to be a good one. 

And here are the links to my photo lineups from previous Memorial Day weekends, in case you want to travel down memory lane with me. 


You Might Also Be Interested In