Sunday, November 27, 2022

Non-Alcoholic Homemade Eggnog

'Tis the season for holiday parties, and if you've got a whole group of eggnog drinkers, you might want to try making a batch of homemade eggnog.

This classic, old-fashioned, cooked eggnog recipe will impress your friends and family at your next Christmas party. The recipe (as written) is non-alcoholic, so kiddos can drink it too. But, if you'd like to make an adults-only version, you can also serve this beverage alongside brandy, rum, bourbon, or whiskey, and let each guest at your party spike their eggnog to taste.


Non-Alcoholic Homemade Eggnog

12 eggs
1 1/4 cup sugar
1 cup heavy whipping cream
4 cups whole milk
1 tsp ground nutmeg
1 tsp ground cinnamon
2 tsp vanilla extract
pinch of salt
dash of cinnamon (for topping)

  1. Whisk together the eggs and the sugar in a large bowl until light and creamy. (Make sure the bowl is large enough to add five cups of additional liquid.)
  2. In a large saucepan over medium-low heat, combine the milk, nutmeg, and cinnamon. Stir constantly and heat until the mixture reaches a simmer. (Do not let this mixture boil.) Remove from heat.
  3. Place a kitchen towel underneath the bowl that contains the egg mixture to prevent it from slipping while you work. Start whisking the egg mixture with your dominant hand while you grab a ladle of the hot milk with the other hand. Slowly drizzle a steady stream of hot milk into the bowl of eggs. Make sure to keep whisking the entire time! Constant whisking will keep the eggs moving, raising the temperature of the eggs slowly enough to prevent them from cooking. Follow this process until all the milk has been added to the egg mixture.
  4. Then pour the mixture back into the saucepan and place it back on the stove.
  5. Heat on medium-low heat and constantly whisk until the mixture reaches 160 degrees on a candy thermometer and is slightly thickened. (It will thicken more as it cools.)
  6. Remove from the heat and then stir in the heavy cream, salt, and vanilla extract.
  7. Store in the mixture in the refrigerator overnight until chilled and thickened.
  8. Serve topped with fresh whipped cream and additional cinnamon if you prefer.

Notes:

You have to be very careful when heating milk and eggs. During both heating steps, remember to stir and whisk constantly to ensure that you don't end up with scalded milk or scrambled eggs.

Another part of the process that ensures your eggnog comes out correctly is heating over medium-low heat and heating slowly. If you increase the temperature to try to speed up the recipe, you may end up with lumpy eggnog.

To decrease the cooking time (slightly), you can measure your milk and cream and leave them out with a dozen eggs for one hour before starting your recipe. Because these are dairy products, it is not recommended to leave them out for a very long time before starting the recipe.

If you are new to tempering eggs (step 3), you might want to consider asking another person to help you. It's easier for one person to whisk the eggs while the other person ladles and streams milk.

Store leftover eggnog in an airtight container in the refrigerator for 3-7 days. If it separates during that time, give it a spin in the blender before serving.

"Can I refill your eggnog for you? Get you something to eat? Drive you out to the middle of nowhere, leave you for dead?"

We served this at our Christmas Vacation-themed party, and it was a hit. The Cousin Eddies sure seemed to enjoy it!


Monday, November 14, 2022

Spiced Christmas Jam

'Tis the season for fresh cranberries to hit grocery store shelves near you. And since they're so readily available, here's a quick and easy jam recipe that also makes a lot of jars at once (so it's perfect for Christmas gift-giving).

This particular recipe is a mix of strawberries, cranberries, and spices, and it tastes so good slathered on a warm biscuit, fresh from the oven. (And, here's another secret about this recipe, you can make it with frozen cranberries and it will taste just as good!)

If you have never used a water bath canning method to can jams or jellies before, you'll want to read the complete instructions online before you start making your Spiced Christmas Jam.


Spiced Christmas Jam

40 ounces frozen unsweetened strawberries

1 pound fresh or frozen cranberries

5 pounds sugar

2  liquid fruit pectin packets, 3 ounces each

1 teaspoon ground cinnamon

1 teaspoon ground ginger

1/4 teaspoon ground allspice

1/4 teaspoon ground cloves

15 half pint (8 oz.) glass preserving jars with lids and bands

  1. Pulse strawberries and cranberries in a food processor and then place prepared fruit into an 8 quart pot. Add sugar and spices and stir. Bring to a full rolling boil; boil for 1 minute, stir.
  2. Remove from the heat; stir in the liquid pectin and return to a full rolling boil. Boil for exactly 1 minute, stirring constantly. 
  3. Remove from the heat. Skim off any foam with a spoon.
  4. Ladle the jam mixture into sterilized jars.
  5. Follow water bath canning directions to complete the canning process.  Process Spiced Christmas jam 10 minutes. 
  6. Recipe yields 15 half pint jelly jars.


Notes:

Jam and jelly recipes are finicky, so these types of things can cause your recipe not to set:
  • Doubling the recipe.
  • Measuring less than the full amount of sugar listed in the recipe or using a sugar substitute. If you want to use less sugar, use a recipe specifically developed for low sugar. 

This post contains affiliate links.

Monday, November 7, 2022

Vintage Thanksgiving Decorating Ideas

As the holidays approach, you might be looking for some simple ways to decorate for Thanksgiving. In our family, we always decorate BIG for Halloween and Christmas. And with only 3 weeks to take down all of the Halloween decorations and put up Thanksgiving decorations (before Christmas decorations go up), we want to make sure that we keep those decorations simple, since these decorations are short-lived. But of course we wouldn't want to overlook this important holiday!

However, since we only gather together to celebrate Thanksgiving for one day (rather than an entire season with multiple celebrations), any decorations that we plan for Thanksgiving need to be:

  1. Easy to put up
  2. Easy to take down 
  3. Easy to store
Using this criteria, I mainly only decorate my dining room, since that's the room that sees most of the Thanksgiving day "action." 

Vintage Honeycomb Turkeys and Vintage Thanksgiving Die Cuts

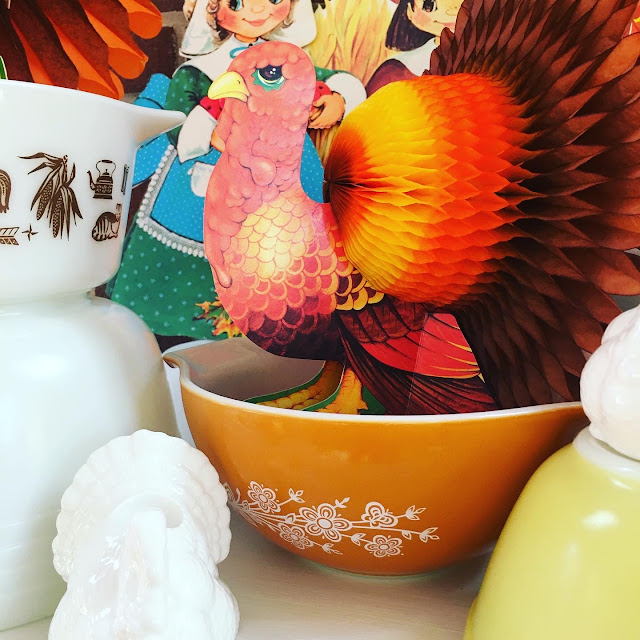
These just might be the easiest Thanksgiving decorations ever! You can often find them at thrift stores starting around the end of September (usually around the same time you're scouring the aisles for vintage Halloween items). Or if you'd like to buy several at a time, you can purchase them in lots on eBay or Etsy. Look for brand names like Beistle, Eureka, and Hallmark.

And the best part about these decorations is that the honeycomb pieces fold flat for storage, but they make a big impact when grouped together for a display. I've displayed them here with some hodgepodge Pyrex bowls (that will be filled on Thanksgiving day with side dishes).


Here are some close-ups of these vintage Thanksgiving decorations. The adults in your group will surely appreciate the nostalgia of these decorations, and the kiddos will love the bright colors.


Vintage Linens

The other items I always use for Thanksgiving decorations are vintage linens. 

The majority of these heirloom aprons were handmade by The Harris Sisters' Grandma Elizabeth, and a few of them were handmade by our Mama. They, too, provide a splash of color that mimic the turkeys. They are the perfect thing to display for a holiday that involves a lot of cooking. I usually keep these on display right through Christmas.


And the other vintage linen item that I add to my Thanksgiving display is a vintage tea towel that was a gift from Harris Sister Misty. While it probably didn't start out life as a Thanksgiving decoration, it certainly fits the bill with its prayer and harvest of fruits and vegetables.


The aprons adorn the upper left corner of our dining room Hoosier cabinet, and the tea towel is displayed on the countertop.


Because all of these pieces are vintage, you can find them at yard sales, thrift stores, antique stores, flea markets, estate sales, or maybe even your own attic. 

I hope this post gives you a few ideas for how to display vintage pieces in a new and different way for Thanksgiving decor. 

You Might Also Be Interested In