Monday, October 1, 2018

2018: Celebrating The Hocus Pocus 25th Anniversary

This year for Halloween, The Harris Sisters are paying homage to another set of sisters. We're dressing up as The Sanderson Sisters from Hocus Pocus. Straight from Salem, Massachusetts, we're giving our best impressions of Winifred, Sarah, and Mary Sanderson just in time for Halloween 2018.


Although, we might have a little more fondness for each other than the Sanderson Sisters . . .


We left you guys a few breadcrumbs on our Facebook page leading up to October 1 to see if you could guess what our costumes might be this year. The biggest clue, of course, was a photo of all three of us with a broom, a mop, and a vacuum.


That is a nod to a scene from the movie when the Sanderson Sisters have to improvise when their brooms are stolen.


We found these awesome t-shirts, which would really be perfect for a group of sisters or girlfriends at Halloween time, so we knew they would be a fantastic teaser for our costumes this year. And when you read them all together, they say "I put a spell on you."

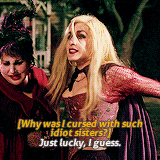
That refers to Bette Midler's show-stopping performance as Winifred Sanderson in the movie. Kathy Najimy and Sarah Jessica Parker (Mary and Sarah Sanderson) were her back up singers and dancers. And they actually put a spell on the townspeople who were listening to the song!


Here we are doing our best impression of the pose in their big finish. "Hello, Salem! My name's Winifred; what's yours?"


While we have dressed up as witches before (way back in 2014), we've had this particular set of witch sisters on our costume wish list for a while now. And we just knew that 2018 was the perfect year for these costumes because this year marks the 25th anniversary of the release of the movie.


I know you're probably thinking to yourself, "25 years??? That can't be right!"

Hocus Pocus, now a cult classic, was released July 16, 1993. And by standard definitions that means it qualifies as a vintage movie. It actually qualified for that status when it turned 20. And you can read some interesting facts about the movie that we wrote about for that big anniversary in 2013.

Do you remember what you were doing in the early 1990s? Casting spells and cooking up potions like these gals?


The Devil's in the Details

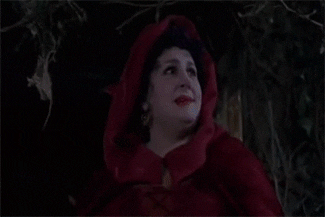
  • We purchased our Sanderson Sisters costumes at Spirit Halloween. But if you are crafty, you might be able to sew or modify a Renaissance or colonial costume to recreate the look. Just remember the characters' signature colors: Winnie wore green, Mary wore red, and Sarah wore purple.
  • They did not have the Winifred wig in stock at the time we purchased our costumes, so Donna substituted a Red Queen wig from Alice in Wonderland.
  • Misty used purple clip in hair extensions to get Mary Sanderson's signature color streak.
  • Donna used a large green necklace from her costume closet to mimic the jewelry that Winifred wears in the movie. If you don't already have a green necklace that will fit the bill, make sure to shop your local thrift store for this piece.
  • We completed our look with striped socks and boots. We actually had both the socks and the boots in our closets, so make sure to shop your own closet to see what you might have to accessorize these costumes!
  • We used a plastic blow mold cauldron as a prop for a few of our photos and a broom, a mop, and a vacuum for our teaser photo.


We have a feeling you're going to see A LOT of Sanderson Sisters this Halloween because of the 25th anniversary, but even if you don't dress up like one of the sisters yourself, you can always celebrate by watching the movie again! It's on the list of our Top 25 Kid-Friendly Halloween Movies, so make sure to check out all of them!

Happy Halloween from The Harris Sisters!


This post contains affiliate links.

Wednesday, September 26, 2018

Chocolate and Peanut Butter Fudge Cake

My oldest son Aidyn just turned 13. And one thing we know for certain about him: he absolutely LOVES Reese's Peanut Butter Cups (and really anything that has both peanut butter and chocolate). So for his birthday cake, he wanted me to make him a chocolate cake with peanut butter frosting.


As a surprise, I decided to get a little creative with the decorations. The most fun part was adding Reese's Pieces around the sides of the cake! I wasn't exactly sure that it would work since they are heavier than sprinkles, but I just pressed them on by the handful and the placed the whole cake in the refrigerator to set the frosting. If you are a more professional baker than I am, you could also carefully line them up or even make a pattern around the cake with them.

It came out really cute! (And delicious - did I mention delicious?) The consistency of this cake is really more like a fudge brownie and the frosting recipe makes a generous amount so that you can just pile it on!


Chocolate and Peanut Butter Fudge Cake

I just happened to have two recipes that I've used for years, but I've just never put the two of them together in one cake. You'll need these recipes for this cake:


I have always made a chocolate frosting for the chocolate cake and a peanut butter cake to go with the peanut butter frosting. (Those recipes are included too - in case you want to try that!)


But, let me tell you - the Chocolate Fudge Cake with the Peanut Butter Fudge Frosting was a real winner! Doesn't that look yummy?


And here's a few photos of the cake with candles and the birthday boy blowing them out!


This makes for a really pretty cake that would be perfect for birthdays, fall, or Halloween since it is decorated with orange, yellow, and brown fall colors. And, since fall is the time of year for organizations to ramp up on bake sales and cake walks, this would also make a great contribution for one of these!

I hope you'll give this cake a try. If you have a Reese's lover on your hands - I promise they'll love it!

Friday, September 21, 2018

DIY Halloween Candy Themed Front Door Wreath

My front porch has needed a Halloween makeover for a few years and this is the year! Today I'm going to show you how to make a funny candy themed Halloween wreath for your own front door.


The neighbors have the good candy - isn't it the cutest? I mean, I dont' know about you, but I am guilty of buying Halloween candy WAAAYYYYY too early, eating all of it, and then buying it again (OK, maybe twice). By the time Halloween gets here, our loot may have some Tootsie Rolls and Dum Dums mixed in with the prized candy bars (because honestly, we ate most of those looong before October 31 rolled around . . . . ). We do draw the line at handing out Raisin Creme Pies - we are not monsters. :-)

So, this wreath is just giving all the kiddos a heads up! (And in case anyone's wondering, this will not deter the kids from our house one bit - and it's not meant to! You guys know that we always dress up with our boys for Halloween and walk around the neighborhood with them. Our neighborhood does Halloween BIG! So we always leave out a giant bucket of candy on the front porch with the light on.) This wreath is just all in good fun!


For a few years now, I have had a conservative all white pumpkin wreath on my front door at Halloween. It matched the dapper skeleton and his dog that would take up residence on our front porch every October. Here's a picture of the porch last year with a few other dashing goblins you might recognize.


Is this not a sassy skeleton?


Every October, he's all like, "Hello, neighbors! I bid a Joyous Halloween to you!"


But this year, I wanted something different. And that something caught my eye when I was in our local craft store in early September. (Of course, as soon as I get wind of stores putting out their Halloween decorations, I immediately go to see what they have put out!) So, yes, I have been sitting on this project waiting to post it for a few weeks now. ;-)

Don't worry, our friend Mr. Skeleton and his dog are living it up in our dining room this year, so you might see more from them later this season in our Halloween Home Tour. Stay tuned!


Candy Corn Themed Halloween Wreath Supplies


  • 1 black pine wreath form
  • 10 3" foam candy corn floral picks
  • 8 5" pom-pom floral picks
  • Outdoor Mod Podge (optional)
  • Deco Art Craft Twinkles, crystal color
  • 7 various Halloween themed wire edged ribbons
  • Chenille stems or wire
  • Candy themed Halloween sign
  • Hot glue gun and hot glue
  • Scissors
  • Paint brush
  • 2 Soda can tabs (optional)


Directions

1. Paint both sides of the candy corn picks with 3 coats of Mod Podge, allowing each coat to dry the recommended amount of time between coats. (I did this to help the foam picks hold up a little better on an outside wreath. This step is optional if you're going to use your wreath indoors.)


2. After the final coat is dry, paint one side with Deco Art Craft Twinkles. If you want your candy corn to be really sparkly, you can paint a second coat after the first has dried. Note: I only painted one side of the candy corn because only one side will be showing on the wreath.


3. Then, fluff your wreath before you start decorating it.


4. My sign had a decorative rope stapled to the back for hanging. So, if your sign has anything like that, you'll need to remove it so that you can wire your sign to your wreath. 


Since my sign had no other hangers, I hot glued two soda can tabs on the back of the sign so that I would have something to loop chenille stems through.


Here's the back side of the wreath. As you can see, the soda can tabs won't show, but the are just the right thing to hold the sign to center of the wreath! 


5. Once your sign is attached to the wreath, the next biggest thing on the wreath will be the bow. I followed this YouTube tutorial and made 4 of the bows she shows.


I used about 7 different types of coordinating Halloween wired ribbon. I already had some of these ribbons stashed in my craft closet, and I bought a few of these specifically for this project. You can always make a bow out of just one type of ribbon if you would prefer.


When I was finished with my 4 funky bows from the tutorial, I attached them all together into one large bow before attaching them to the upper left corner of my wreath with a chenille stem.


6. After you've attached the bow, you'll need to "dry fit" your candy corn picks and your pom-pom picks around the wreath and make sure that you're happy with their placement.


7. Once you're happy with how everything looks, just hot glue all the picks in place.

Now you're all set to hang your new candy corn wreath on your front door to greet the ghouls and goblins for Halloween (and send them to your neighbors' house - ha)!


Hope you give this DIY Halloween Candy Wreath a try for yourself.

If you're just itchin' for some more Halloween goodness, and you can't wait for the new stuff that's coming in a week or so, make sure you take a stroll through some of our most popular past Halloween posts.

This post contains affiliate links.

You Might Also Be Interested In