Pages

Monday, December 14, 2020

Yes, Virginia, There Is a Santa Claus

The story behind this classic newspaper article is that in 1897, the New York Sun received a letter from an eight-year-old girl, Virginia O’Hanlon, asking whether Santa Claus exists. Her father encouraged her to send the question to The Sun, "because if you see it in The Sun, it's so."

It is probably the most famous letter to the editor ever published and because of that, it is also the most reprinted newspaper editorial in the English language. It has also been re-published in book and movie format.


Francis P. Church of The Sun replied with an editorial that has become a well-known Christmas classic. His answer gave a resounding, "Yes!" by focusing on concepts like love, generosity, devotion, beauty, joy, and faith. 

More than 120 years after the original editorial was published, these sentiments still encourage us today during the season of hope.


The popular Christmas editorial reads:

Is There a Santa Claus?

We take pleasure in answering at once and thus prominently the communication below, expressing at the same time great gratification that its faithful author is numbered among the friends of The Sun:

"Dear Editor - I am 8 years old. Some of my little friends say there is no Santa Claus. Papa says if you see it in the Sun, it's so. Please tell me the truth — is there a Santa Claus?

— Virginia O’Hanlon, 195 West Ninety-Fifth Street"

Virginia, your little friends are wrong. They have been affected by the skepticism of a skeptical age. They do not believe except they see. They think that nothing can be which is not comprehensible by their little minds. All minds, Virginia, whether they be men’s or children’s, are little. In this great universe of ours, man is a mere insect, an ant, is his intellect, as compared with the boundless world about him, as measured by the intelligence capable of grasping the whole of truth and knowledge. 

Yes, Virginia, there is a Santa Claus. He exists as certainly as love and generosity and devotion exist, and you know that they abound and give to your life its highest beauty and joy. Alas! How dreary would be the world if there were no Santa Claus. It would be as dreary as if there were no Virginia. There would be no childlike faith then, no poetry, no romance to make tolerable this existence. We should have no enjoyment except in sense and sight. The eternal light with which childhood fills the world would be extinguished. 

Not believe in Santa Claus! You might as well not believe in fairies! You might get your papa to hire men to watch all the chimneys on Christmas Eve to catch Santa Claus, but even if they did not see Santa Claus coming down, what would that prove? Nobody sees Santa Claus, but that is no sign that there is no Santa Claus. The most real things in the world are those that neither children nor man can see. Did you ever see fairies dancing on the lawn? Of course not. But that's no proof that they are not there. Nobody can conceive or imagine all the wonders there are unseen and unseeable in the world. 

You may tear apart the baby’s rattle and see what makes the noise inside, but there is a veil covering the unseen world which not the strongest man, nor even the united strength of all the strongest men that ever lived, could tear apart. Only faith, fancy, poetry, love, romance can push aside that curtain and view and picture the supernal beauty and glory beyond. Is it all real? Ah, Virginia, in all this world there is nothing else real and abiding. 
 
No Santa Claus! Thank God! He lives, and he will live forever. A thousand years from now, Virginia, nay, ten times ten thousand years from now, he will continue to make glad the heart of childhood.

I hope this timeless piece serves as a reminder of some of the most important parts of the Christmas season. "The most real things in the world are those that neither children nor man can see."

This post contains affiliate links.

Sunday, December 6, 2020

The "Secret" to Making No Bake Choc Oat Cookies

No Bake Choc Oat Cookies were a favorite in the Harris household growing up. We made them nearly every year at Christmastime. And as easy as they are to make (no baking, few ingredients), some years they might come out dry and crumbly (or even worse, they might not set up at all).

Over the years we've figured out a few tips to share to ensure that your batch of No Bake Cookies comes out perfect every time.


Tips for Making Perfect No Bake Choc Oat Cookies

  • First, make sure that you measure out all ingredients ahead of time. You need to work quickly when mixing these cookies. So if you're trying to measure out a cup of peanut butter while timing your boiling, you'll end up boiling your mixture for too long. Every. Single. Time.
  • Make sure that you start timing your boiling after the mixture comes to a full, rolling boil. Then boil the mixture for exactly 1 minute and 15 seconds. Do not start timing as soon as you see bubbles. You won't boil your mixture enough that way.
  • Don’t substitute old fashioned or rolled oats. Instant or "quick" oats are a must-have for this recipe. The cookies won’t have the same texture if you use a different type of oats.
  • Finally, (and this one's REALLY important), never make No Bake Cookies when there's moisture in the air. Rain? Nope. Snow? Negative. High humidity because you're in the South and winter temperatures haven't kicked in yet? Sorry, but no. Running a humidifier in your home? Hope you like eating your cookies with a spoon. Seriously, you need a perfectly dry day for these cookies to set up correctly. Any hint of moisture in the air will cause them to stay gooey.


No Bake Choc Oat Cookies

1 stick butter

2 cups granulated sugar

1/2 cup milk

4 tablespoons cocoa powder

1 cup creamy peanut butter

3 cups instant oats

2 teaspoons vanilla extract


  1. Line baking sheets with wax paper and set aside. 
  2. Measure your peanut butter and oats and get out your vanilla and measuring spoon. Set aside.
  3. In a medium saucepan, add butter, sugar, milk, and cocoa powder. Place on medium heat.
  4. Bring the mixture in the saucepan to a rolling boil. 
  5. Once it is at a full boil, boil for exactly 1 minute and 15 seconds, then immediately remove from the heat.
  6. Add in the peanut butter and stir. Add in the oats and stir. Add in the vanilla and stir.
  7. Drop by tablespoon onto lined baking sheets.
  8. Let cool for approximately 30 minutes or until set.
  9. Store in an airtight container.


Fun Fact

These cookies go by many different names: No Bake Cookies, Chocolate Oatmeal Cookies, Cow Pies, Stovetop Cookies, or Preacher Cookies. The recipe is actually listed in our family cookbook as Preacher Cookies, but we always called them No Bake Choc Oats.

The reason they are sometimes called Preacher Cookies is because years ago when preachers made a practice of visiting members of their congregation at home, the cookies were a treat that ladies could prepare quickly with ingredients that they usually already had in their pantries. A housewife could prepare them quickly when she looked out her window and saw the preacher riding up the mountain on his horse. By the time the preacher arrived, the cookies were already cooling!

Whatever you call them, we hope you use our tips to make sure your No Bake Chocolate Peanut Butter Cookies come out perfectly this Christmas! 

My final tip is to try to get some super-cute elves to help you make them or to agree to be your quality control inspectors/taste-testers. This step is not absolutely necessary, but it always seems to work for us. Enjoy!


Sunday, November 29, 2020

How to Make a Christmas Wreath with Vintage Christmas Decorations

This set of three vintage-themed Christmas wreaths are a few years in the making, and I'm so excited about how they came out! Of course you can find all sorts of tutorials on how to make vintage ornament wreaths with Shiny Brite ornaments (check out Harris Sister Misty's vintage ornament wreath), but not only are they expensive to make if you have to purchase all of the ornaments, but vintage ornaments are also a little more in demand and if you're lucky enough to find a set in good condition, you might want to actually use them as ornaments. 

But, there are all sorts of vintage materials that you can use to make a Christmas wreath, and the materials were what drove this project for me.

I found the three vintage plastic Christmas cookie plates at a thrift store last year for a whopping 50 cents (for all three). I remember we had trays like these when we were growing up, so I would date these circa the late 1970s. And you can't beat the graphics on them!

I knew immediately that I wanted to make a set of three wreaths with these trays featured prominently in the center, but I also wanted to find vintage plastic holly and poinsettias to go with the 1970s trays.

Unfortunately, I wasn't able to find the 1970s-era plastic greenery until this September when I scored a plastic holly wreath with poinsettias, a plastic holly candle ring, and a plastic Christmas tree wall hanging. Here they are with their thrift store tags still on them. 


Now, before I get started on the DIY tutorial for these vintage themed Christmas wreaths, I will say that I didn't have the heart to break apart the Christmas tree wall hanging. Both the large wreath and the candle ring were missing pieces (chunks of greenery), so I didn't feel bad about taking those apart. So, if you happen to find broken or incomplete supplies for your wreath, remember that you're just taking them apart anyway, so you might be giving those items a new life!

Vintage Christmas Tray Wreath Supplies

  • Pine wreath form
  • Vintage plastic greenery (holly, pine, poinsettias, etc.)
  • Vintage Christmas tray or cookie plate (plastic or tin)
  • Chenille stems or wire
  • Hot glue gun and glue


Directions for How to Make a Vintage Cookie Tray Christmas Wreath

  1. Fluff up your wreath and reposition any branches. Position a layer of branches toward the center of the wreath to help with holding the plate in position.


  2. Cut apart your vintage plastic greenery. "Dry fit" your greenery pieces around the wreath and make sure that you're happy with their placement.
  3. Once you're happy with how everything looks, just hot glue all the greenery in place.
  4. Hot glue chenille stems to the back of the plastic vintage plate.
  5. Position the plastic vintage plate in the middle of the wreath, using the layer of branches you moved toward the center to "hold" the plate in place while you work (moving some in front of the plate and some in back of the plate to "sandwich" the plate in between until secured).


  6. Wrap the chenille stems around the wire frame of the wreath on the back, checking the front of the wreath to ensure the plate is positioned how you want it to be before fastening securely.
  7. Fluff up the layer of branches around the front of the plate, ensuring that any cracks around the edges of the plate (which are common in these vintage plastic plates) are covered by the wreath branches or greenery.

Here's a few close up photos to show how these vintage inspired Christmas wreaths turned out:


And as it turns out, the vintage greenery matched the holly on the Santa cookie trays and the poinsettias on the poinsettia tray pretty well!


Notes:

Vintage cookie trays often turn up in thrift stores (which is where I found this set), but if you're looking for a particular pattern, you can hunt them down on sites like eBay and Etsy. The set I used was plastic, but tin cookie trays would also work for this purpose since they're light enough to be suspended in the middle of a wreath form.

Adding extra greenery (of any kind) will add extra volume to a standard wreath base. In this case, I used vintage plastic Christmas greenery to add an extra "kitsch" factor to these wreaths and to match the decade of the plates as best I could. However, you can also use this trick when creating any wreath. I used this same technique on my front door Christmas wreath to create a fuller wreath base.

For these wreaths, I chose to use vintage Christmas trays and vintage plastic greenery, but you could also use many different types of vintage Christmas items to create a wreath. Be on the lookout for vintage Christmas items like: 
  • ornaments
  • bubble lights
  • light covers
  • light reflectors
  • Christmas corsages
  • cupcake toppers or picks
  • Christmas costume jewelry (check out Harris Sister Deanna's costume jewelry tree)
  • small decorations
  • figural stocking hangers
  • small toys
  • Santa, elf, or deer figures
  • holiday salt and pepper shakers that are missing mates
  • Christmas cookie cutters

A collection of any of these items would make a show-stopping wreath. And don't forget that you could always choose a tinsel garland wreath base instead of a pine wreath base if that suits your project better!


There you go! If you've got about 30 minutes, you can create a trio of vintage inspired Christmas wreaths!

This post contains affiliate links.

Sunday, November 15, 2020

Old Fashioned Rice Pudding

This old fashioned rice pudding recipe is a favorite of my husband's. When he was a young boy, his grandma used to make this for him, so I made sure to learn how to make it myself and was surprised at how easy it is to make!

This is a quick and simple dessert recipe that you cook on the stovetop.


Creamy Rice Pudding

1 1/2 cups water
3/4 cup uncooked white rice
2 cups milk, divided
1/3 cup white sugar
1/4 teaspoon salt
1 room temperature egg, beaten
1/2 teaspoon cinnamon
1 tablespoon butter
1/2 teaspoon vanilla


  1. In a medium saucepan, bring 1 1/2 cups water to a boil. Add rice and stir. Reduce heat, cover, and simmer for 20 minutes.
  2. In another saucepan, combine 1 1/2 cups cooked rice, 1 1/2 cups milk, sugar, and salt. Cook over medium heat until thick and creamy, 15-20 minutes. 
  3. Slowly add 1/4 cup of your heated mixture to the beaten eggs while beating constantly to temper the eggs. 
  4. Slowly add in remaining milk, beaten eggs, and cinnamon and cook 2 minutes more, stirring constantly.
  5. Remove from heat and stir in butter and vanilla. Serve warm.
  6. Sprinkle with additional cinnamon if desired.

Notes:


The original recipe calls for 2/3 cup of golden raisins, but my family are not fans of raisins, so we omit these. If your family would enjoy them, you can add them in step 4.

This recipe doesn't work well with other types of grains or rice like long grain rice, brown rice, couscous, quinoa, or wild rice. It's truly a recipe for good old fashioned white rice.

This is a fun recipe to try in the fall since it's served warm and its primary flavor is cinnamon. If you'd like to try a Christmas version, you could change the spices used to 1/2 tsp Allspice (substituted for the cinnamon), 1/2 tsp orange extract (substituted for the vanilla), and 2/3 cup dried cranberries/craisins (substituted for the golden raisins if you used them).


Fun Fact:


The dish you see this rice pudding shown served in is a vintage Anchor Hocking Champagne/Tall Sherbet Dish in the Wexford pattern. I found a set of 12 of them at a thrift store for $5 about a year ago. They were covered in plastic wrap and packing tape within an inch of their life (as thrift stores often do), so I originally mistook the set for Hazel Atlas promotional glassware that originally came in Big Top Peanut Butter. 

However, I purchased the set, and after I got it home and unearthed it from the four layers of plastic wrap and packaging tape and could inspect the pattern better, I realized what I really had. This pattern by Anchor Hocking was produced from 1967 to 1998, which still places it in the vintage category. They currently sell for $5.99 per sherbet glass at Replacements.com, so $5 for a set of 12 turned out to be a steal!

Tuesday, November 10, 2020

Chattanooga, TN - Girls' Weekend 2020

Well, Peeps, 2020 has been quite the ride for all of us. If you've been following along with us on our Facebook page, you know that Harris Sister Misty's family was in a car accident in March of this year, and her daughter Emma had several surgeries throughout the year, as well. (You can read about Emma's recovery here.)

So, in addition to the extra precautions that the country has been under due to COVID-19, our family's schedule was upended for a good portion of the year. We postponed this year's Girls' Weekend trip since we usually take our trip in the summertime.

This year, we decided on a fall trip to Chattanooga, TN. And while we didn't plan on many of the adventures that we often write about, we still had several outdoor activities that we thought we could update you guys on should you ever want to visit the area.


Our first full day there, we decided to visit many of the murals in the area. It was a fun outdoor activity, which was the perfect way to spend our 2020 Girls' Weekend.

Where to Find the Most Popular Instagram-Worthy Murals in Chattanooga, TN


Polka-Dot Wall
1400 Block of Williams Street

This one is located across Main Street from Hi-Fi Clyde's. The pastel polka-dots were a perfect match for our pink Girl Power T-shirts!


Angel Wings Mural
1501 Long Street
Artist: Kelsey Montague

This one is also near Hi-Fi Clyde's. The black and white angel wings are the perfect place to strike a pose!


Flying Doughnut Mural
1900 Broad Street
​Artist: Joseph Giri

If you’re on the Southside, make sure to swing by one of Chattanooga's most popular murals on the corner of Broad Street and 20th Street (next door to Koch's Bakery).


Chattanooga Choo-Choo


Of course a trip to Chattanooga wouldn't be complete without a visit to see the Chattanooga Choo-Choo. 

Opened in 1909 as Terminal Station, the train depot welcomed thousands of travelers during the golden age of railroads. Today, Terminal Station (located at 1400 Market Street) stands as part of the world-famous Chattanooga Choo Choo Hotel. 


The train itself is on display in an open courtyard, and various small businesses surround the area. A visit to the famous train made for the perfect outdoor activity.


See Rock City


Who remembers The Harris Sisters' 2018 Girls' Weekend trip where we spent a little bit of time on a quest to find an original See Rock City painted barn? (If you'll remember, Harris Sister Deanna found one on her trip back home to Tennessee that trip, but we never did find the barn that we were looking for in Bryson City - just some awesome antique shops along the way.)

Well, this year we were able to actually visit Rock City on this trip (which is technically just over the border in nearby Georgia).

This is a wonderful option for an outdoor activity. At the time we visited they were decorated for fall, but they also decorate for Christmas. So if that is your preferred holiday, you might want to consider a visit during November, December, or January for the Enchanted Garden of Lights for the holiday season.


They are currently managing crowds with an online timed ticketing system. And the park and gardens offer a walking trail surrounded by a waterfall, a swinging bridge, Lover’s Leap (where you can See 7 States), Fat Man’s Squeeze (a narrow pass between two large rock formations), Fairyland Caverns, and Mother Goose Village. 

Here's the photo we got of ourselves on the swinging bridge. (It was very similar to the bridge in Indiana Jones and the Temple of Doom - although we had to manage it by ourselves without the help of Harrison Ford.)


And here's the marker they have at Lover's Leap that shows the directions to look to see seven states: Tennessee, Kentucky, Virginia, North Carolina, South Carolina, Georgia, and Alabama. 


They fly the flags of the seven states at this area too.


Here we are on our way through a giant magical door into the last leg of the trip toward Fairyland Caverns and Mother Goose Village.


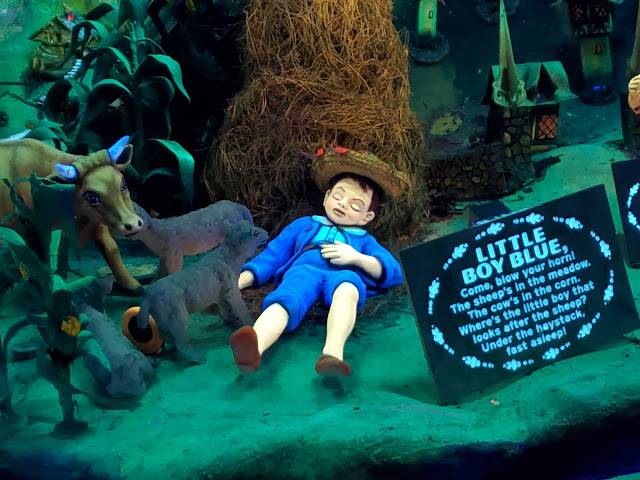
Fairyland Caverns and Mother Goose Village is the only enclosed area in Rock City. Both areas in the cavern are hand-crafted, brightly colored diorama displays of classic childhood fairy tales and Mother Goose nursery rhymes.

From Hansel and Gretel to Rip van Winkle and Little Red Riding Hood to Jack and the Beanstalk, these colorful displays that were originally created in 1947 still capture the magic of these popular children's stories.


The Mother Goose Village was located in Fairy Land Caverns after the fairy tale dioramas. Originally created in 1964, this section included scenes from popular nursery rhymes like Hey, Diddle, Diddle; Little Miss Muffet; Jack and Jill; Little Boy Blue; and Humpty Dumpty.


We spent the rest of our time this Girls' Weekend hanging out, relaxing, doing a wine and Halloween candy pairing, dressing up in our COVID-19 Halloween costumes, and planning exciting things for the blog. Stay tuned!

So if you have a chance to visit Chattanooga, TN, and Rock City, they make for a fun weekend!

Make sure to check out our other Girls' Weekend posts for our photos, recommendations, and reviews on the other places we've visited in previous years.