Pages

Tuesday, September 30, 2014

Caring for and Making Your Decorative Pumpkins Last Longer

'Tis the season, my friends.  The pumpkins, they are a poppin' up all over around these parts.  Every day, I see more fall displays going up, and they are all just gorgeous.  I do so love this time of year.  

Upon a recent trip to the pumpkin patch, we were fortunate enough to talk to the pumpkin farmer himself about how to best care for your pumpkins and make them last longer.  Let me tell you, I put on my listening ears quickly, and here are the tips we learned. 

Now this is what my pumpkins looked like when we brought them home...


And here they are now.  Not bad, huh?


1.  Clean your pumpkins!  That's an easy one, but one that most of us probably forget to do.  Our pumpkins were "farm fresh".  We brought them home directly from the fields, dirt and all.  So the first step is to rid yourself of all that mud and muck.  If they aren't too bad, you can just wipe them down with a wet cloth.  Most of ours required a little more attention, so I used a kitchen cleaner and some good old fashioned elbow grease.  

2.  Spray them down with Pam cooking spray.  Not only does it bring out a brilliant shine, but it also helps to seal and protect your pumpkins so they will last much longer for you. Take a look at our before and after pictures above.  I promise these photos haven't been edited in any way, and yet these hardly even look like the same pumpkins!  Awesome!!

3.  Be careful of those stems.  Short, damaged, or missing stems can cause a pumpkin to decay faster.  Choosing a pumpkin with a longer stem will help to ensure a longer life for your gourd.  In the same vein, even though those wonderful pumpkin topiaries are just beautiful, you often have to chop the stems to accomplish the look, so beware and know that your pumpkins may not last quite as long. 

4.  Don't sit your pumpkins on concrete surfaces.  It can cause your pumpkin to decay quickly.  We have learned that the hard way over the years.  Instead, pop a piece of wood, cardboard, paperboard, etc, under them and then place them wherever you like.  It will make them last a lot longer for you. 

5.  If you carve your pumpkins, rub Vasoline along the exposed edges.  Carved pumpkins tend to shrivel up along those carved edges.  The Vasoline helps to lubricate the edges and will give you a little more life once your jack-o-lantern is ready. 

So that's it.  Not too hard really, but certainly worth a few extra steps to make those pumpkins last through the fall.  And to leave you with my favorite pumpkin, here she is- sweet, sweet Babydoll, getting ready for her first Halloween.  


Sunday, September 21, 2014

31 Free Halloween Printables

Last year, we brought you a few free Halloween decor printables. Those can be found here. I thought I'd bring you even more this year. I LITERALLY could not hold out any longer. ;-) And even though the post is titled "31 Free Halloween Printables" - I've given you a few extra because you know me and Halloween.

I also have an entire Pinterest board dedicated to FREE Halloween Printables, which I will be loading up with these finds today and with others in the coming weeks. So make sure to follow it for all the latest finds. Also check out and follow my Halloween Pinterest board for awesome decorating ideas, my Halloween Costumes Pinterest board for costume ideas, and my Party Ideas - Halloween Pinterest board for seasonal party ideas.


Here we go!

Do you BOO? Your neighbors, that is? ;-) You can download this free We've Been Booed sign from Anders Ruff and start this neighborhood tradition today. (Instructions for how to participate in the fun are also included with the download.)


Love these Halloween Treat Cones, Soda Bottle Labels, and Lollipop Labels from TomKat Studio at HGTV:


A candy corn goodie box from Hello Happy Crafts (other Halloween styles available include jack-o-lantern, pumpkin, Frankenstein, bat, and skeleton):


A vintage style treat box template from Goddess of Chocolate:


Here's an adorable free Chalkboard Countdown Board from Yellow Bliss Road that's a perfect way to count down the number of days to Halloween with your kids:


If you're throwing a Halloween Party and need party printables, check out these retro party decorations from B. Nute Productions over at Catch My Party:


Or here's a pink and orange retro party kit at The Elli Blog (includes cupcake wrappers, cupcake toppers, treat bag labels, stickers, Happy Halloween banner, and more!):


Or here's a black and orange free party printable set from Print Your Party:


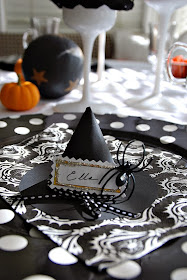
Check out Tatertots and Jello for these fantastic chevron treat bag toppers and mini witch hat place card template:


And here's another treat bag topper from Dixie Delights - "Bugs" and Kisses for Halloween!


Some adorable Candy Bar Wrappers from Today's Creative Blog:


Spiff up any wine for your own Halloween party or that you might be bringing as a hostess (ghostess) gift with these Halloween themed wine bottle labels from The Elli Blog. Four designs are available:


Need to head out on Halloween night and leaving some goodies for the trick or treaters? Sometimes it's a good idea to leave them a little note to remind them to be polite. The Prudent Patron has designed this "Take One Treat" sign so you're covered:


You could use this next set of vintage images for any Halloween crafting projects that you might be working on, or you could just print and frame them because they're so pretty:

A vintage Halloween postcard image featuring a witch girl and her black cat from The Graphics Fairy:

And another vintage postcard featuring a pumpkin witch stirring a cauldron from The Graphics Fairy:


A vintage Butterfinger and Baby Ruth ad by Sweet Magnolias Farm (available in three different color schemes):


An image of a sassy retro 1940's witch flying across the moon from The Graphics Fairy:


A free downloadable image of retro costumed ladies holding a giant jack-o-lantern by The Graphics Fairy:


If you're roasting pumpkin seeds this year, attach these adorable vintage design tags to bags of roasted seeds and send them home as party favors! Free printable tags are courtesy of B. Nute Productions:


Stumped for a last minute costume? Or need some cute and simple party favors, photo booth props, or a craft to keep kids busy for a Halloween party? Spoonful has got both boys and girls covered with these free printable Avengers masks, Classic Halloween Icons / Monsters masks, and Princess masks. Each one is linked separately below and includes directions for assembly:


And last but not least, we'll leave you with a few decor items. Here are three Chalkboard Printables by Classy Clutter:

Two Shakespeare pieces - thanks, Witches!

Double, Double Toil and Trouble


and Something Wicked This Way Comes


And for all you Nightmare Before Christmas fans, This Is Halloween:


And a vintage Ouija Board from Jack and Cat Curio:


And another beautiful free chalkboard printable from The 36th Avenue that's available in 4 color choices:


Hope you've found something here that you can use this season! Let us know which ones are your favorites!

This post contains affiliate links.

Friday, September 19, 2014

Super Simple Salsa

As our thoughts turn to Fall, we've got to come to terms with the fact that we're giving up on fresh garden tomatoes until next Summer rolls around. 

I know. What the heck kind of way is that to start a post, woman?!? ;-) We've got to make room for pumpkin-y and apple-y goodness somehow, people!

BUT! If you're not quite ready to give up on homemade salsa, you can use this recipe throughout Fall and Winter to get you over the hump until the fresh tomatoes are back. It's quick and simple, and you can add as much heat as you'd like. Give it a try!


Super Simple Salsa

14 oz. can diced tomatoes
10 oz. can original Rotel
1/2 small onion, diced
2 cloves garlic, minced
1 jalepeno, seeded and minced
1 tsp. honey
1/2 tsp. salt
1/4 tsp. cumin
1 tsp. dried cilantro
1 Tbsp. lime juice

  1. Add all ingredients into a food processor and process until desired consistency.
  2. Serve with tortilla chips.
  3. Store leftover salsa in refrigerator for up to one week.
Note: if you like super spicy salsa, remember to leave the seeds in your jalapeno before processing.

This post contains affiliate links.

Wednesday, September 17, 2014

The Flat Stanley Project

Now that the kids are back in school, I thought you might be interested in hearing about how we completed our Flat Stanley project at the end of last school year with our nephew, Aidyn (Harris Sister Donna's son).


If you are anything like us, you may not have heard of Flat Stanley before.  This project is designed to help school children learn about geography.  So each child creates a paper "Flat Stanley" and then mails him to a friend or relative who lives in another state (or country), and then good old Stanley lives with them for a while, having adventures in another part of the world.  His hosts document what Flat Stanley did and learned while he was there with journals, pictures, etc, and ultimately sends it all back to the student at the conclusion of the project. 

As it turned out, we had a trip planned to Los Angeles, CA right around the time Flat Stanley arrived so we decided to just take him with us.  Here's a look at some of the things Flat Stanley did during his time in LA. 

First it was a quick plane ride out to California...


Then right down to business.  First stop was for a treat at Randy's Donuts.  


Stanley toured the Paramount Film Studios with us.  


Including a tour of the Dr. Phil show. 


He was front and center when we found the "Hansel and Gretel" house in Burbank. 


And I think he might have eaten a berry or two before he saw this sign.  Eeek!!


He really wanted to visit the beach, so we took him.


He made his way to the famous Hollywood sign, of course. 


 And then it was off to the Hollywood Walk of Fame.  He found all his favorite stars. 


And when Stanley finished his whirlwind tour of the big city, he did a little souvenir shopping for his friend back home in North Carolina.  


Good old Stanley did indeed make it back home safe and sound toward the end of the school year, and by all accounts, I'd say it all turned out pretty well. 


So, if you ever find yourself in possession of a Flat Stanley, take a little helpful advice from me.  Just drop him in your purse and take him with you everywhere.  I plunked him down everywhere we went and just whipped out the camera for a few shots.  Trust me, no one batted an eye, and more often than I could count, people actually knew who Flat Stanley was.  As it turns out, he's pretty well traveled.  ;)