Pages

Tuesday, December 31, 2013

Peanut Noodles

This recipe is so easy to whip up and if your kids are fans of peanut butter, then they'll surely like this quick and easy pasta dish.


Peanut Noodles
8 oz. thin spaghetti noodles
1 bunch green onions, sliced
1 head broccoli, chopped into florets
1 carrot, chopped
8 oz. firm tofu, drained and cubed
2 Tbsp sesame oil
1 tsp ginger powder
1/3 cup peanut butter
1/4 cup soy sauce
1/4 cup hot water
1 Tbsp apple cider vinegar
1 tsp granulated sugar
red pepper flakes to garnish (if desired)


  1. Bring water to a boil and prepare spaghetti noodles as directed on package. Steam vegetables in basket placed over the boiling water as the pasta cooks. Drain pasta and combine with steamed vegetables in pasta pot.
  2. In a medium saute pan, saute tofu over medium-low heat for about 7 minutes in 2 Tbsp sesame oil. Add green onions and saute until tender.
  3. Add ginger, cook and stir for 1 to 2 minutes.
  4. Mix in peanut butter, soy sauce, water, vinegar, and sugar. Stir over heat until ingredients blend into a sauce.
  5. Remove from heat and stir into noodles and steamed vegetables. Serve. May garnish with red pepper flakes if desired.
Notes: 
Recipe can be doubled if feeding a larger group.

This recipe tastes great served cold the next day.

Sunday, December 29, 2013

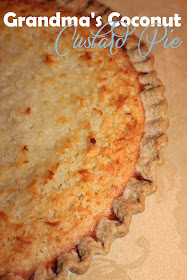
Grandma Elizabeth's Coconut Custard Pie

This is another one of Grandma Elizabeth's "famous" recipes. We make it at least once a year. Because she was known for sometimes only writing the ingredients for her recipes and remembering the rest, it has taken a bit of trial and error to figure out other important things like oven temperature and how long to bake these. But it only took a few tries to get this recipe down and it was well worth it. It certainly lives up to Grandma's note in the cookbook - "Good" - and then some. :-)


Grandma Elizabeth's Coconut Custard Pie

2 cups granulated sugar
4 Tbsp all purpose flour
1, 14 oz bag sweetened coconut, flaked
4 eggs
2 cups milk
4 Tbsp butter, melted
2 tsp vanilla
2 prepared pie crusts (unbaked dough)

  1. Preheat oven to 350 degrees.
  2. Mix coconut with dry ingredients. Add eggs, milk, butter, and vanilla. Mix until thoroughly incorporated.
  3. Pour into two prepared pie crusts. Bake for 45 minutes. Center of pies should seem set.
Notes: 
I have also prepared this recipe in one deep dish pie crust before. In that instance, I have baked at 350 degrees for at least 55 minutes, checking every 5 minutes after the 45 minute mark to ensure that the coconut doesn't brown too much. The center of the pie should still be set when you remove it from the oven.

This recipe can easily be halved, though, to only make one regular-sized pie. Look at the math, it won't be that difficult.

When it comes to pie crusts, I cannot recommend Trader Joe's enough. Their pie crusts do not include that one pesky ingredient that makes vegetarians cringe - "Praise the LARD!" (or more specifically, the lack thereof) ;-)

Saturday, December 28, 2013

Cranberry Zucchini Bread

I have made this recipe for years, but I have always made it with blueberries. Since the holidays are upon us, I thought I would change the fruit to cranberries and add a sugared topping (and it turned out delicious). The recipe that follows is the holiday recipe.


Cranberry Zucchini Bread
1/2 c granulated sugar
1 1/2 tsp cinnamon

3 eggs, lightly beaten
1 c vegetable oil
3 tsp vanilla extract
2 1/4 c granulated sugar
2 c shredded zucchini*
3 c all purpose flour
1 tsp salt
1 tsp baking powder
1/4 tsp baking soda
1 Tbsp ground cinnamon
12 oz cranberries (fresh or frozen)*

  1. Preheat oven to 350 degrees.
  2. Grease bottom and sides of two large loaf pans. Mix 1/2 cup of sugar and 1 1/2 teaspoon cinnamon in a small bowl. Dust the bottom and sides of each pan with half of the mixture.
  3. In a large bowl, mix together eggs, oil, vanilla, and sugar. Fold in zucchini.
  4. Beat in the flour, salt, baking powder, baking soda, and cinnamon. Gently fold in the cranberries.
  5. Transfer to prepared loaf pans and sprinkle the remaining cinnamon sugar mixture over the top.
  6. Bake 1 hour 20 minutes in the preheated oven, or until a knife inserted into the center of a loaf comes out clean. Cool 20 minutes in pans, then turn out onto wire racks to cool completely.
Notes:
I think I've mentioned in other posts that we shred our summer garden-harvested zucchini and store it in 1 cup increments in the freezer. That makes for easy baking throughout the year.

The original recipe called for 1 pint of blueberries (fresh or frozen) instead of the cranberries and did not include the cinnamon sugar topping.

If you have a small family, you might want to eat one loaf and freeze one to eat later. However, as tasty as this recipe is, you might also just want to dive into that second loaf!

Friday, December 27, 2013

Free New Year's Eve Printables

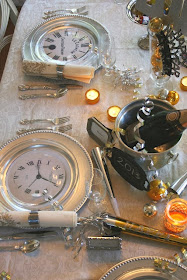
I can't believe another year has passed already - I have no idea where the time goes! And it seems like it was only a few weeks ago that we were bringing you Free Christmas Printables in three different color schemes: blue, red and green, and neutral. But images like these are swirling around the Internet in droves as everyone prepares to ring in the new year:


And whether or not you are planning festivities quite so schmancy, you might appreciate some FREE New Year's Eve printables to help you with whatever level of planning you might need to do. So here is our roundup of various types of free printables without further hesitation.

Make sure to check out my FREE New Year's Eve Printables Pinterest Board and my New Year's Eve Pinterest Board. I will be loading them up in the days to come with even more free printables and decor ideas. And if you are planning a party or attending one, you might also want to check out my Recipes - Appetizers Pinterest Board for some yummy ideas for what to eat!


And in the meantime, on to the free printables!

8 X 10 Chalkboard Printable and matching Happy New Year Banner from Over the Big Moon:


Three 8 X 10 Printables from Just Us Three Designs at A Night Owl Blog:


8 X 10 "Time to Drink Champagne and Dance on the Table" Printable, Drink Flags, Banner, and other party printables from The TomKat Studio:


Chalkboard Party Printables from The 36th Avenue:


Fun and Fancy Party Printables by B.Nute Productions on Catch My Party:


Eight Printable Champagne (or Wine or Sparkling Cider) Labels from Better Homes and Gardens (five shown here):


Printable drink menu, bar sign, drink tags, and food tents from Evite:


Clock drink tags from Evermine Blog:


Take some funny photos with these 2014 Photo Props from I Heart Naptime:


How about some favors? Lil' Luna has some printables to beautify boxes of sparklers:


And here's some printable 2014 Hershey Kiss stickers from Bloom Designs Online:


And do the kids want to stay up late? Need to keep them entertained? Maybe try making Spoonful's 2014 Disney Party Glasses with them as a craft activity:


Or Party Hats from Evermine Blog:


Or 2014 Clock Design Party Hats from Merriment Design:


Or have the kids complete this Mickey and Friends Word Search and Maze by Spoonful:


If they're old enough, start this tradition. Have them fill out their own Journal Entry by Wonderful Joy Ahead each year. (Help younger kids fill out theirs - these make nice keepsakes.)


Or set aside a special table for the kids with some crayons and these printable coloring pages from Coloring Kids:


Hope these have given you some ideas to help you with your planning!

Thursday, December 26, 2013

Healthier Queso Dip

I'm sure that everyone at some point has melted a wedge of Velveeta and mixed in a can of Rotel to make Kraft's Famous Queso Dip. This is a slightly healthier version - only because it doesn't involve the Velveeta and it includes black beans, which add protein to the original recipe. So, slightly healthier? Well - as healthy as a cheese dip can claim to be, I suppose. Just as tasty? Definitely!


Healthier Queso Dip
8 oz sharp cheddar cheese, shredded*
8 oz Monterrey Jack cheese, shredded*
2 Tbsp cornstarch
1, 12 oz can evaporated milk
1 Tbsp hot sauce
1, 15 oz can black beans, drained and rinsed
1, 10 oz can Rotel diced tomatoes and green chiles, drained

  1. In a medium sized saucepan, toss together shredded cheese and cornstarch until evenly coated. Stir in evaporated milk and hot sauce. 
  2. Cook over medium heat until cheese is melted, stirring often.
  3. Once cheese is melted, add drained black beans and drained Rotel. Serve with tortilla chips.
Notes:
I have made this recipe before with different types of cheeses, at it always impresses, so use what you have and get creative!

Store leftovers (if you have any) in a sealed container in the refrigerator. This dip will reheat well in the microwave.

Tuesday, December 24, 2013

Peanut Butter Balls

It seems we are a family divided. In the Harris household, we have always called this Christmas candy "Peanut Butter Balls." However, SOME of our family members (John Austin Cruser) have always called this Christmas candy "Buckeyes." 

The recipe is the same, but the difference lies in how you apply the chocolate candy coating. So, do whatever floats your boat. Or, do what we did, make half of the recipe one way and half the other way. :-)


Peanut Butter Balls (AKA Buckeyes)
1 1/2 cups graham cracker crumbs
1, 16 oz box confectioner's sugar
1 cup chopped nuts
2 sticks butter, melted
12 oz crunchy peanut butter
1 tsp vanilla
36 oz chocolate flavored bark coating*


  1. Mix graham cracker crumbs, confectioner's sugar, chopped nuts, melted butter, peanut butter, and vanilla in a mixing bowl.
  2. Roll into small balls and chill in the refrigerator until firm.
  3. Melt candy coating according to package directions.
  4. If making Peanut Butter Balls, drop into candy coating, roll with fork until full coated, letting excess coating drip off through tines of fork before placing on wax paper to cool.
  5. If making Buckeyes, insert a toothpick firmly into ball. Use the toothpick to dip the ball into the candy coating, making sure that a portion of the peanut butter remains showing. Remove from candy coating and transfer to wax paper to let cool.
  6. Store cooled candy in a wax paper lined tin.
Notes:
If you choose to make Buckeyes, make sure to firmly insert the toothpick into the peanut butter ball before dipping into the coating or the coating may pull the toothpick out of the peanut butter ball.

36 oz of chocolate flavored bark coating is approximately 1 1/2 packages of candy coating, and you will likely have excess chocolate coating remaining at the end of the recipe. If you choose to use less coating, you may not have enough to submerge each piece of candy to obtain an even coating. However, you may use the remaining chocolate coating to cover pretzels for another quick and easy treat.

Crockpot Wassail

As the weather dips ever so briefly into cooler temperatures, this Christmassy beverage seems to be one that's a keeper. 


Crockpot Wassail
2 qt apple cider
2 c orange juice
1/2 c lemon juice
12 whole cloves
4 cinnamon sticks
pinch ginger
pinch nutmeg

  1. Combine ingredients in crockpot. 
  2. Simmer for 4 hours on high heat or 8 hours on low heat.

In addition to the spiced cider drink, you may also be familiar with the English traditional Christmas carol "Here We Come a Wassailing" - Love and joy come to you . . . .

Enjoy!

'Twas the Site by Three Sisters - 2013

If you remember from last year's Christmas Eve post, we Harrises have a long-standing Christmas tradition of penning a parody of 'Twas the Night Before Christmas. This task usually fell to yours truly, so I'm at it again this year. 


Here's the 2013 Harris Family 'Twas the Night Before Christmas Parody:

'Twas the Site by Three Sisters - 2013


'Twas the site by three sisters in Twenty Thirteen
And there's really not much that this blog hasn't seen;
Starting in January and for half of the year,
We brought free crochet patterns. (We'll keep that up - never fear!)

As the year moved on, we brought you 100 Things,
For Summer, for Fall, for Winter (come on Spring!);
And later in summer, we went to visit Dolly,
With a mini Harris sister who keeps us young by golly!

And while we were there - no rest for the weary,
We took gangster photos that spawned a mini-series!
And don't forget one very specific Mouse,

And then in November, we brought you BIG news, sir!
In Spring, we'll have a new Baby Cruser!
To the top of the porch! To the top of the wall - 
I feel certain that this was the BIGGEST news of all!

You might be wondering what we have in store,
For 2014 - we've got BIG plans (galore).
More rapid than eagles, the blog posts we'll write,
And we'll whistle and shout at each wondrous delight:

"Yay, RECIPES! Yay, NOSTALGIA! Yay, HOLIDAYS and DECOR!
Woo, FAMILY! Woo FASHION! Woo, FREEBIES and MORE!"
Regardless the topic - the big and the small - 
We'll blog away! Blog away! Blog away all!

With 400+ posts and more than 179,000 page views,
We wanted to offer a heartfelt thank you,
To all who have followed and supported this site,
"HARRIS CHRISTMAS TO ALL, AND TO ALL A GOOD NIGHT!"

Merry Christmas from Donna, Deanna, and Misty!


Make sure to read our 2012 Christmas parody and read about the beginnings of the parody in this post about Harris Family Christmas Traditions.

Monday, December 23, 2013

What to Buy for the Christmas Vacation Movie Lover on Your List

If you've been reading the blog for any amount of time, you might have picked up on the fact that we Harrises are slightly enamored with the National Lampoon's Christmas Vacation movie. We've mentioned it a few times like herehere, and here. So, something Christmas Vacation themed is always a hit when it comes to presents, but we have been doing this so long that we had to get creative this year - we are running out of ideas! 

These might look familiar to anyone who knows the movie well:


We recreated the L-shaped gifts that Clark (and apparently every other employee) gave to Mr. Shirley for Christmas. "Put it over there with the others, Greaseball!"


While IMDB FAQ explains that the ones from the movie were desk organizers, we recreated the L-shape for Daddy with two boxes of chocolate cherries, wrapped individually in the same paper and then taped together into an L-shape with clear packing tape. Of course, ours are a little bit larger, but considering Daddy loves chocolate cherries, this was a perfect way to present them to him. Here he is with all of his Mr. Shirley gifts:


And (if you were wondering), yes that's a custom made Griswold Blackhawks jersey that he's wearing. A Christmas Vacation gift from a previous Christmas. :-)


This post contains affiliate links.

Saturday, December 21, 2013

I Want a Hippopotamus for Christmas . . .

Can I just tell you that I usually only get to hear this song maybe once a year, but our local radio station has received a letter from a class of fifth grade science students that have asked the DJ to play the song during a certain time slot because it is their teacher's favorite Christmas song. And if he hears it during that time slot, he will give the entire class an A on their next test. 

So, of course said DJ has decided to play it every day this week during that time slot (and I've been in the car line waiting to pick up Jaxon from preschool at that same time, so I've gotten more than my fair share this year). Those kids deserve an A for effort, ingenuity, and for taking over the airwaves if you ask me!


I really do like this song though, I mean I wouldn't imagine it's all that easy to work the word "vegetarian" into a Christmas song, but John Rox (the songwriter) and Gayla Peevey (the 10-year-old Oklahoma City crooner you hear once a year) managed to do it. And THAT just might be my favorite part of the whole song. :-)

Of course, the legend behind the song isn't too shabby either. As the tale goes, in 1953 the song had become such a Christmas hit, the local Oklahoma Zoo decided to use the popularity of the song to help them perform a publicity stunt of epic proportions. They would use the song to help them raise money to buy a hippo that they would then give to Gayla for Christmas. And of course, Gayla would give it right back to the zoo. Mathilda the hippo arrived on Christmas Eve that year and lived for 45 years.

So, if you think about that story, it really supports the magic of Christmas. Anything is possible at Christmas time - even "hippopotamus-es." So, I guess asking a radio station to play a novelty song in a certain time slot to get an A for your entire science class isn't out of the question. I'm sure that Christmas wish has been granted too! 

And I'll try to keep all of this in mind while we're frantically looking for the last-minute Christmas gifts that seem like they are the most IMPOSSIBLE things to find. Aren't those always the last things on the list? Repeat after me, "At least nobody asked for a hippo."

And if you need a refresher on the song, here you go. You're welcome.


Thursday, December 19, 2013

Vintage Button Garland

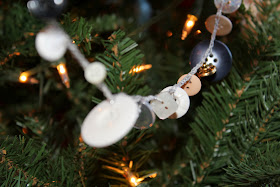
Yesterday, I posted about vintage items turned Christmas decor, and I included in that post some vintage buttons that I crocheted into a garland for one of my Christmas trees.

Here's the garland in all its glory:


And here's where it started - a few jars of vintage buttons:


This was a fairly simple project, so I thought it was definitely one worth sharing as a free crochet pattern. In the example shown, I used Aunt Lydia's Metallic Silver crochet thread, but I think a simple natural or white would have been just as lovely.

Also, I stuck to neutral colored buttons for my project because the garland was going on a neutral colored tree. However, this same project could easily be completed with red, green, and white buttons on white thread for more traditional Christmas colors or in all white for an icicle effect.

So, if you're looking for a crochet project for your Christmas decor, give this one a try:


It will only take you a couple of hours to complete. Trust me, it takes longer to wrap presents than to finish this project (and you get to bring THIS out year after year)!

Add this project to your Ravelry queue.

Enjoy!

This post contains affiliate links.