Pages

Tuesday, August 27, 2019

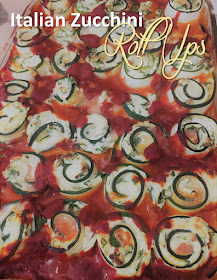
Italian Zucchini Roll Ups

This recipe is a really great one to make in the summertime, especially if you have a garden that's producing an abundance of zucchini and you're trying to figure out new ways to use it. In this recipe, you make strips of zucchini to replace the noodles and you fill them spinach, ricotta, and cover them with marinara sauce. (PSST: If you also have an abundance of garden tomatoes, you can make your own marinara sauce too!) This makes for a gluten free, grain free, low carb dinner that tastes delicious! A healthy version of lasagna? Well, this recipe still has plenty of cheese, so we'll call it a healthier version of lasagna.


Italian Zucchini Roll Ups

4 medium zucchini, thinly sliced lengthwise
30 oz ricotta cheese
2 Tbsp fresh basil, chopped
2 cups chopped spinach
¼ cup freshly grated Parmesan cheese
2 1/2 cups mozzarella cheese, shredded
1 large egg
4.5 cups marinara sauce* (if using jarred, this is 1.5, 26 oz jars)

  1. Use a mandoline or vegetable slicer to slice zucchini into thin strips lengthwise so that they resemble lasagna noodles. 
  2. Layer zucchini strips between paper towels to draw out excess water before baking.
  3. Preheat your oven to 375 degrees.
  4. In a medium bowl, mix together ricotta cheese, basil, spinach, Parmesan cheese, half of the mozzarella cheese, and egg.
  5. Spray a 9 x 13 baking dish with cooking spray. Spread 3/4 cup of marinara sauce on the bottom of the dish.
  6. Begin assembling your zucchini rolls by laying out the sliced zucchini noodles on a flat, clean surface.
  7. Spread 1 heaping tablespoon of the ricotta mixture over each zucchini noodle. Then, roll up the zucchini noodle and place it in the baking dish. As you work, place each rolled noodle next to the previous noodle to hold them securely in place so that they don't unroll.
  8. Pour remaining tomato sauce evenly over top of and in between the rolls. 
  9. Bake for 45 minutes. 
  10. Sprinkle the remaining mozzarella cheese over the top. Return to oven for additional 5 minutes or until cheese on top is melted and bubbly.

Here's a closeup of the top after the cheese on top has been melted. Yum!


Notes:

If you want to try making your own homemade marinara sauce, you can give these recipes a try:

Crockpot Marinara Sauce
Stovetop Marinara Sauce

Rather than rolling the "noodles" this recipe might make a good candidate for layering them lasagna-style between sauce and cheese layers. I have not tried this method yet, but let me know if you try this and if it works for you!

This post contains affiliate links.

Monday, August 19, 2019

I Hope You Dance: A Mother's Letter to her Kindergartner

I recently penned this little letter to my new kindergarten girl.  She started school late last week, but this will be her first full week as a kindergartner.  It has been such a fun and exciting time in our family- buying school supplies for the first time, talking about how "big girl" elementary school would work, adjusting bed times and our daily routines, and on and on and on.  In any case, I thought I would share this milestone with you all.   


But honestly, I think you can substitute "Kindergarten" with any grade, or any big "first" for that matter, as you read on through these thoughts below.   It is so important to encourage our little ones, even when they aren't so little anymore.  And so important to lift up our teachers.  They have such big and wonderful jobs to do.  And I am grateful for everyone who positively impacts my little girl.


Today begins a big, new, fresh chapter in this family. Today, Lexi starts Kindergarten and we are THRILLED for her. Such a big step for such a big girl. So on this day- on this journey that begins anew for you- I wish so many things. Lexi girl, today and all throughout your years, I hope you will:
• respect, 
• listen, 
• play, 
• volunteer, 
• befriend, 
• observe, 
• learn, 
• be kind,
• conquer,
• help,
• behave,
• relate,
• remember,
• sing, 
• notice, 
• include,
• think,
• congratulate, 
• smile, 
• inquire, 
• cheer, 
• be fierce, 
• create, 
• love,
• encourage, 
• show pride,
• cooperate,
• grow, 
• skip, 
• thrive, 
• understand,
• be thoughtful, 
• sympathize, 
• lead, 
• follow, 
(and know when to do each.)


And always remember to:
• BE YOU, 
• SOAR, 
• DANCE.


I hope you dance. 
Now, today, every day, for all the years to come, ALWAYS. 
I hope you dance.

Monday, August 12, 2019

Proud as a Peacock Baby Dress

I haven't checked in with you guys in a while with a new crochet project, but you're really going to like the one I have for you today! I recently made a handmade crochet baby dress for a very special little girl, and I'm proud as a peacock over how this one came out for two reasons:

  1. The original pattern was written for a solid color of yarn, but I chose a variegated yarn, which created a finished product that I think looks similar in color to a peacock's plumage. With its various purples, blues, and greens, the colors in this dress are really beautiful.
  2. I finished the dress in 2 days flat - start to finish - ends woven in - buttons sewn on - inaugural wash and dry - photos taken - and wrapped for gift giving! How awesome is that?!?


I used the Little Sweetie free crochet pattern and followed the directions for a size 12 months. (Directions for size 6 months, 12 months, 18 months, and 24 months are included with the pattern.) The only modification I made was the color of yarn I used. I chose Red Heart Super Saver Stripes Parrot Stripes to complete the pattern, and it's a beautiful variegated yarn that does all of the color blending for you!

(Some of you might remember that I chose Red Heart Super Saver Stripes Grape Fizz for my Mermaid Tail Afghans that I made for all the kiddos one Christmas.) This yarn comes in many ombre colorways that would make good choices for this dress!

I know the name of the yarn I chose for this dress is Parrot Stripes, and I have lovingly called this dress Proud as a Peacock - I have switched birds on you! But with good reason!

Once I completed the last round of stitches at the bottom of the dress, I really thought the pattern in this colorway turned out to look like peacock feathers. Take a look at some close up photos:


Don't let the beautiful stitching at the bottom of the dress fool you - this really is a simple pattern to follow! This YouTube Video Tutorial will walk you through working every step of the pattern if you think it looks hard to make. (But it's really just a long written pattern because it includes multiple size options.)


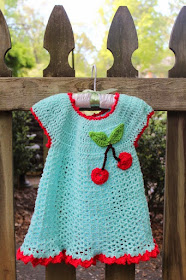
Long time readers of the blog might recognize this pattern because I've made it before for niece Lexi for her first birthday! At that time, I changed the color scheme to transform it into a Retro Cherry Dress. Make sure to read all about the pattern modifications to make that version too!

Retro Cherry Baby Dress Free Crochet Pattern

You can add this pattern to your Ravelry queue here:

Little Sweetie Dress
Retro Cherry Baby Dress

Have fun making your own version of this crochet baby dress!

This post contains affiliate links.